Written By Sophanith Dith
Last Updated March 15, 2026
Applies to Microsoft Excel 365 (Windows only)
Part of the Beginner Learning Path
Module 1 Excel Fundamentals
Lesson 4 of 12
Losing work in Excel can be frustrating. Imagine spending 30 minutes entering data into a workbook after creating a new workbook in Excel, only to accidentally close the file and realize you never clicked Save. Many beginners assume their work is gone forever in this situation.
Fortunately, Microsoft Excel includes built-in recovery features that help protect your work. These tools automatically store temporary copies of your workbook while you work, allowing Excel to recover recent changes if something goes wrong.
Learning how to recover unsaved Excel files is an important skill for anyone using Excel. Even experienced users occasionally close a workbook by mistake or experience a system crash.
In this tutorial, you’ll learn how Excel recovery works, where temporary files are stored, and the exact steps you can follow to restore unsaved work. This guide shows how to recover an unsaved Excel file step by step using Excel’s built-in recovery tools.
Can You Recover Unsaved Excel Files?
Excel can recover unsaved workbooks using temporary recovery files created by the AutoRecover feature. If a workbook closes unexpectedly, you can restore it from File → Info → Manage Workbook → Recover Unsaved Workbooks, or from the Document Recovery panel that appears after Excel crashes.
Before exploring the full process, let’s start with a quick overview of how Excel recovery works.
Quick Reference
Excel automatically creates temporary recovery copies of workbooks while you work. These backups can help restore your file if Excel closes unexpectedly or if you forget to save.
Key points to remember:
- Excel periodically saves temporary versions of open workbooks.
- Unsaved workbooks can often be restored from the Recover Unsaved Workbooks feature.
- After crashes, Excel may show a Document Recovery panel automatically.
- Recovery works best when AutoRecover is enabled.
- Temporary recovery files are stored in a system folder.
Understanding these basics will make the recovery process much easier.
Why Excel Can Recover Unsaved Files
Many beginners believe that if a workbook closes without saving, the work disappears instantly. However, Excel includes a safety feature that helps protect your data while you are working.
This feature is called AutoRecover, which automatically creates temporary versions of your workbook while you work. Microsoft also provides official guidance on how Excel file recovery works.
Some beginners confuse AutoRecover with another Excel feature called AutoSave. Although the names are similar, they work differently.
| Feature | AutoRecover | AutoSave |
|---|---|---|
| Purpose | Recover work after crashes or accidental closure | Save changes automatically while you work |
| File location | Temporary recovery files stored on your computer | Files saved to OneDrive or SharePoint |
| When used | After unexpected closure or crash | While editing cloud-stored files |
AutoRecover periodically creates temporary backup copies of your workbook. These copies are stored in a special recovery folder on your computer.
This means Excel may still have a recent version of your work even if you never saved the file manually.
AutoRecover works in the background by:
- Saving temporary versions every few minutes.
- Keeping recovery copies while Excel is open.
- Attempting to restore files after crashes.
For example, imagine you are editing a workbook called Budget.xlsx and accidentally close Excel without saving. If AutoRecover created a temporary version a few minutes earlier, Excel may allow you to restore that work.
For beginners who are still developing the habit of saving frequently, this feature can prevent hours of lost work. To learn how to properly manage and save Excel files, see how to open, save, and close Excel files.
With that foundation in place, let’s look at the most common method for restoring an unsaved workbook.
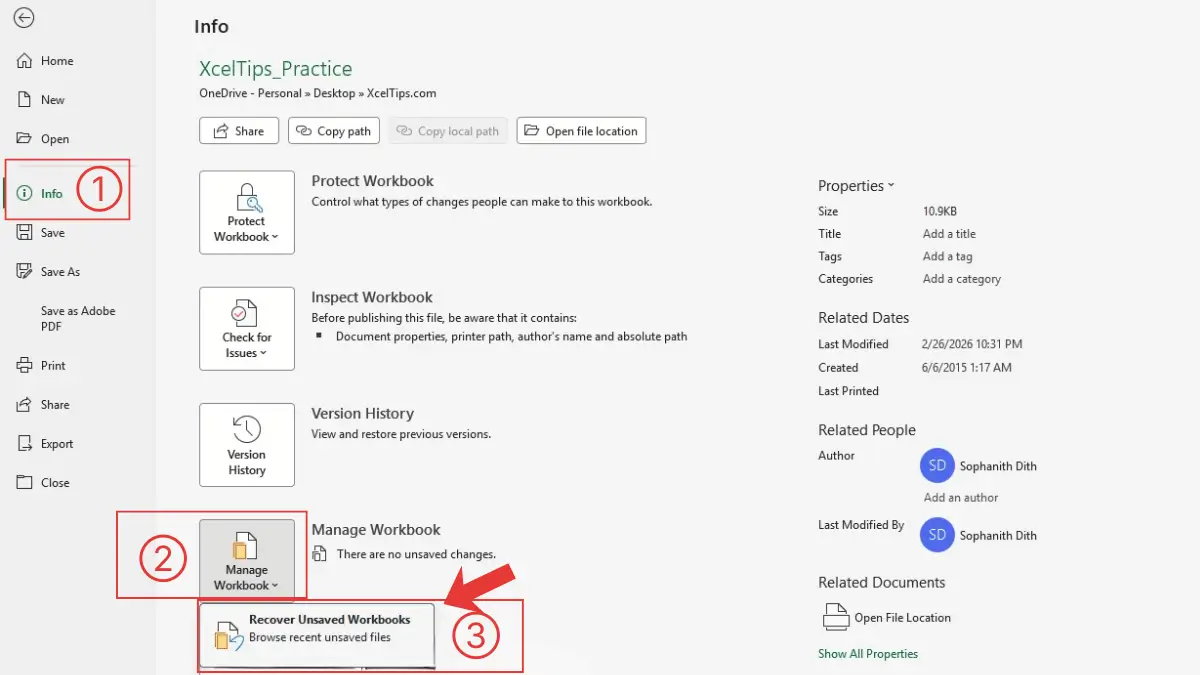
How to Recover an Unsaved Excel File from the Info Menu
The most reliable way to recover unsaved Excel files is through the Recover Unsaved Workbooks feature inside Excel.
This tool allows you to open temporary recovery files stored by the program.
Before starting, open Excel normally.
Step-by-Step Instructions
Follow these steps to recover your workbook. You do not need to open an existing workbook.
Navigation path:
File tab → Info → Manage Workbook → Recover Unsaved Workbooks
Beginner Tips:
If you already have a workbook open, the steps are exactly the same. Just click the File tab first.
Open Excel and click the File tab to enter the Backstage view. Then follow these steps:
- Select Info from the menu on the left.
- Click Manage Workbook.
- Choose Recover Unsaved Workbooks.
A folder window will open showing available unsaved workbook files. Then follow these steps:
- Select the workbook you want to restore.
- Click Open.
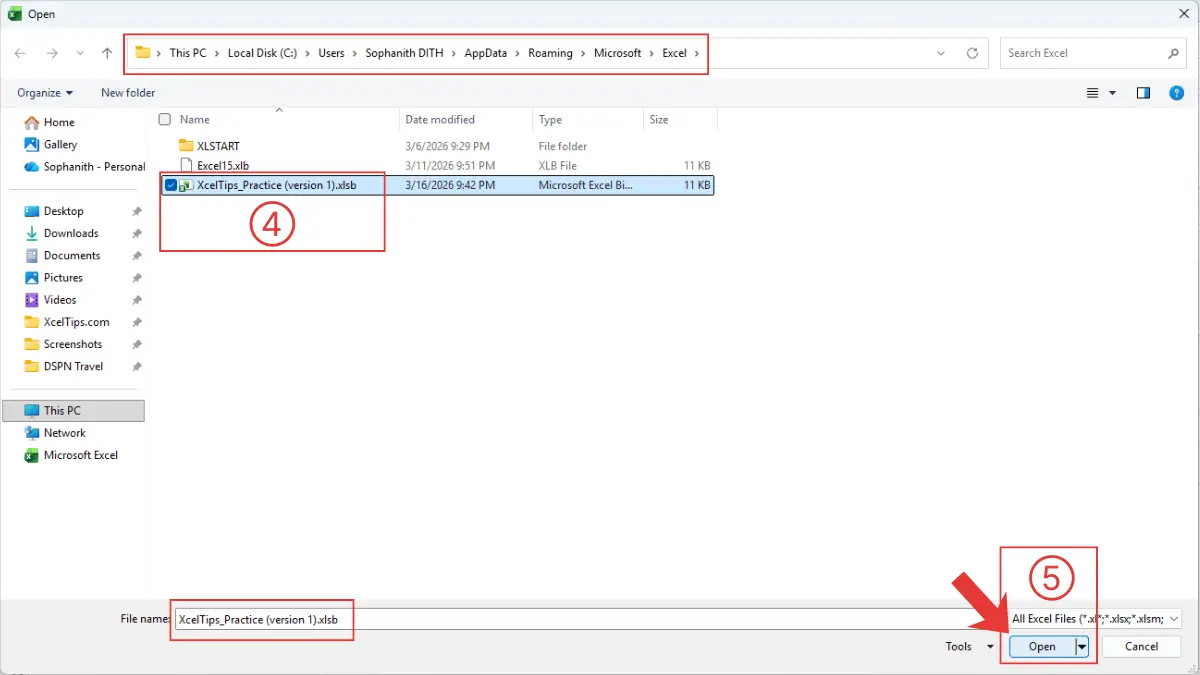
When the recovered workbook opens, save it immediately.
Beginner Warning:
Recovered files are temporary. If you close the file again without saving, Excel may delete the recovery copy.
Example Scenario
Suppose you were entering monthly sales numbers into Sales_Report.xlsx and accidentally closed Excel after working for 30 minutes.
Using Recover Unsaved Workbooks, Excel may still contain a temporary copy of that workbook that you can restore and save.
Now that you know the most common recovery method, let’s look at another situation where Excel attempts recovery automatically.
Recover Files After Excel Crashes
Sometimes Excel may close unexpectedly due to a power outage, computer restart, or software crash.
When this happens, Excel often attempts to recover your work automatically the next time you open the program.
You may see a panel called Document Recovery on the left side of the Excel window.
What to Do When the Document Recovery Panel Appears
If Excel detects recoverable files, follow these steps.
- Look for the Document Recovery panel on the left side.
- Click the recovered workbook listed in the panel.
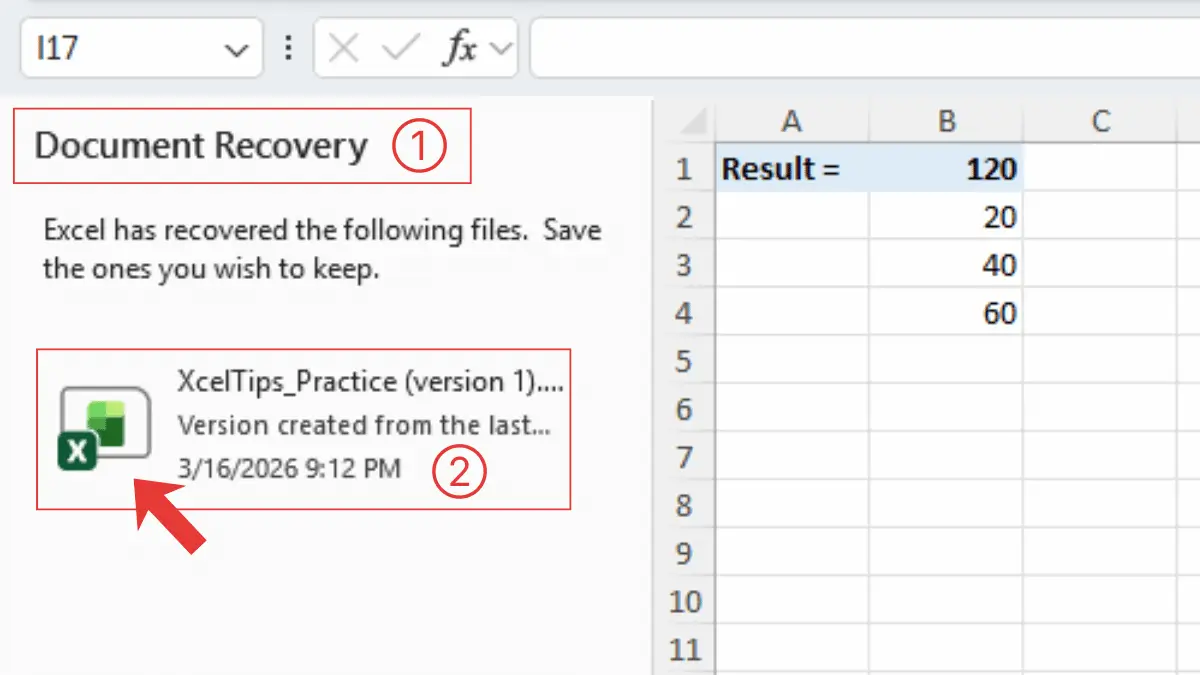
Excel may display multiple versions of the workbook depending on when AutoRecover last created a copy.
Beginner Mistake to Avoid
Some users close the Document Recovery panel immediately because they think it is a warning message.
Always review the recovered files first. Closing the panel without saving may remove your chance to restore the workbook.
Next, it helps to understand where these recovery files are stored.
Where Excel Stores Unsaved Files
Excel keeps temporary recovery files in a hidden folder on your computer.
Normally, you do not need to open this folder manually because Excel automatically displays recovery files through the tools you already learned.
However, understanding where these files are stored explains why recovery sometimes works—and sometimes does not.
AutoRecover File Location
Excel stores recovery files in a folder defined by the AutoRecover file location setting. In many installations, the AutoRecover folder is located inside your Windows user profile, for example:
C:\Users\[YourName]\AppData\Roaming\Microsoft\Excel\
Excel saves temporary recovery versions of workbooks in this folder while you work. These files usually use temporary names and may disappear after some time.
Why Recovery Files Can Disappear
Temporary recovery files are not permanent. Excel may remove them if:
- Too much time has passed.
- Temporary system storage is cleared.
- Excel settings change.
- The computer restarts multiple times.
Because of this, recovering unsaved work usually works best immediately after the problem occurs. Acting quickly increases the chances of restoring your file successfully.
Next, let’s confirm that the AutoRecover feature is enabled.
How to Make Sure AutoRecover Excel Files Is Enabled
Before relying on Excel’s recovery tools, it is important to verify that AutoRecover Excel files is turned on.
Most Excel installations enable this feature by default, but checking the setting ensures your work is protected.
To confirm this setting, follow the steps below.
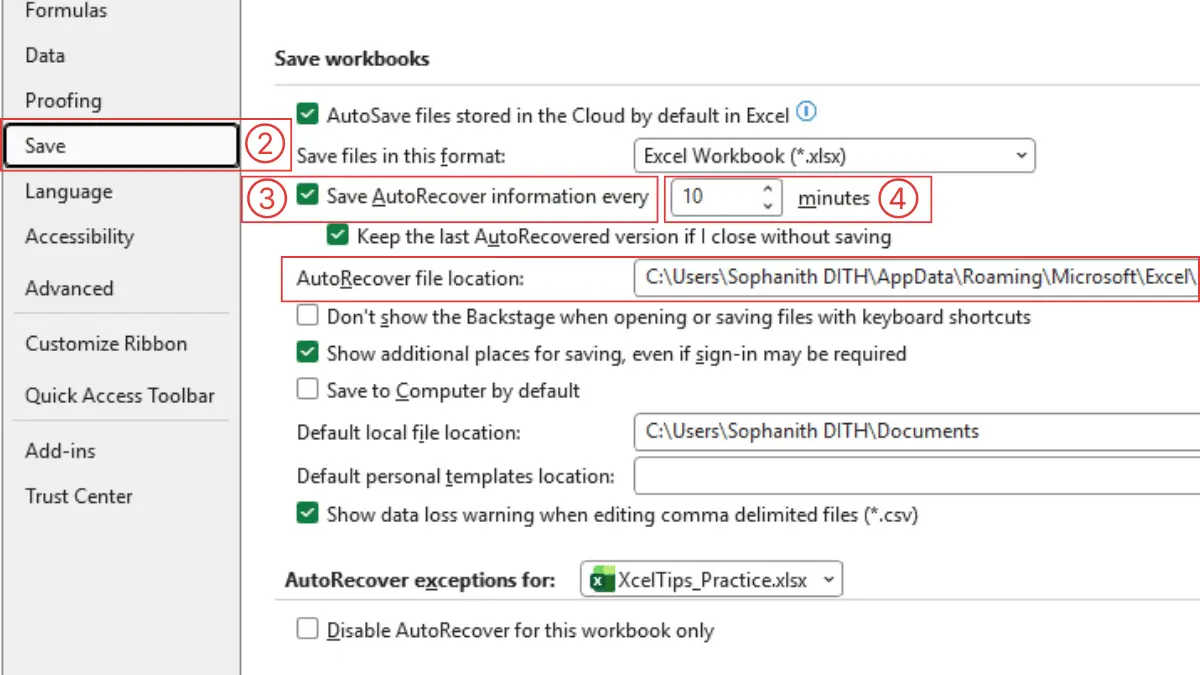
Step-by-Step Instructions
Follow these steps to verify the AutoRecover setting.
Navigation path:
File tab → Options → Save
Open Excel and click the File tab. Then follow these steps:
- Select Options at the bottom of the menu.

Once the Excel Options window opens, continue with the steps below.
- In the Excel Options window, select Save from the menu on the left.
- Locate the option Save AutoRecover information every ___ minutes. Make sure the checkbox next to it is enabled.
- Choose how often Excel should create AutoRecover information.
Next, let’s choose the best AutoRecover interval for your work.
Recommended Setting for Beginners
After enabling AutoRecover, it is helpful to choose an appropriate time interval.
A 10-minute interval is a good balance between safety and performance.
Shorter intervals mean Excel creates recovery copies more frequently, reducing the risk of losing work.
For example, if you are updating Budget.xlsx, Excel will automatically store temporary versions while you work—even if you forget to save manually.
However, AutoRecover should always be considered a backup safety feature, not a replacement for saving files regularly.
Pro Tip:
Press Ctrl + S every few minutes while working. Even with AutoRecover enabled, saving frequently is the safest way to protect your work.
Now that you understand how AutoRecover works, let’s look at when recovery is possible in real situations.
Common Situations and Recovery Options
Different problems can cause lost work in Excel. Some situations allow recovery, while others may require different solutions.
The table below summarizes common scenarios beginners encounter.
| Situation | Can It Be Recovered? | What To Do |
|---|---|---|
| Closed Excel without saving | Often yes | Use Recover Unsaved Workbooks |
| Excel crashed | Usually yes | Use Document Recovery panel |
| Computer power outage | Often yes | Reopen Excel and check recovery |
| Deleted saved file | Usually no | Check the Recycle Bin |
Understanding these scenarios helps you quickly decide which recovery method to try.
With this understanding, let’s apply what you’ve learned with a short practice exercise.
Quick Practice
The best way to remember the recovery process is to practice it once.
Try this short exercise.
- Create a new workbook.
- Enter a few numbers in cells
A1–A5. - Close Excel without saving.
- Reopen Excel.
- Go to File → Info → Manage Workbook → Recover Unsaved Workbooks.
- Open the recovery file if it appears and save it properly.
Beginner Tip:
If the recovery file does not appear, AutoRecover may not have created a backup yet.
This simple exercise helps you understand where Excel stores recovery files and how to restore them quickly.
Before moving on, let’s quickly review the most important points from this lesson.
Key Takeaways
Before moving on, here are the most important points to remember.
- Excel automatically creates temporary recovery copies of workbooks using the AutoRecover feature.
- You can restore unsaved files from File → Info → Manage Workbook → Recover Unsaved Workbooks.
- If Excel crashes, the Document Recovery panel may appear automatically when Excel reopens.
- Temporary recovery files are stored in a special system folder and may disappear after some time.
- The safest habit is still to save your workbook frequently using
Ctrl + S.
Even with these steps, beginners often have a few questions about Excel recovery. The answers below clarify the most common situations.
Frequently Asked Questions (FAQs)
Can you recover an Excel file that was never saved?
Sometimes. If AutoRecover created a temporary copy while you were working, Excel may allow you to restore the file using the Recover Unsaved Workbooks feature.
How long does Excel keep unsaved files?
Temporary recovery files are usually available for several days, but the exact duration depends on system settings and storage cleanup.
What if Recover Unsaved Workbooks shows nothing?
If no recovery files appear, Excel may not have created a temporary version. This can happen if the workbook closed too quickly or AutoRecover was disabled.
Is AutoSave the same as AutoRecover?
No. AutoSave continuously saves files stored in cloud services like OneDrive. AutoRecover creates temporary backup versions that help restore work after crashes.
Should I still save files manually?
Yes. Press Ctrl + S frequently while working. Recovery tools should be treated as a safety net rather than the main way to protect your files.
Where is the Recover Unsaved Workbooks option in Excel?
You can find it by going to:
File → Info → Manage Workbook → Recover Unsaved Workbooks
This opens the folder that stores temporary unsaved Excel files.
Conclusion
Recovering unsaved Excel files is a valuable skill for beginners. Excel’s built-in recovery tools can restore temporary versions of your work if you accidentally close a file or experience a crash.
However, the safest approach is still to save your work regularly and confirm that AutoRecover is enabled.
Building small habits, such as saving frequently and checking your AutoRecover settings, can prevent most data loss problems. These recovery tools are helpful, but good saving habits remain the best protection.
This lesson is part of the Beginner Learning Path, a structured series designed to help you learn Microsoft Excel step by step from the basics.
← Previous Lesson
How to Open, Save, and Close Excel Files (Step-by-Step Guide)
Next Lesson →
Understanding the Excel Interface: Ribbon, Tabs, and Toolbar Explained