Written By Sophanith Dith
Last Updated April 12, 2026
Applies to Microsoft Excel 365 (Windows only)
Part of the Beginner Learning Path
Module 1 Excel Fundamentals
Lesson 12 of 12
When you first start using Excel, the worksheet can feel either too small to read or too large to see enough data at once. You may find yourself leaning toward the screen, missing column labels, or scrolling more than necessary just to work comfortably.
That is where learning how to zoom in and out in Excel becomes useful. Zoom lets you change how large or small the worksheet appears on your screen without changing the actual data, font size, or print size.
This matters because beginners often confuse visibility with formatting. A simple zoom adjustment can make Excel feel much easier to read, edit, and navigate, especially when you are working with a wide table, small text, or a worksheet with many columns.
Before looking at the step-by-step methods, here is a quick answer and summary to help you get oriented.
Quick Answer:
If you need to know how to zoom in and out in Excel, use the zoom slider in the bottom-right corner, the View tab → Zoom group, or Ctrl + mouse wheel. You can also use keyboard shortcuts if you want a keyboard-only method. Zoom changes only the worksheet view on your screen, not your actual data, formatting, or print size.
Before we go deeper, here is a quick reference to the most important points from this lesson. The points below summarize how to zoom in and out in Excel at a glance.
Quick Reference
Use this quick reference as a fast summary before you try the methods below on how to zoom in and out in Excel. It highlights the main tools and the most important beginner points to remember.
- Use the zoom slider in the bottom-right corner for the fastest manual adjustment.
- Use View tab → Zoom when you want specific percentages such as 75%, 100%, or 200%.
- Use
Ctrl+ mouse wheel for a quick shortcut-like way to zoom in or out. - Use 100% zoom when you want to return to Excel’s normal view.
- Excel zoom range: 10% to 400%.
- Zoom changes screen view only, not your actual font size or print size.
- Different tasks feel easier at different zoom levels, so adjust the view to match what you are doing.
Now let’s look at what zoom actually does and the easiest ways to use it in real workbooks.
What Zoom Does in Excel
Zoom is a viewing tool. It helps you control how large or small the worksheet appears on your screen so you can work more comfortably.
If you already read the lesson on Understanding the Excel Interface: Ribbon, Tabs, and Toolbar, think of zoom as another basic way to control what you see while working in Excel.
Why zoom helps beginners
When you are new to Excel, small changes in visibility can make a big difference. A worksheet that feels confusing at one zoom level may feel much easier to understand at another.
Zoom is especially helpful when:
- Text looks too small to read clearly.
- You want to see more columns at once.
- You are checking a worksheet layout.
- You are working on a laptop screen.
- You want a closer look at specific cells.
In Excel, the worksheet zoom level can range from 10% to 400%, depending on how large or small you want the on-screen view to appear.
For example, if you are entering data into a budget sheet, zooming in can help you read row labels more easily. If you are reviewing the overall layout, zooming out can help you see more of the worksheet at once.
What zoom does not change
This is where many beginners get confused, so it is worth being very clear.
Zoom does not change:
- Font size
- Row height
- Column width
- Actual worksheet content
- Print size
It only changes how the worksheet appears on your screen.
Beginner Warning:
If you zoom in and your text looks larger, that does not mean you formatted the cells. It only means you changed the view.
With that difference clear, the next step is learning the main ways to change the zoom level in Excel.
How to Zoom In and Out in Excel: 4 Easy Ways
Excel gives you a few simple ways to adjust the zoom level. All of them do the same job, but each is useful in a slightly different situation. These are the main methods beginners should know when learning how to zoom in and out in Excel.
Here is a quick comparison before the step-by-step instructions.
| Method | Best For | Speed | Where to Find It |
|---|---|---|---|
| Zoom slider | Fast manual adjustment | Very fast | Bottom-right corner |
| View tab → Zoom | Choosing a specific percentage | Medium | View tab → Zoom group |
Ctrl + mouse wheel | Quick zoom while working | Very fast | Mouse + keyboard |
Ctrl + Alt + = / - | Keyboard-only zoom | Fast | Keyboard |
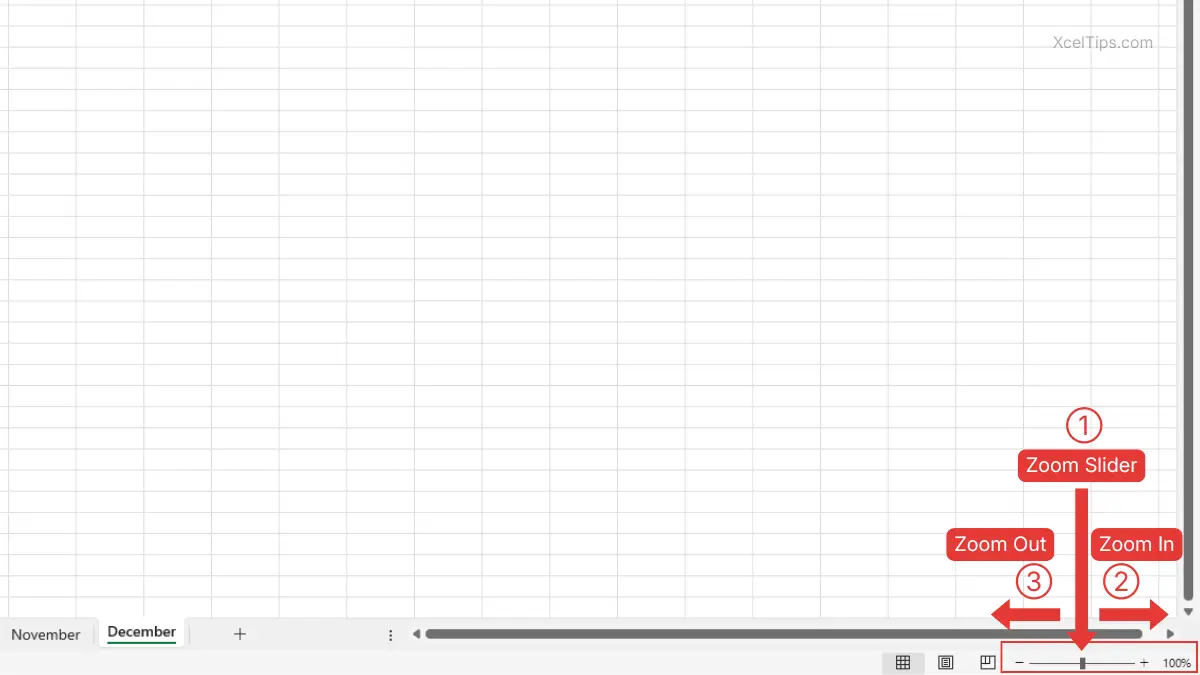
Method 1: Use the zoom slider
The zoom slider is the easiest option for most beginners because it is always visible while you work. It is also one of the simplest ways to learn how to zoom in Excel and how to zoom out in Excel without opening extra menus.
Follow these steps to use the zoom slider:
- Look at the bottom-right corner of the Excel window and find the zoom slider next to the zoom percentage.
- Drag the slider to the right to zoom in.
- Drag the slider to the left to zoom out.
- You can also click the
+sign to zoom in one step at a time. - Click the
-sign to zoom out one step at a time.
As you drag the slider, the worksheet view updates immediately. This makes it a good choice when you want to adjust the screen little by little until it feels comfortable. Watch the percentage change as you move the slider.
Beginner Tip:
If you are not sure which percentage to use, start at 100%, then move up or down slowly.
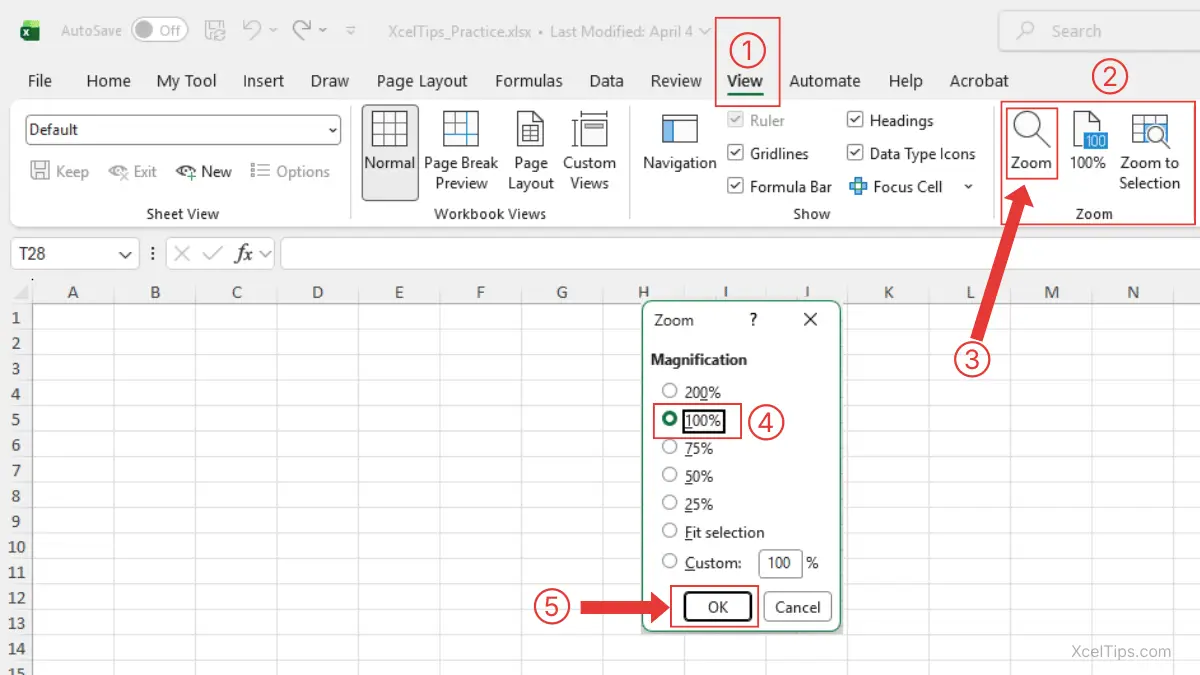
Method 2: Use the View tab zoom commands
The View tab is helpful when you want more control or want to return to a standard view.
To zoom from the Ribbon, follow these steps:
- Click the View tab.
- Go to the Zoom group.
- Click Zoom.
- Choose a percentage such as 200%, 100%, or 75%.
- Click OK.
You can also use other commands in the same Zoom group:
- Click 100% to return instantly to the default zoom level.
- Click Zoom to Selection to make your selected cells fill more of the screen.
This method is useful when you want a clean, exact setting instead of dragging the slider manually.
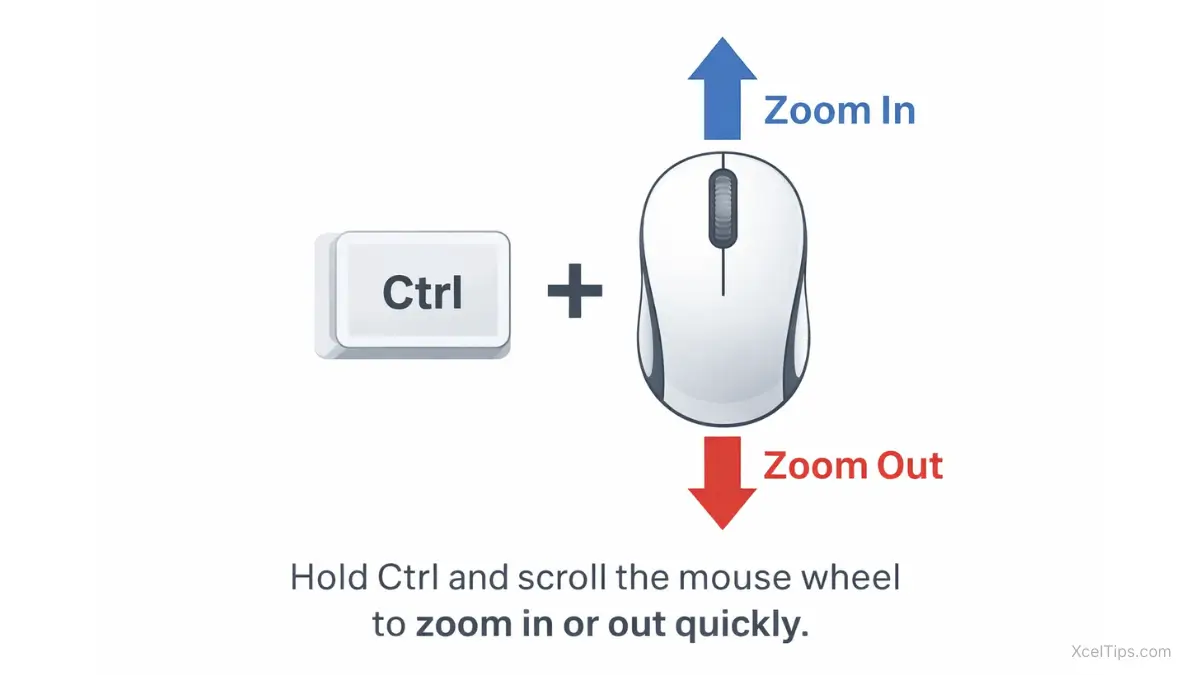
Method 3: Use Ctrl + mouse wheel as an Excel zoom shortcut
This is one of the quickest ways to zoom while you are actively working. For many beginners, it is the most practical Excel zoom shortcut because it feels fast and natural once you get used to it.
To use it:
- Hold down
Ctrlon your keyboard. - Move your mouse pointer over the worksheet.
- Scroll the mouse wheel up to zoom in.
- Scroll the mouse wheel down to zoom out.
- Release
Ctrlwhen you finish.
This method feels fast because you do not need to move to the Ribbon or the bottom-right corner first.
Microsoft also provide a guide to zooming and scrolling in Excel.
Beginner Tip:
Hold down Ctrl on your keyboard, then scroll the mouse wheel up to zoom in or down to zoom out. In many setups, each wheel step changes the zoom by about 15%.
Beginner Warning:
If you scroll the mouse wheel without holding Ctrl, Excel will scroll up and down the worksheet instead of zooming.
Method 4: Use keyboard shortcuts
If you want to change the zoom level without touching the mouse, Excel also includes keyboard shortcuts for zooming. This is helpful when you prefer keyboard-based navigation or want a quick way to adjust the worksheet view while typing.
Use these Excel zoom shortcuts:
- Press
Ctrl+Alt+=to zoom in. - Press
Ctrl+Alt+-to zoom out.
Each press usually changes the worksheet zoom by about 15%. This method changes only the on-screen view, not your actual data, formatting, or print size.
Beginner Tip:
On many keyboards, the = key shares the same key as +. Follow the shortcut exactly as Excel documents it: Ctrl + Alt + = for zooming in.
Best Zoom Levels for Common Tasks
There is no single perfect zoom level for every worksheet. The best setting depends on what you are doing.
Before choosing a zoom percentage, think about whether you need to read details or see more of the worksheet structure at once.
| Zoom Level | Best Use | Why It Helps |
|---|---|---|
| 60%–80% | Viewing more of a wide worksheet | Lets you see more columns and layout |
| 90%–110% | Everyday editing | Comfortable for most basic work |
| 120%–150% | Reading labels or entering data carefully | Makes text easier to read |
| 200%+ | Close inspection of specific cells | Useful for small areas, but too large for full-sheet work |
A simple beginner example
Imagine you are working on a monthly expense tracker.
- At 70% zoom, you may be able to see many columns at once, which helps when checking the overall structure.
- At 100% zoom, the sheet usually feels balanced for normal work.
- At 125% zoom, labels and amounts may become easier to read while entering data.
This is why zoom is so useful. You do not have to force one view to fit every task.
If you are also moving between multiple worksheets, pair this skill with How to Switch Between Sheets in Excel so you can navigate the workbook more smoothly.
Once you know how to change zoom, it helps to know how to quickly return to a comfortable default view.
How to Reset Excel to a Comfortable View
Sometimes beginners zoom in too far, zoom out too far, or simply lose track of what looks normal. The good news is that Excel makes it easy to get back to a practical view.
Return to 100% zoom
If the worksheet feels strange or hard to judge, 100% is the safest place to reset.
To return to 100%:
- Click the View tab.
- Go to the Zoom group.
- Click 100%.
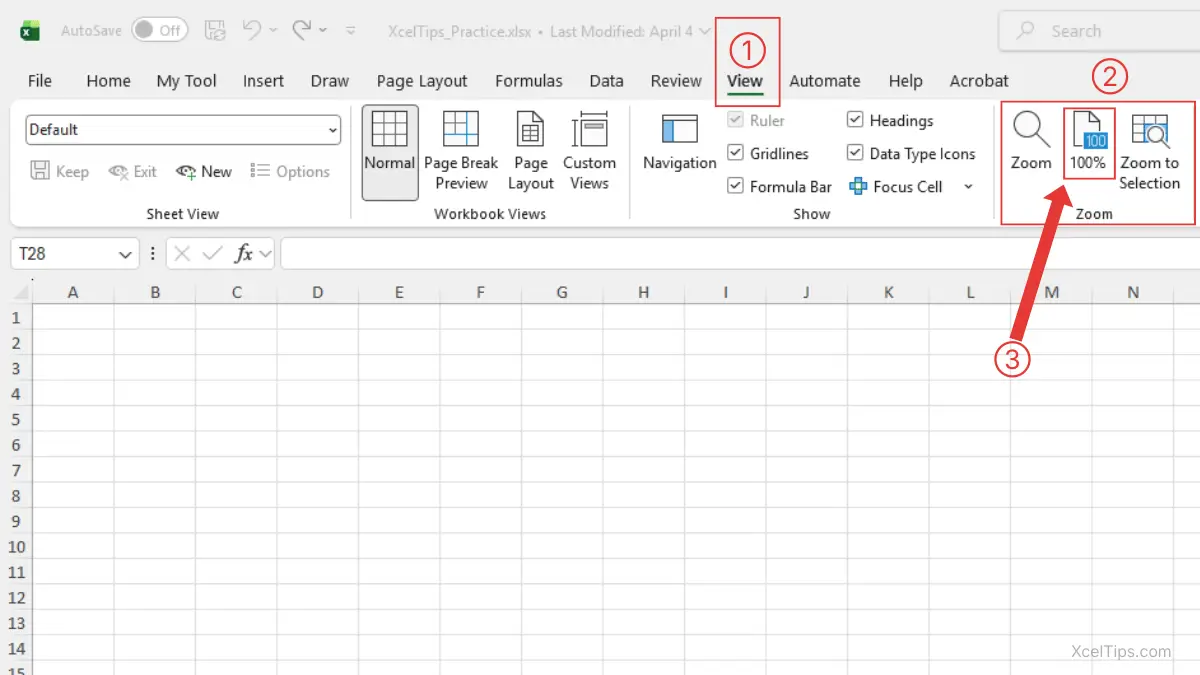
This instantly resets the worksheet to the default viewing size most beginners are comfortable with.
Use Zoom to Selection
If you only need to focus on a small part of a worksheet, Zoom to Selection can save time.
To use it:
- Select the cells you want to focus on.
- Click the View tab.
- In the Zoom group, click Zoom to Selection.
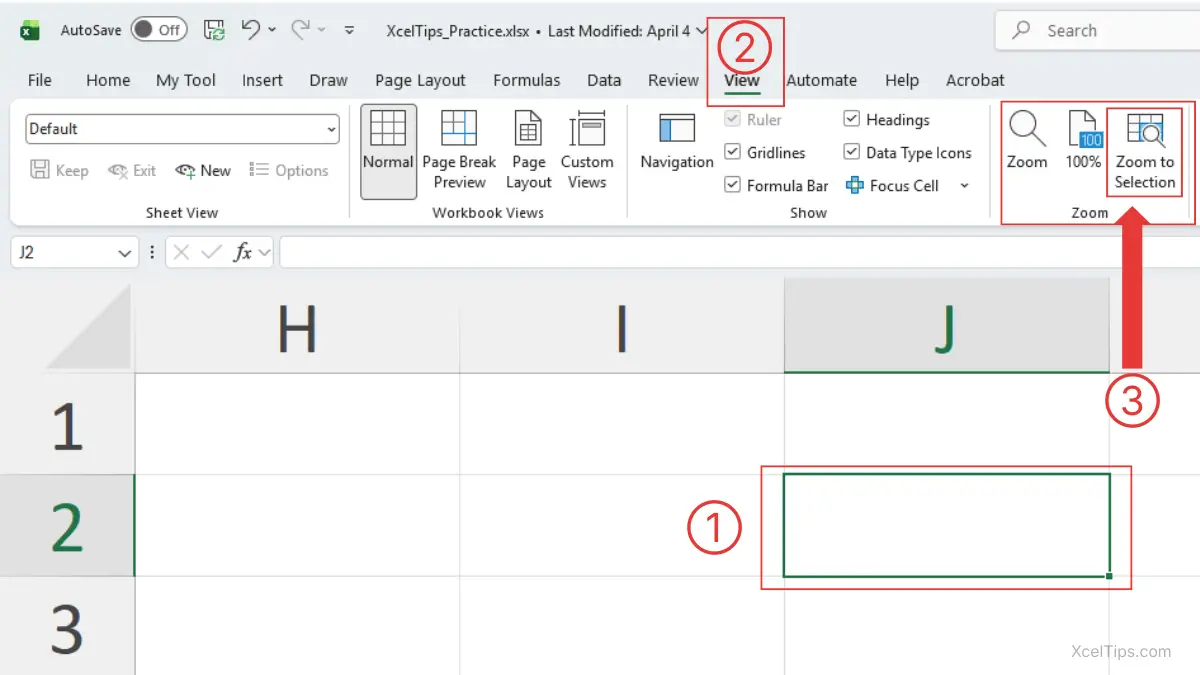
Excel will adjust the view so the selected area fits more clearly on screen.
This can be helpful when reviewing a small table or checking a block of values without manually testing different zoom percentages.
Save after choosing your preferred view
Once the worksheet looks comfortable, save the workbook if you want to keep that view for later.
In many cases, Excel keeps the zoom view you were using when you last saved the workbook.
If you need a refresher on basic file actions, see How to Open, Save, and Close Excel Files.
Before moving on, it helps to see a few common zoom mistakes so you do not confuse zoom with other Excel settings.
Common Beginner Mistakes When Zooming in Excel
Zoom is simple, but a few common mistakes can still make Excel feel more confusing than it needs to be.
Mistake 1: Thinking zoom changes formatting
This is the biggest misunderstanding. Zoom only changes how the worksheet looks on screen.
If you want text to actually become larger inside the worksheet, that is a formatting change, not a zoom change. That belongs to a different lesson area.
Mistake 2: Staying zoomed in too far
A very high zoom level can make it harder to understand the worksheet because you only see a small area at once.
For example, at 200% or 300%, you may lose sight of nearby labels, totals, or related columns. High zoom is useful for close inspection, but not always for normal work.
Mistake 3: Zooming out so much that details become unreadable
The opposite problem also happens. If you zoom out too far, you may see more of the worksheet, but everything becomes tiny and harder to read.
Try to match the zoom level to the task instead of keeping one extreme setting all the time.
Mistake 4: Confusing zoom with print size
A worksheet can look large on screen and still print normally. Or it can look small on screen and still print fine.
That is because zoom controls screen view, while printing uses separate settings. When you reach later lessons such as print setup and layout control, you will handle those separately.
Mistake 5: Forgetting other navigation tools
Zoom is helpful, but it works best alongside other basic Excel skills. Learn more on Understanding Cells, Rows, Columns, and Worksheets in Excel makes zooming more useful because you know what you are looking at.
Quick Practice
The best way to remember zoom controls is to try them in a real worksheet. This short exercise will help the steps feel natural and reinforce how to zoom in and out in Excel through simple practice.
Open a blank workbook or a practice file such as XcelTips_Practice.xlsx, then try this:
- Move the zoom slider to 125%.
- Move the slider back to 90%.
- Click View → 100%.
- Select a small range of cells.
- Click View → Zoom to Selection.
- Hold
Ctrland scroll the mouse wheel to zoom out. - Save the workbook when you are done.
As you practice, notice which method feels most comfortable. Most beginners end up using the slider first, then gradually use Ctrl + mouse wheel more often.
Key Takeaways
After trying the main zoom methods, take a moment to review the most important points.
- You can learn how to zoom in and out in Excel using thezoom slider, the View tab,
Ctrl+ mouse wheel, or keyboard shortcuts. - Zoom changes only the way the worksheet looks on your screen. It does not change your data, formatting, or print size.
- The zoom slider is usually the easiest method for beginners because it is always visible.
Ctrl+ mouse wheel is one of the fastest ways to adjust zoom while working.- Keyboard shortcuts such as
Ctrl+Alt+=andCtrl+Alt+-give you a mouse-free way to zoom in or out. - A comfortable zoom level depends on your task, so it is normal to zoom in for reading and zoom out to see more of the worksheet.
With these key points in mind, let’s answer some common beginner questions about zooming in Excel.
Frequently Asked Questions (FAQs)
These are some common beginner questions related to zooming in Excel.
How to zoom in and out in Excel quickly?
The fastest ways are:
- The zoom slider in the bottom-right corner, which is easiest for beginners.
Ctrl+ mouse wheel, which often feels faster once you get used to it.
How to zoom out in Excel using only the keyboard?
Press Ctrl + Alt + - to zoom out in Excel.
How to zoom in in Excel using only the keyboard?
Press Ctrl + Alt + = to zoom in in Excel.
Does zoom affect printing?
No. Zoom changes how the worksheet looks on your screen, not how large it prints. Print size is controlled by separate print and scaling settings.
Can different worksheets have different zoom views?
Yes. Excel can save a zoom setting, so one sheet may appear larger or smaller than another when you switch between tabs.
With the basics and common questions covered, the next step is simply to practice these zoom tools until they feel natural.
Conclusion
Learning how to zoom in and out in Excel is a small skill, but it makes a big difference for beginners. It helps you read data more clearly, see more of your worksheet when needed, and work at a view that feels comfortable instead of fighting the screen.
Take a few minutes to practice all four methods in a sample workbook so the steps become automatic. Whether you want to know how to zoom in Excel, how to zoom out in Excel, or which Excel zoom shortcut feels fastest, the key is to try each method and use the one that fits your workflow best.
A few minutes of practice with zoom controls can make Excel feel much more comfortable right away. As you continue through the roadmap, small navigation skills like this will save time and reduce frustration every time you open a workbook.
This lesson is part of the Beginner Learning Path, a structured series designed to help you learn Microsoft Excel step by step from the basics.