Written By Sophanith Dith
Last Updated March 28, 2026
Applies to Microsoft Excel 365 (Windows only)
Part of the Beginner Learning Path
Module 1 Excel Fundamentals
Lesson 7 of 12
When you’re new to Excel, it can feel like everything takes too many clicks. You constantly move between tabs, searching for basic commands like Save, Undo, or formatting tools. This slows you down and makes Excel feel harder than it actually is.
That’s where the Quick Access Toolbar becomes incredibly useful. Learning how to use the Quick Access Toolbar in Excel allows you to keep your most-used commands in one easy-to-reach place—no matter which tab you’re on.
Instead of constantly switching tabs and navigating the Excel interface, you can access important tools instantly, making your workflow faster and easier to manage. Without the Quick Access Toolbar, you may click through multiple tabs. With it, you can access tools instantly in one click.
If you’re just starting your Excel journey, mastering this small feature can make a big difference in your daily workflow.
Quick Answer:
The Quick Access Toolbar is a small, customizable toolbar located at the top-left of the Excel window that allows you to quickly access frequently used commands like Save, Undo, and Redo without switching between Ribbon tabs.
Before diving into the details, let’s start with a quick overview.
Quick Reference
Here’s a quick summary to help you understand the Quick Access Toolbar:
- It is located at the top-left corner of Excel.
- It provides one-click access to frequently used commands.
- You can customize it by adding or removing buttons.
- It works across all Ribbon tabs.
- It helps improve speed and reduce repetitive clicks.
With that overview in mind, let’s take a closer look at how the Quick Access Toolbar works in Excel.
What Is the Quick Access Toolbar in Excel?
The Quick Access Toolbar (often called QAT) is one of the simplest yet most powerful features in Excel. It sits above or below the Ribbon and remains visible no matter which tab you’re using.
This means you don’t need to switch between tabs repeatedly to access common commands. Whether you’re working with data, formatting cells, or editing formulas, your essential tools are always within reach.
For example, imagine you’re working on a file called Sales_Report.xlsx. You might frequently use:
- Save
- Undo
- Redo
- Format Cells
Instead of clicking through different Ribbon tabs every time, you can place these commands directly in the Quick Access Toolbar.
For additional details, see Microsoft’s official guide on customizing the Quick Access Toolbar.
Why the Quick Access Toolbar Matters for Beginners
When you’re learning Excel, reducing friction is important. The Quick Access Toolbar helps you:
- Work faster with fewer clicks.
- Stay focused without navigating menus.
- Build confidence using Excel tools.
With that in mind, let’s see why it’s especially useful for beginners.
Benefits of Using the Quick Access Toolbar
In everyday Excel tasks, even small improvements can save time. The Quick Access Toolbar helps you reduce repetitive actions and keep important tools within reach.
For example, instead of switching between multiple tabs, you can access commonly used commands instantly from one place. This becomes especially helpful when working on files like Budget.xlsx or Sales_Report.xlsx, where you repeat the same actions many times.
Because of this, using the Quick Access Toolbar can make your workflow feel smoother and more consistent. However, many beginners don’t take advantage of this feature, which can slow down their workflow.
Common Beginner Mistake When Using the Quick Access Toolbar
Many beginners ignore the Quick Access Toolbar and rely entirely on the Ribbon. This leads to unnecessary clicks and makes simple tasks take longer than they should.
Before moving forward, let’s make sure you can easily find it in Excel.
Where to Find the Quick Access Toolbar
If you’re not sure where the Quick Access Toolbar is located, don’t worry—it’s easy to spot once you know what to look for.
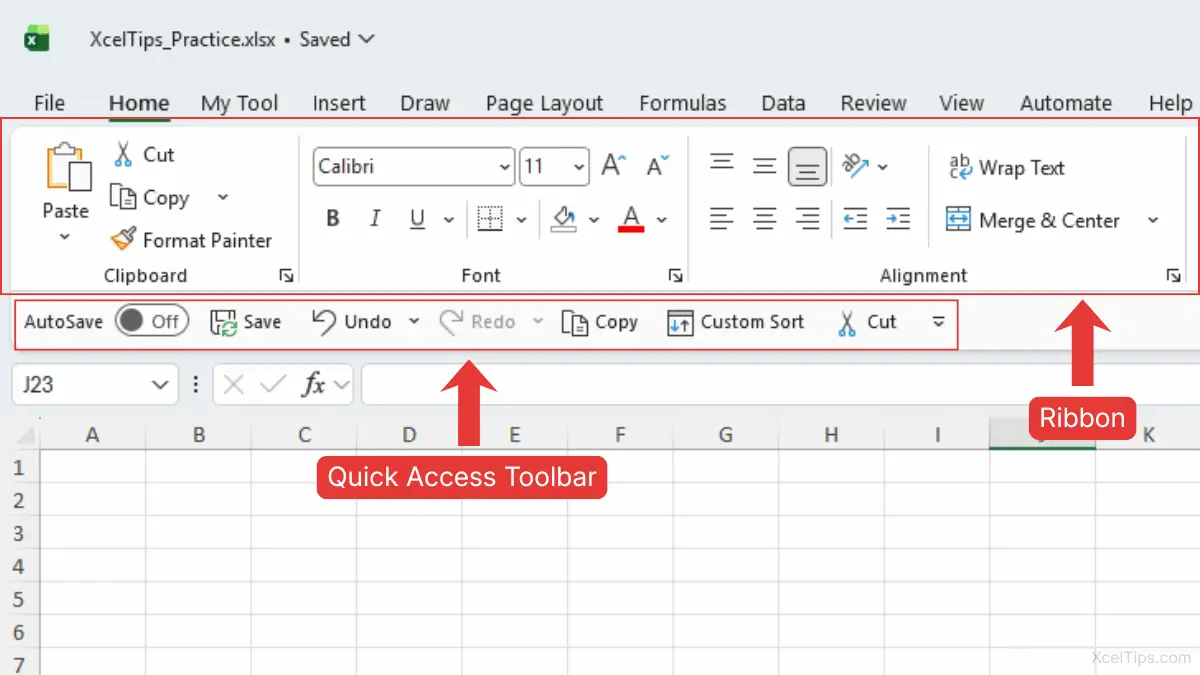
By default, it appears in the top-left corner of the Excel window, above the Ribbon. It may appear very small at first, so look for the icons above the Ribbon. It usually includes a few default commands.
Default Commands You’ll See
These are typically included when you first open Excel:
- Save (disk icon)
- Undo (curved arrow left)
- Redo (curved arrow right)
If you want an even faster keyboard method for two of these commands, learn how to use the Undo Redo shortcut in Excel.
How It Fits into the Excel Interface
To understand its position better:
- It sits above the Ribbon tabs (Home, Insert, etc.).
- It remains visible even when switching tabs.
- It can be repositioned below the Ribbon if preferred.
If you need a refresher, you can review our guide on understanding the Excel interface, including the Ribbon, tabs, and toolbar.
Now that you know where to find it, let’s start customizing it to match your workflow.
How to Add Commands to the Quick Access Toolbar
One of the most useful things about the Quick Access Toolbar is that you can customize it based on your workflow.
Adding commands is simple and only takes a few seconds.
Method 1: Add from the Ribbon
This is the easiest way for beginners.
To add a command to the Quick Access Toolbar from the Ribbon, go to the Ribbon and find the command you want, then follow these steps:
- Right-click the command on the Ribbon (for example, the Merge & Center button on the Home tab).
- Click Add to Quick Access Toolbar.

That’s it! The command will instantly appear in your toolbar.
Method 2: Use the Customize Menu
You can also add commands using the toolbar menu itself.
To add a command using the customize menu, follow these steps:
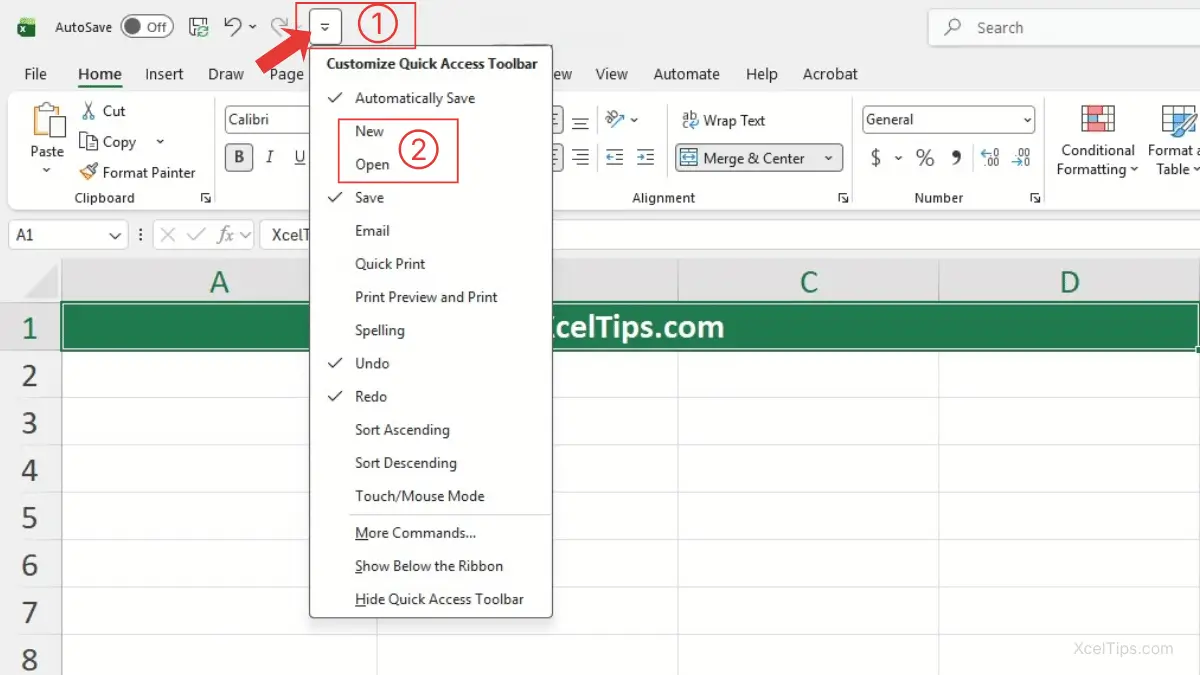
- Click the Customize Quick Access Toolbar dropdown arrow.
- Select one of the listed commands (e.g., New, Open).
The command will be added immediately.
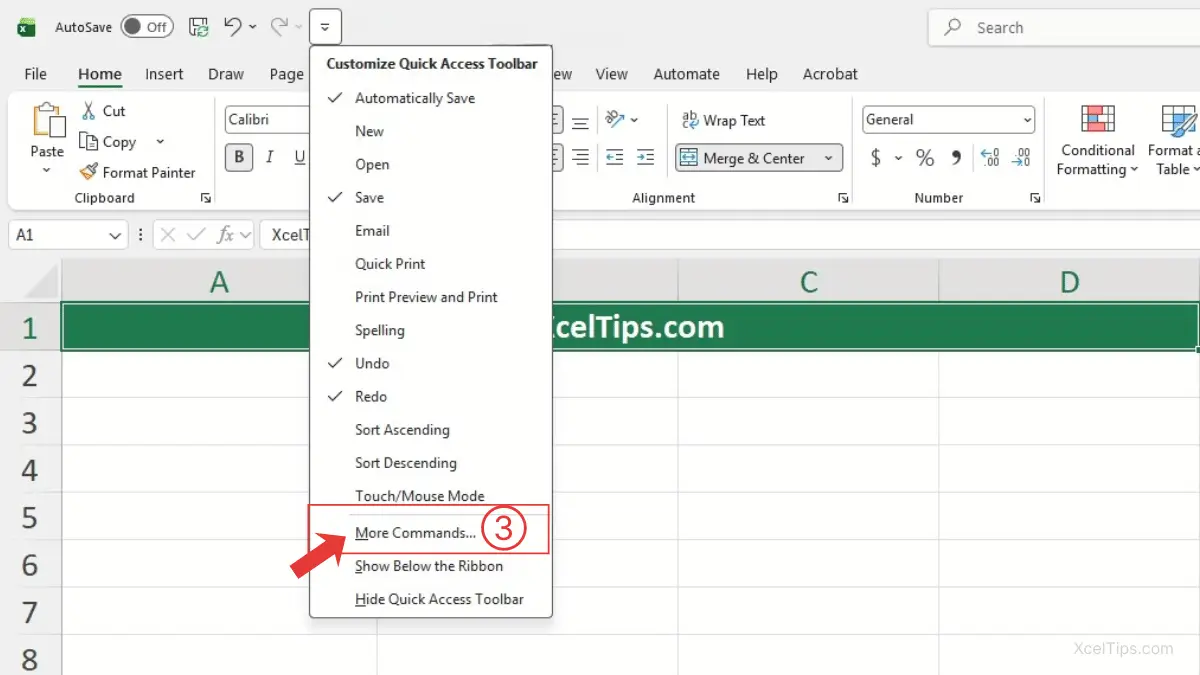
For more options, you can open the full command list:
- Click More Commands…
This opens the Excel Options window, where you can choose from a full list of available commands.
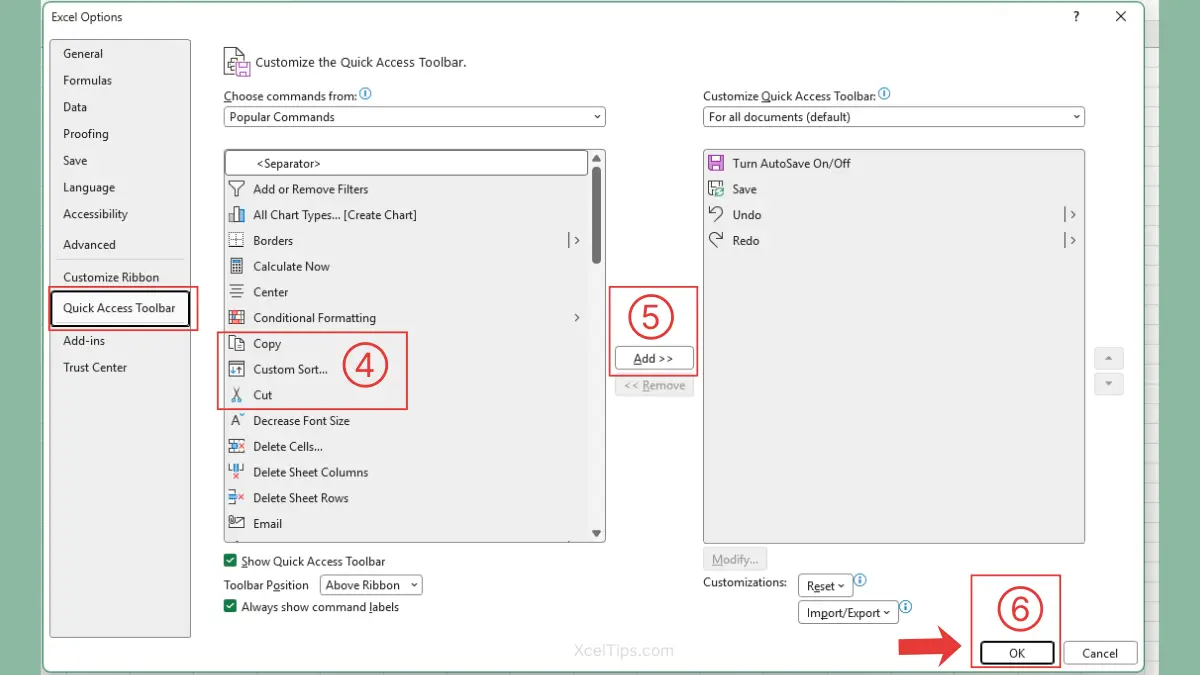
Once the Excel Options window opens, you can select the commands you want to add to your Quick Access Toolbar.
- Choose commands from the list. For example, Copy, Custom Sort…, Cut.
- Click Add >>.
- Click OK.
Beginner Tips:
Start by adding commands you use frequently, such as: Format Cells, Sort A to Z, Filter, Bold or Fill Color. You can always add more later.
Beginner Warning:
Avoid adding too many commands at once, as it can make the toolbar cluttered. Adding too many commands can make the toolbar harder to use instead of faster.
Pro Tip:
Place commands you use most often at the beginning of the toolbar so they are easier to click quickly.
Once you’ve added the commands you need, it’s just as important to remove any that you don’t use to keep your toolbar clean and easy to navigate.
How to Remove Commands from the Toolbar
As your workflow changes, you may want to remove commands you no longer use.
Thankfully, removing items is just as easy as adding them.
Steps to Remove a Command
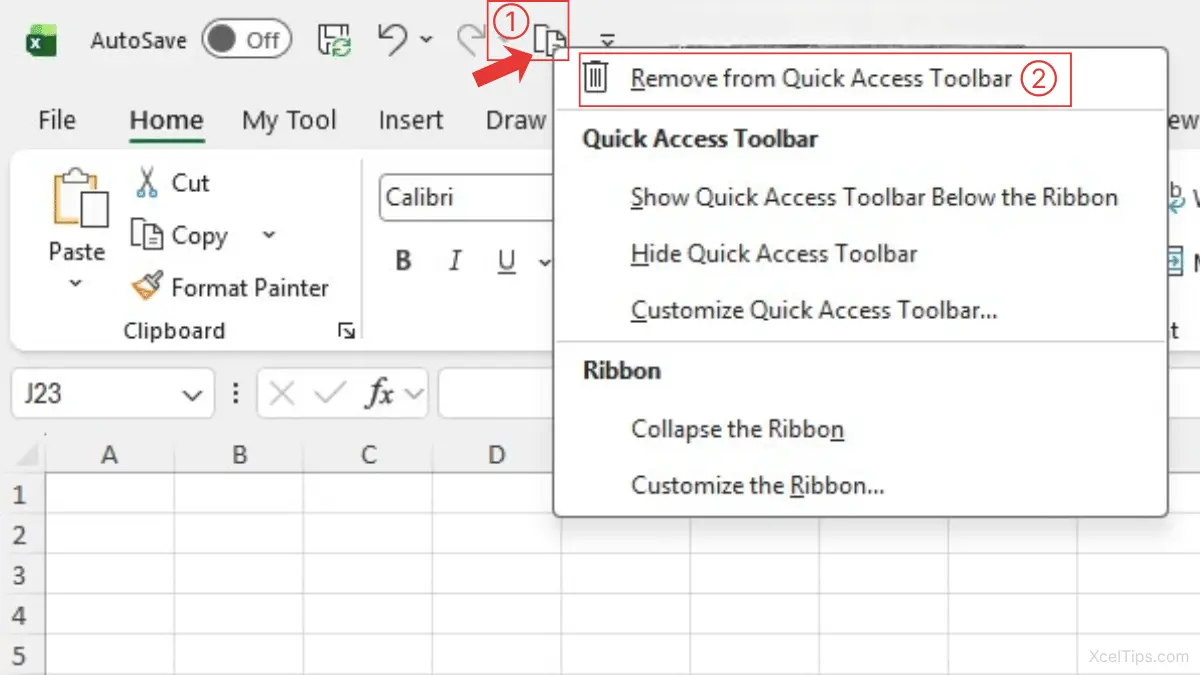
Removing a command from the Quick Access Toolbar is quick and only takes a couple of clicks. Follow these steps:
- Right-click the command in the Quick Access Toolbar.
- Click Remove from Quick Access Toolbar.
The command will disappear immediately.
Why This Matters
Keeping your toolbar clean ensures:
- Faster access to important tools.
- Less visual clutter.
- Better focus while working.
Beginner Mistake to Avoid
Some users add too many commands and never clean them up. This defeats the purpose of having a “quick” access toolbar.
After adding and removing commands, you can take it a step further by adjusting the position of the Quick Access Toolbar to better suit your workflow.
How to Move the Quick Access Toolbar
Did you know you can change the position of the Quick Access Toolbar?
This small adjustment can improve visibility depending on your preference.
Steps to Move the Quick Access Toolbar
You can easily change the position of the Quick Access Toolbar depending on your preference.
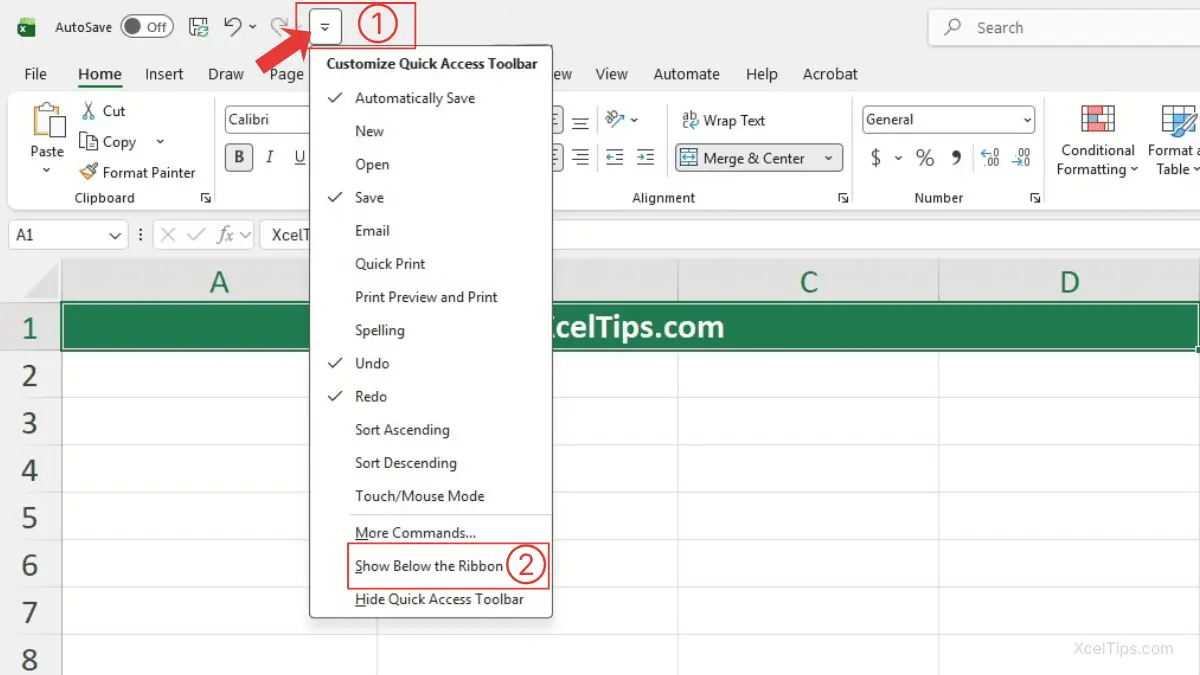
- Click the Customize Quick Access Toolbar dropdown arrow.
- Select one of the following:
- Show Below the Ribbon. (if the toolbar is currently above the Ribbon)
- Show Above the Ribbon. (if the toolbar is currently below the Ribbon)
The toolbar will move immediately after you select an option.
When to Move It Below the Ribbon
Placing it below the Ribbon can be helpful if:
- You want larger, more visible icons.
- You use many commands.
- You prefer a cleaner top layout.
Beginner Tips:
Try both positions and see what feels more comfortable. There’s no “right” choice, it depends on your workflow.
Now that you know how to customize the toolbar, let’s look at the most useful commands to add.
Best Commands to Add for Beginners
If you’re unsure what to add, here are some beginner-friendly suggestions that can immediately improve your efficiency.
Before choosing, think about what actions you repeat often.
Recommended Commands
| Command | Why It’s Useful |
|---|---|
| Save | Quickly save your work anytime |
| Undo / Redo | Fix mistakes instantly |
| Format Cells | Access formatting options quickly |
| Sort A to Z | Organize data easily |
| Filter | View specific data faster |
| Bold / Fill Color | Apply formatting quickly |
These commands are useful because they are used across almost every Excel task, not just one specific feature.
Real-World Example
If you’re working on a file like Budget.xlsx, you might:
- Format numbers frequently.
- Adjust cell styles.
- Sort expense categories.
Having these commands in your toolbar saves time every time you use them.
Once your toolbar is set up, it’s important to understand when it’s most useful.
When to Use the Quick Access Toolbar Effectively
The Quick Access Toolbar is ideal for tasks you perform repeatedly across different tabs.
Here are some situations where the Quick Access Toolbar is especially useful:
Best Use Cases
- Saving your file frequently.
- Undoing mistakes while editing.
- Applying formatting quickly.
- Sorting or filtering data.
When Not to Use It
Avoid adding commands you rarely use. The goal is efficiency—not storing every feature.
Connection to Future Lessons
As you continue learning, especially in topics like:
- Sorting & Filtering Data
- Formatting Cells
- Using Basic Formulas
You’ll discover new commands worth adding to your toolbar.
We’ll revisit efficiency techniques in later modules, including tools like Paste Special and Flash Fill.
Let’s apply what you’ve learned with a quick hands-on exercise.
Quick Practice
Try this simple exercise to build confidence:
- Add Format Cells to your Quick Access Toolbar.
- Add Sort A to Z.
- Remove one default command you don’t use.
- Move the toolbar below the Ribbon.
- Use one of the commands on a sample file.
This quick exercise helps you see how customization works in real Excel tasks.
Now that you’ve practiced customizing the toolbar, let’s quickly review the most important points to remember.
Key Takeaways
Before moving on, here are the most important points to remember about using the Quick Access Toolbar in Excel.
- The Quick Access Toolbar lets you access frequently used commands instantly.
- It stays visible across all Ribbon tabs, saving time and effort.
- You can easily add commands by right-clicking them on the Ribbon.
- Keeping only essential commands helps maintain a clean and efficient toolbar.
- Moving the toolbar below the Ribbon can improve visibility for some users.
- Customizing the toolbar helps you work faster and with fewer clicks.
With these key ideas in mind, let’s answer some common questions beginners often have.
Frequently Asked Questions (FAQs)
Here are some common questions beginners often have when learning how to use the Quick Access Toolbar in Excel.
What is the Quick Access Toolbar in Excel?
The Quick Access Toolbar is a small, customizable toolbar located at the top-left of Excel. It lets you quickly access frequently used commands like Save, Undo, and Redo without switching between Ribbon tabs.
How do I add buttons to the Quick Access Toolbar in Excel?
Right-click any command on the Ribbon (for example, Bold on the Home tab) and select Add to Quick Access Toolbar. You can also use the toolbar dropdown menu and choose More Commands to add additional options.
Can I move the Quick Access Toolbar in Excel?
Yes, you can move it above or below the Ribbon. Click the toolbar dropdown arrow and select Show Below the Ribbon or Show Above the Ribbon.
Why are my Quick Access Toolbar changes not saving?
This usually happens if Excel settings are reset or not saved properly. Try closing and reopening Excel. If the issue continues, check that your Excel settings are not being restricted by your system.
What is the fastest way to customize the Quick Access Toolbar?
The fastest method is to right-click any command on the Ribbon and select Add to Quick Access Toolbar. This adds the command instantly without opening additional menus.
Can I reset the Quick Access Toolbar to default?
Yes. Click the dropdown arrow on the toolbar, select More Commands, then click Reset → Reset only Quick Access Toolbar. This will restore the default settings.
With these common questions answered, let’s quickly recap what you’ve learned.
Conclusion
The Quick Access Toolbar is a simple but powerful feature that helps you work more efficiently in Excel by keeping your most-used commands within easy reach. By customizing it to match your workflow, you reduce unnecessary clicks and make Excel much easier to use, especially as a beginner.
Keep practicing by adding and removing commands as you work, and you’ll naturally build a more efficient setup over time. Try using the toolbar for one day—you’ll quickly notice how much time it saves.
This lesson is part of the Beginner Learning Path, a structured series designed to help you learn Microsoft Excel step by step from the basics.