Written By Sophanith Dith
Last Updated April 05, 2026
Applies to Microsoft Excel 365 (Windows only)
Part of the Beginner Learning Path
Module 1 Excel Fundamentals
Lesson 10 of 12
When you start working with Excel, you’ll quickly notice that every new workbook comes with generic sheet names like Sheet1, Sheet2, and Sheet3. If you’re not yet familiar with how worksheets work, see our guide on Understanding Cells, Rows, Columns, and Worksheets in Excel.
While these names work at first, they become confusing as your file grows. That’s why learning how to rename a sheet in Excel is an essential skill for beginners. It helps you stay organized, find information faster, and create professional-looking workbooks.
In this guide, you’ll learn simple ways to rename a sheet in Excel and rearrange sheets so your Excel files are easy to understand and manage.
How to rename a sheet in Excel and move it:
Renaming a sheet in Excel means changing its default name to something meaningful, while moving a sheet means changing its position within a workbook. Both actions help organize your data and improve navigation.
Before diving into step-by-step instructions, here’s a quick overview of what you’ll learn.
Quick Reference
Here’s a quick summary of the key actions covered in this tutorial:
- Rename a worksheet by double-clicking the sheet tab.
- Use right-click options to rename or move sheets.
- Drag and drop sheet tabs to change their position.
- Keep sheet names short, clear, and meaningful.
- Avoid duplicate or confusing sheet names.
Now, let’s explore each concept in detail so you can confidently organize your worksheets.
Why Renaming a Sheet in Excel Matters
Before learning the steps, it’s important to understand why renaming worksheets is such a useful habit.
When you create a new workbook, Excel assigns default names like Sheet1, Sheet2, and Sheet3. These names don’t tell you anything about the content inside the sheet. As your workbook grows, this can quickly lead to confusion.
For example, imagine working on a simple budget file. Instead of using generic names, you could rename your sheets to:
- January Budget
- February Budget
- Summary
This makes it much easier to navigate your workbook, especially when switching between multiple sheets. This is especially important when working with multiple worksheets in a single workbook.
Renaming worksheets also helps in real-world scenarios like:
- Managing monthly reports
- Organizing sales data
- Preparing financial summaries
Beginner Tip:
Clear sheet names reduce mistakes because you always know where your data is.
Before moving forward, let’s look at how to rename a worksheet step by step.
How to Rename a Sheet in Excel
There are multiple ways to rename a sheet in Excel, and each method is simple to learn. The easiest method is using the sheet tab at the bottom of the screen.
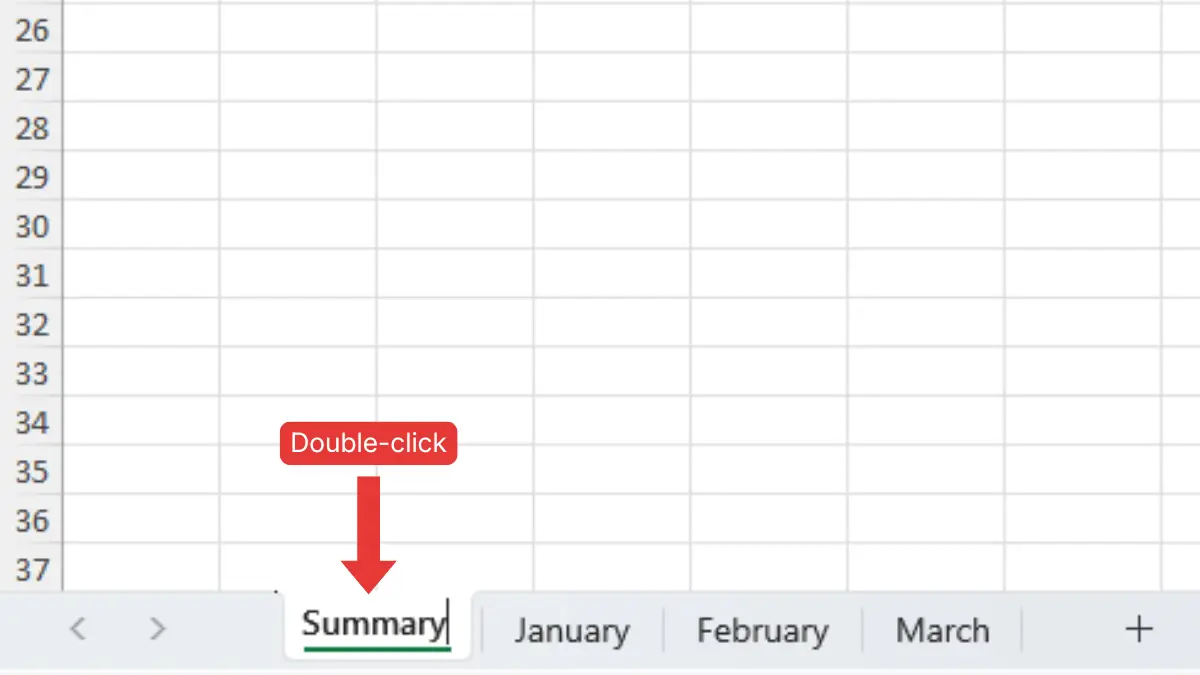
Method 1: Double-Click the Sheet Tab
This is the fastest and most beginner-friendly method.
Follow these steps to rename a sheet in Excel:
- Locate the sheet tabs at the bottom of Excel.
- Double-click the sheet name.
- Type the new name, such as Summary.
- Press Enter.
This is the quickest way to rename a sheet in Excel without using any menus.
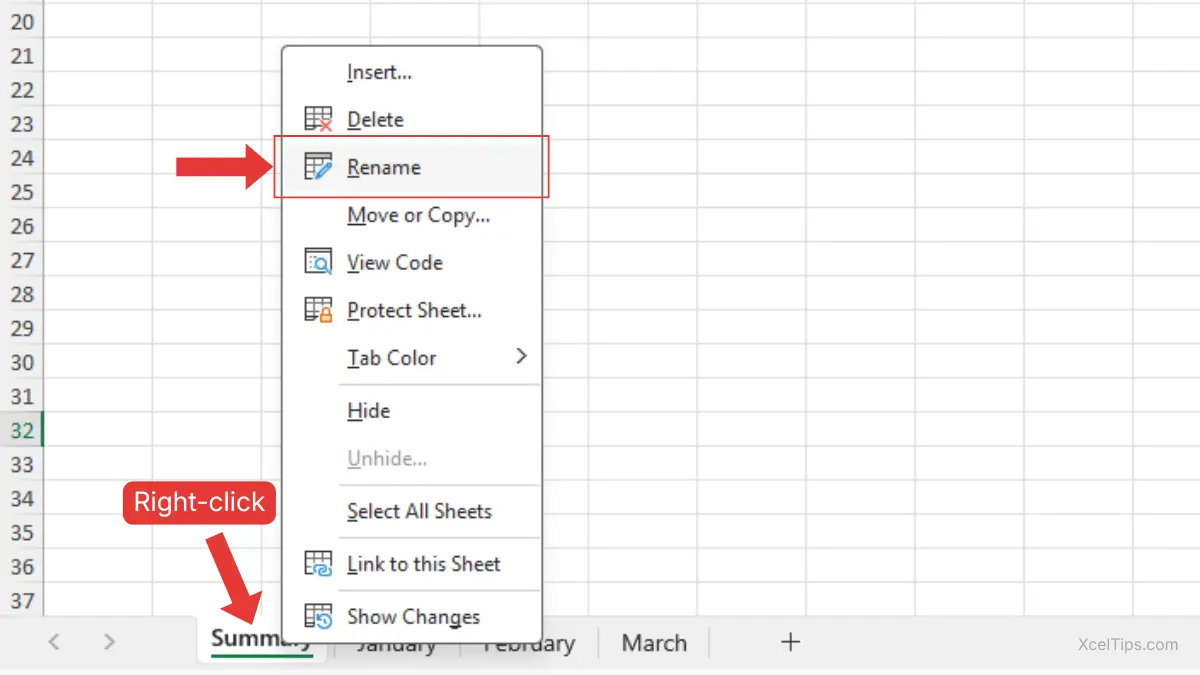
Method 2: Right-Click Rename Option
If you prefer using menus, you can rename a worksheet using the right-click option.
Follow these steps:
- Right-click the sheet tab.
- Click Rename.
- Type the new name, such as Summary.
- Press Enter.
This method is helpful if you are already using right-click options for other actions.
Beginner Tip:
Press Enter after typing the new name. If you click away without pressing Enter, Excel may not save the change.
Naming Best Practices for Beginners
Before choosing a worksheet name, it’s important to understand Excel’s naming rules. These rules help prevent errors when renaming your sheets.
Here are a few simple guidelines to follow:
- Use clear and descriptive names.
- Keep names short and easy to read (maximum 31 characters).
- Do not leave the sheet name blank.
- Avoid special characters such as
/ \ ? * : [ ]. - Do not begin or end the name with an apostrophe (
'). - Do not use duplicate names within the same workbook.
- Avoid using the name “History”, as it is reserved by Excel.
Example:
- ❌
05/04/2026(invalid due to special character/) - ✅
05-04-2026(valid)
Following these rules will help you avoid errors when you rename a sheet in Excel.
If you want to explore Microsoft’s official instructions, you can also refer to the Rename a worksheet guide from Microsoft Support.
With your sheets properly named, the next step is learning how to arrange them in a logical order.
How to Move a Sheet in Excel (Reorder Worksheets)
Moving a worksheet allows you to organize your workbook in a logical order. This is especially useful when working with multiple sheets. Once you rename a sheet in Excel, the next step is to move it into the correct position.
For example, you might want:
- Monthly data in chronological order.
- A summary sheet at the beginning.
- Supporting data at the end.
Let’s look at the easiest way to move worksheets. There are two common methods, and each is useful in different situations:
| Method | Best For |
|---|---|
| Drag and Drop | Quick rearranging |
| Move or Copy | Precise placement |
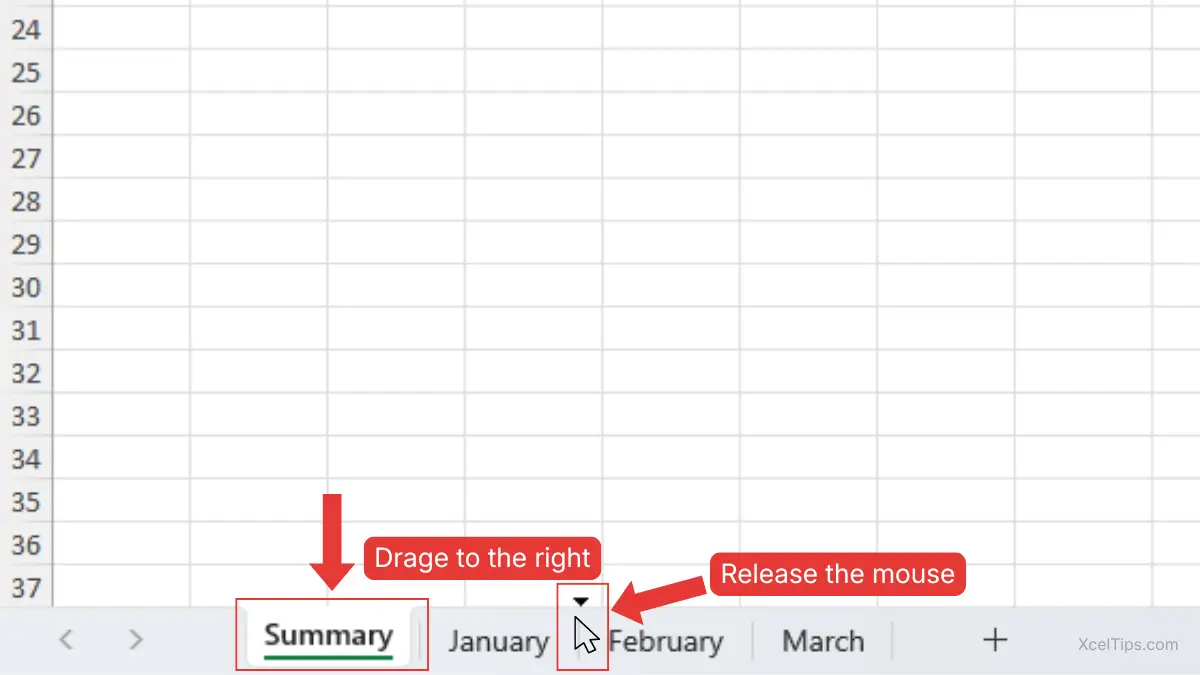
Method 1: Drag and Drop Worksheets
This is the simplest way to rearrange sheets.
Follow these steps:
- Click and hold the sheet tab.
- Drag it left or right.
- Release the mouse when you see the desired position.
You’ll see a small arrow indicating where the sheet will be placed.
Beginner Tip:
If the sheet doesn’t move, make sure you are dragging the sheet tab, not the worksheet area.
Method 2: Move or Copy Option
For more control, Excel provides a built-in menu to move worksheets.
Follow these steps:
- Right-click the sheet tab.
- Click Move or Copy…
- Choose the position in the list.
- Click OK.
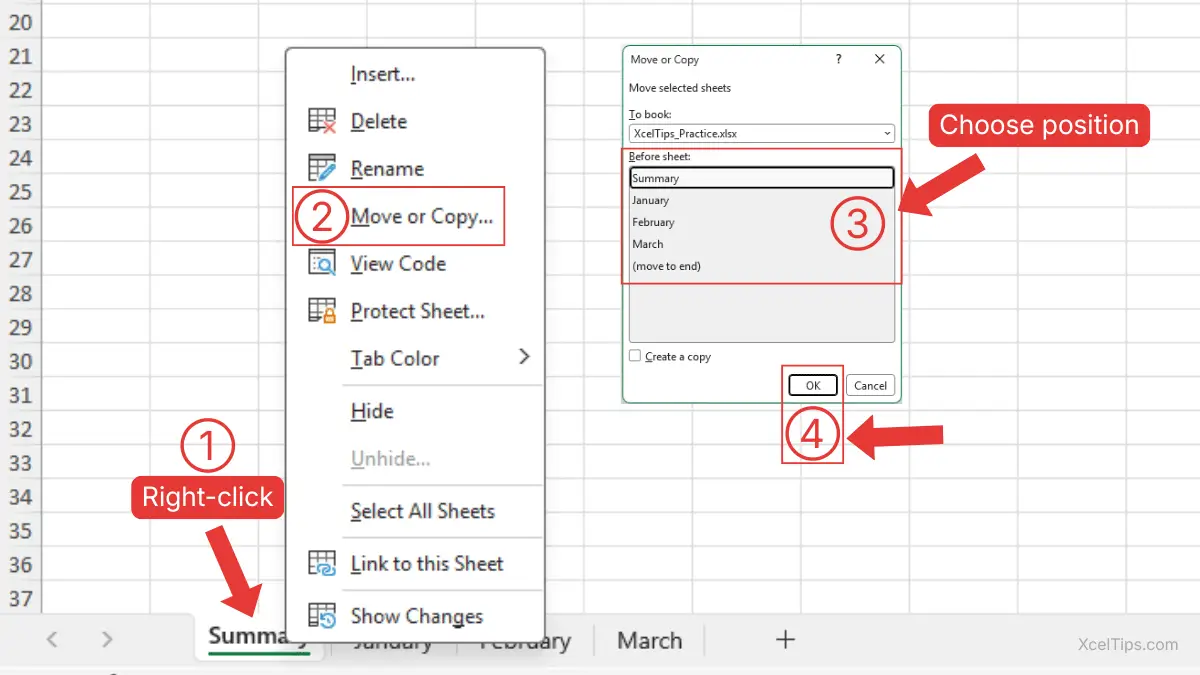
This method is useful when working with many sheets or when you want precise placement.
Now that you understand both actions, it’s important to see how they work together.
How Renaming and Moving Excel Sheets Work Together
Renaming helps you identify each sheet, while moving helps you organize them in a logical order. When combined, they make your workbook much easier to use.
For example, in a sales report:
- Rename sheets to: January, February, March.
- Move them into chronological order.
- Place a Summary sheet at the beginning.
This creates a clean and professional structure that is easy to navigate.
Beginner Tip:
Always rename sheets first, then arrange them. This makes organizing much easier.
Even with simple tasks like renaming and moving sheets, beginners often make small mistakes. Let’s look at what to avoid.
Common Mistakes When Renaming and Moving Sheets
As a beginner, it’s easy to make small mistakes when managing worksheets. Understanding these early will save you time and frustration.
Here are some common issues:
- Leaving default names like Sheet1.
- Using vague names like Data or Info.
- Accidentally dragging sheets to the wrong position.
- Creating inconsistent naming styles.
For example, mixing names like Jan, February, and 03 can make your workbook confusing.
Better Approach:
Use consistent naming such as Jan, Feb, Mar or full month names.
Before continuing, make sure you’re comfortable renaming and moving sheets, as these are core navigation skills. After you rename a sheet in Excel, moving it helps you organize your workbook in a logical order.
How This Connects to Other Worksheet Actions
If you’ve completed the previous lesson, you already know how to add, delete, and duplicate worksheets. If not, you can first learn it in the tutorial How to Add, Duplicate, and Delete a Sheet in Excel.
Renaming and moving worksheets build directly on those skills by helping you organize what you’ve created.
For example:
- After adding new sheets → rename them.
- After duplicating a sheet → rename to avoid confusion.
- After creating multiple sheets → move them into order.
In the next lessons, you’ll continue improving your ability to manage and navigate Excel workbooks more efficiently.
Quick Practice
To reinforce what you’ve learned, try this simple exercise:
- Create a new workbook.
- Add three worksheets.
- Rename them to: January, February, and March.
- Move them into the correct order.
- Add a sheet called Summary and move it to the first position.
This small practice will help you build confidence quickly. Try repeating this exercise with different names to build confidence.
Now that you’ve practiced renaming and moving worksheets, let’s quickly recap the most important points to remember.
Key Takeaways
Here are the key points to keep in mind when working with worksheets in Excel:
- Learning how to rename a sheet in Excel helps you stay organized and quickly identify your data.
- You can rename a sheet by double-clicking the tab or using the right-click menu.
- Moving worksheets allows you to arrange your workbook in a logical order.
- Drag and drop is the fastest way to reposition sheets.
- Clear and consistent naming makes your workbook easier to use and understand.
With these key points in mind, let’s answer some common questions beginners often have about renaming and moving worksheets.
Frequently Asked Questions (FAQs)
Here are answers to common beginner questions about worksheet management.
How do I rename a sheet in Excel quickly?
The fastest way is to double-click the sheet tab, type a new name, and press Enter.
Can I move multiple worksheets at once?
Yes, but this is typically covered in more advanced lessons. For now, beginners should focus on moving one sheet at a time.
Why can’t I rename a worksheet?
This usually happens if the name contains invalid characters or if another sheet already uses the same name.
How do you move a sheet in Excel?
Yes, simply drag and drop the sheet tab to a new position, or use the Move or Copy option.
What is the difference between a sheet and a worksheet in Excel?
A worksheet is the official term used by Excel, but “sheet” is commonly used. Both refer to the same thing.
With these questions answered, let’s wrap up what you’ve learned.
Conclusion
Learning how to rename a sheet in Excel and move it helps you stay organized, avoid confusion, and work more efficiently. These simple actions make a big difference, especially as your workbooks grow.
Improving how you organize your worksheets is one of the fastest ways to become more confident in Excel. Keep practicing these small skills, and you’ll notice a big difference in how easily you navigate your files.
Take a few minutes to practice renaming and rearranging sheets in your own file. The more you use these skills, the more natural they will feel.
This lesson is part of the Beginner Learning Path, a structured series designed to help you learn Microsoft Excel step by step from the basics.
← Previous Lesson
How to Add, Duplicate, and Delete a Sheet in Excel
Next Lesson →
How to Switch Between Sheets in Excel