Written By Sophanith Dith
Last Updated March 14, 2026
Applies to Microsoft Excel 365 (Windows only)
Part of the Beginner Learning Path
Module 1 Excel Fundamentals
Lesson 3 of 12
In the previous post, you learned what Microsoft Excel is and why it is one of the most powerful tools for organizing data, performing calculations, and creating reports. However, before you can use any advanced features, you must first understand the most basic and essential skills: how to open, save, and close Excel files correctly.
Many beginners assume these actions are too simple to matter. But in reality, most Excel mistakes happen because files are opened or saved incorrectly. Files get lost, overwritten, saved in the wrong format, or closed without saving changes.
In this guide, you’ll learn:
- All common ways to open Excel files.
- The correct ways to save your work (and avoid losing it).
- How to close Excel files safely.
- Common beginner mistakes and how to avoid them.
Before we go further, here are essential shortcuts every beginner should know.
Quick Reference: Essential File Shortcuts
Here are commonly used Excel shortcuts:
- Save File → Ctrl + S
- Save As → F12
- Close Workbook → Ctrl + W
- Close Excel → Alt + F4
With these essential shortcuts in mind, let’s understand what an Excel file actually is.
What Is an Excel File?
An Excel file is also called a workbook. Each workbook can contain:
- One or more worksheets
- Data, formulas, charts, and formatting
Excel files usually have extensions like:
.xlsx– the most common and recommended format.xls– older Excel format (avoid unless required).csv– plain text data format (no formulas or formatting)
Knowing how to handle these files properly will save you time and prevent frustration.
How to Open Excel Files
There are several ways to open Excel files, and each method is useful in different situations.
Method 1: Open Excel First, Then Open a File
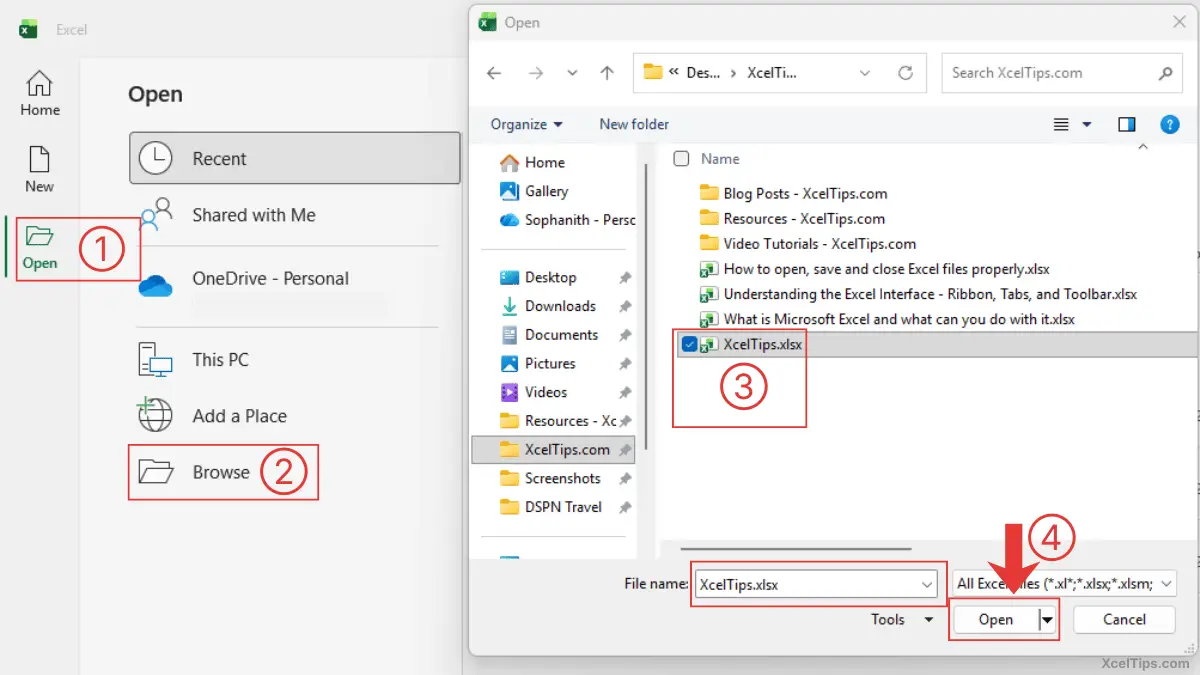
First, open Microsoft Excel. Then, on the Start Screen:
- Select Open.
- Choose Browse.
- Navigate to the folder where your Excel file is saved. Select the file (or type its name in the File name box).
- Then click Open.
Why This Method Is Recommended:
- Best for beginners.
- Gives full control over file selection.
- Reduces risk of opening the wrong file.
If you already know where your file is saved, you can skip the Start screen entirely and open it directly from Windows File Explorer.
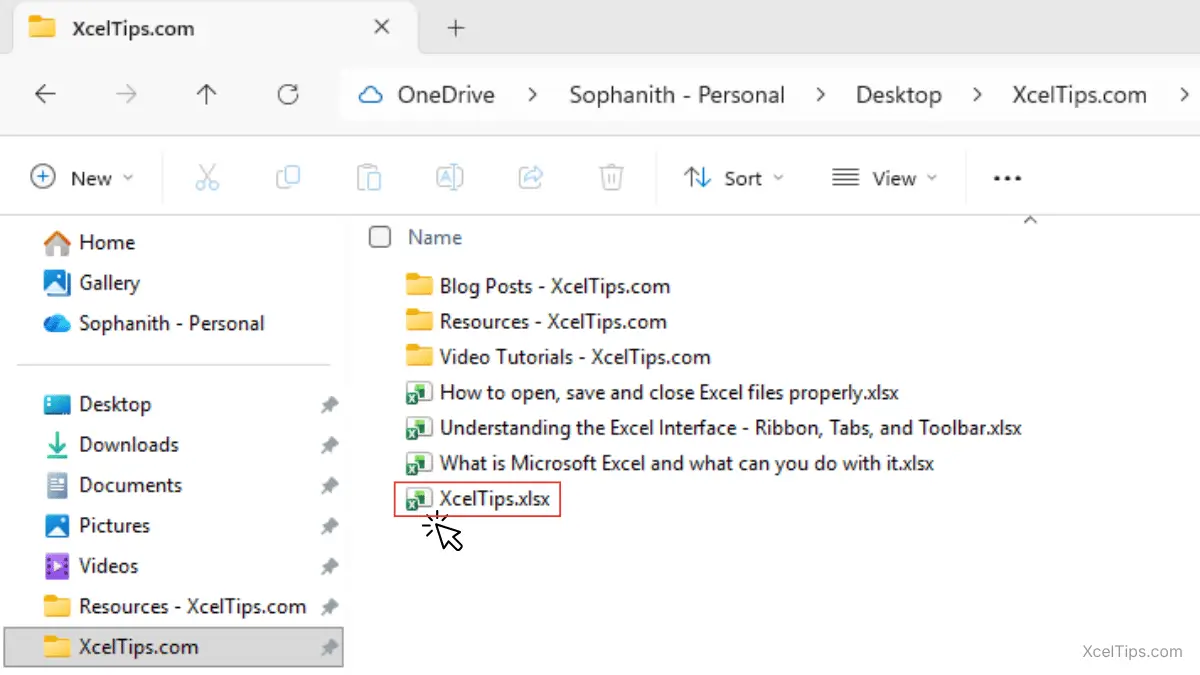
Method 2: Double-Click the Excel File
You can open an Excel file directly by double-clicking it in Windows File Explorer.
Excel will launch automatically and open the file.
Be careful:
- Make sure you are opening the correct file, especially if you have similar file names.
- Avoid editing important files accidentally.
Alternatively, you can open a file directly from Excel’s Recent list.
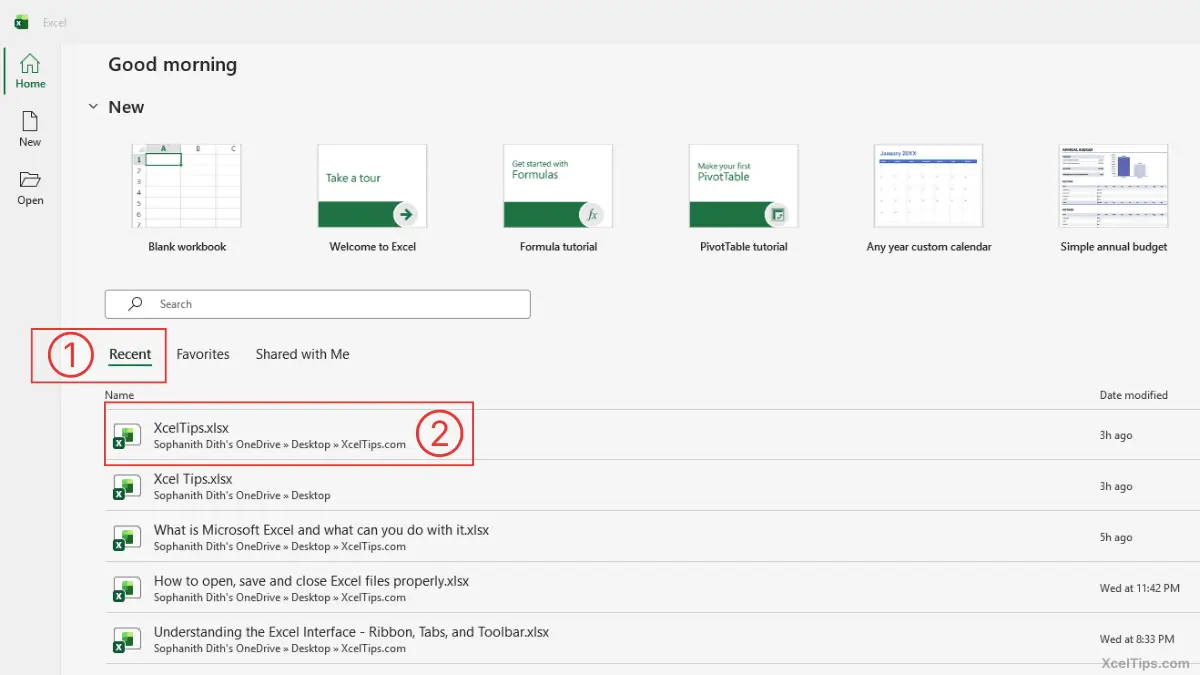
Method 3: Open Recent Files
Excel keeps a list of recently opened workbooks for quick access. When you launch Excel 365, the Start Screen automatically displays your recent files.
To do this:
- On the Start Screen, click Recent (if needed).
- Then, select any files from the recent list.
This is useful when:
- You worked on a file recently.
- You don’t remember where it’s saved.
Important:
If the file was moved or deleted, it may not open.
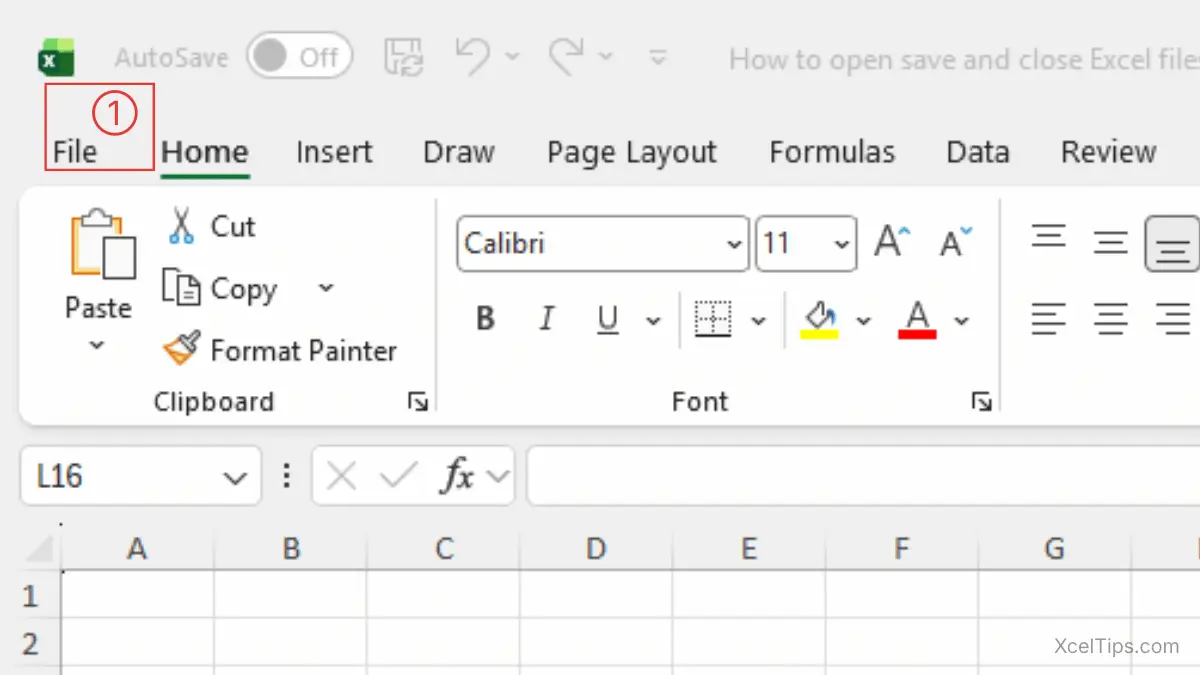
Method 4: Open a File While Excel Is Already Open
Sometimes you are already working in Excel and need to open another workbook. Instead of closing Excel, you can open another file directly from inside Excel.
To do this:
- Click the File tab in the top-left corner of Excel.
If this screen still feels unfamiliar, start with understanding the Excel interface so the File tab and Backstage view make more sense.
You are now in Backstage view, the full-screen menu where you manage your files.
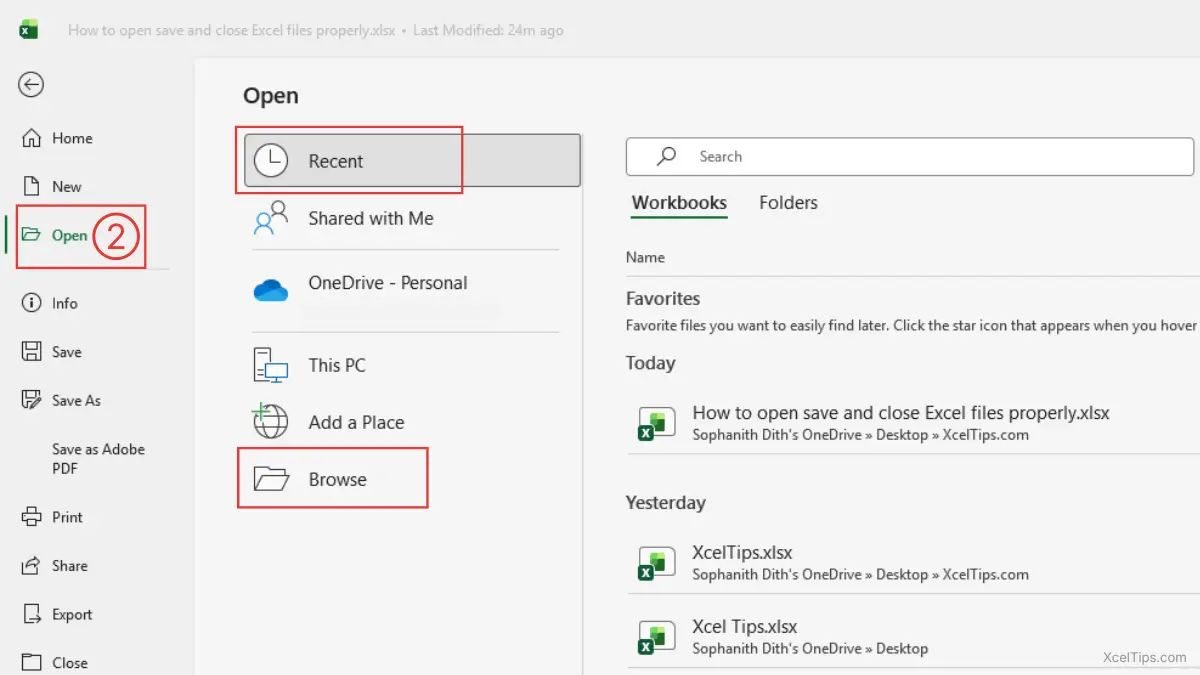
- From the left panel, click Open.
Now you can choose:
- Recent → Open a recently used file.
- Browse → Locate a file on your computer.
If you want to start a completely new workbook instead of opening an existing file, we cover that in our guide: How to Create a New Workbook in Excel.
Now that you know how to open workbooks, the next critical skill is saving them correctly.
How to Save Excel Files Correctly
Learning to save files properly is one of the most important Excel habits you can build.
Save vs Save As – What’s the Difference?
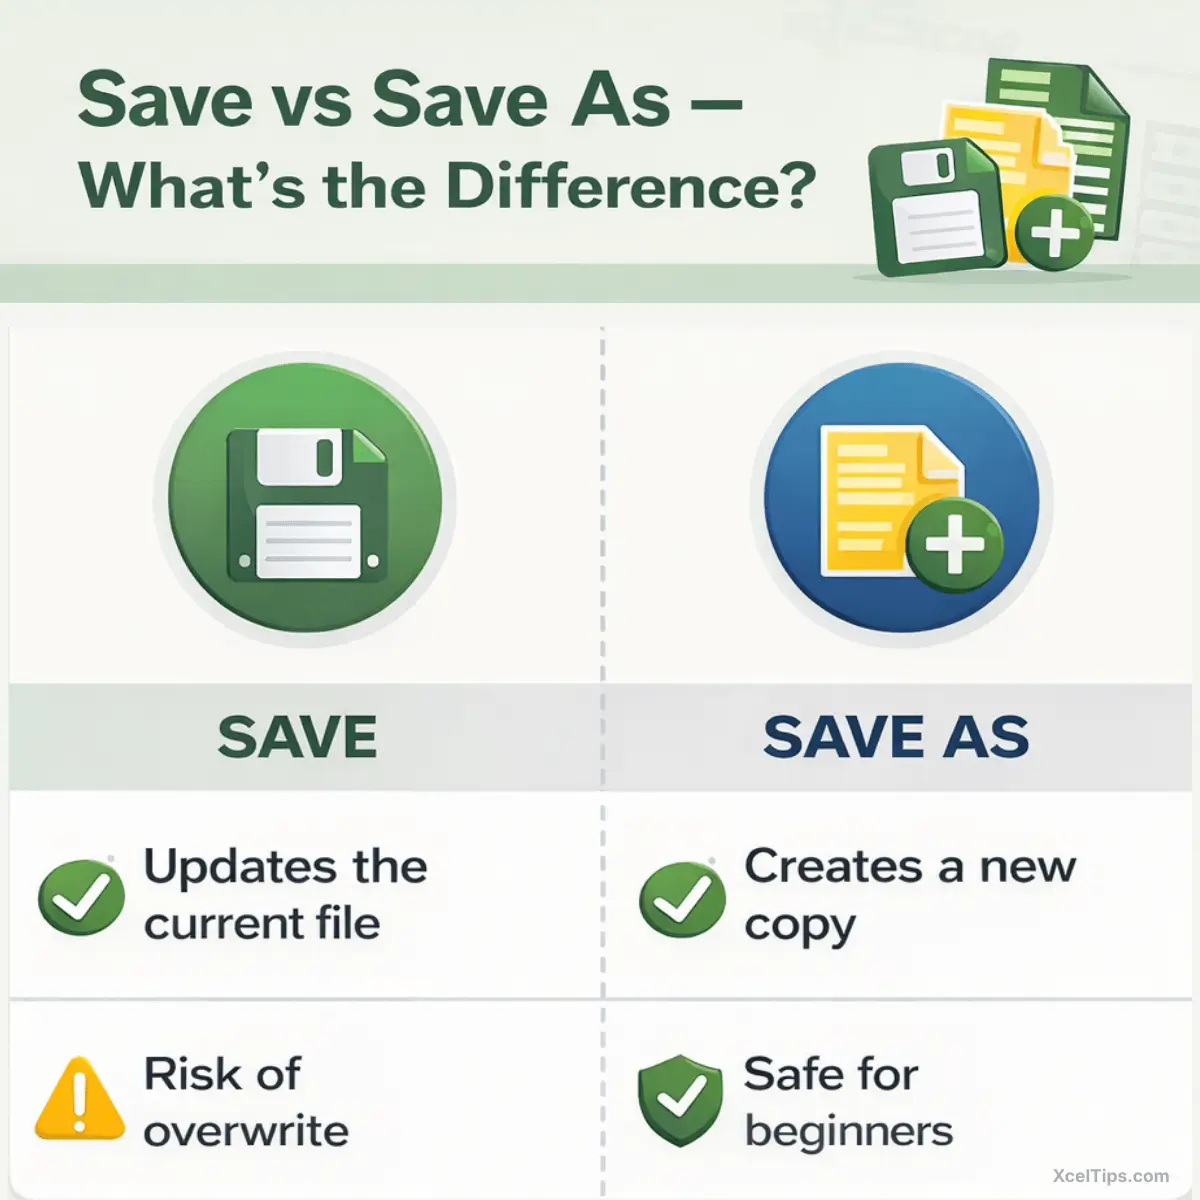
| Option | Purpose |
| Save | Updates the current file |
| Save As | Creates a new copy or changes format or location |
According to Microsoft’s official Excel documentation, Save updates the existing file, while Save As allows you to create a separate version.
Microsoft recommends using Save As when creating new versions of important files.
Best Practice:
Always create a backup before making structural changes to important workbooks.
Saving a New Excel File (First Time)
When you create a new file, Excel does not save it automatically.
Follow these steps to save the Excel file:
- Click the File tab in the top-left corner of Excel.
- Click Save As from the left panel.
- Then, click Browse to open the Windows File Explorer window.
- Enter the file name.
- Click Save.
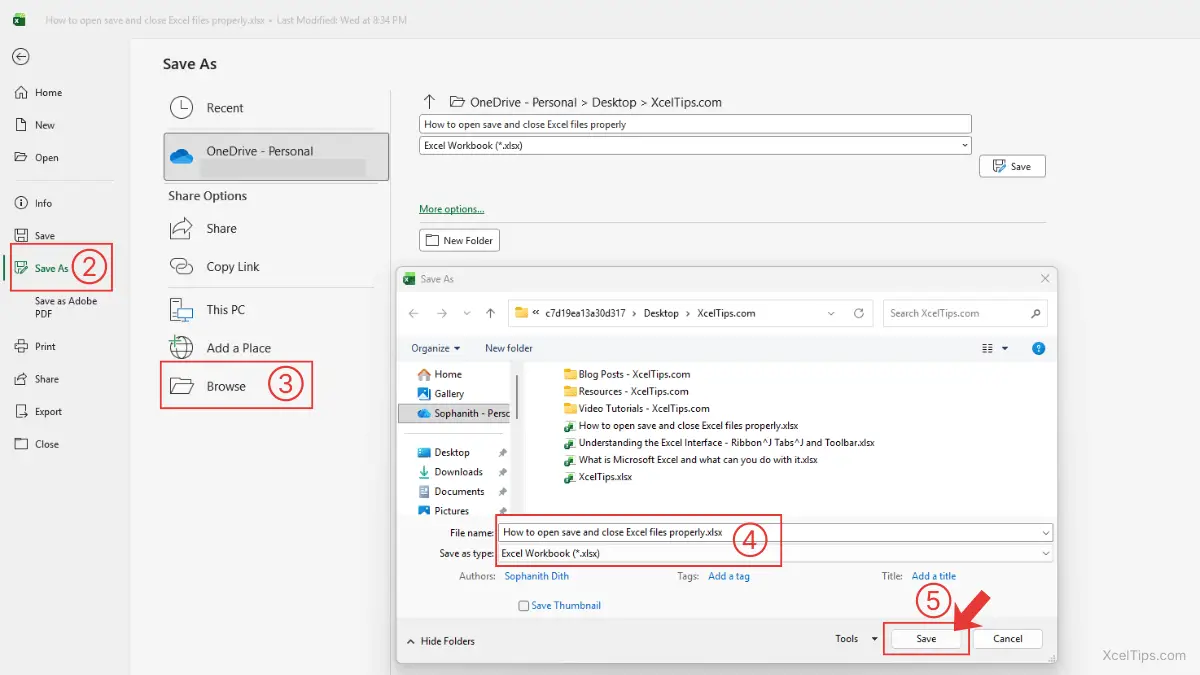
Use Save As to create and name a new workbook. Always select Excel Workbook (.xlsx) unless you have a specific reason to use another file format.
Tips for Beginners:
Always name your file clearly. Avoid names like Book1 or New File.
Saving Changes to an Existing File
If the file has already been saved, press Ctrl + S to quickly save any changes.
Tip:
Press Ctrl + S frequently while working.
Save As or Save a Copy (Very Important for Beginners)
If AutoSave is turned on in the Quick Access Toolbar, Excel will show the option Save a Copy when you save the file. If you are not sure where that setting appears, this beginner guide shows how to use the Quick Access Toolbar in Excel.
Save a Copy is commonly shown when the file is stored on OneDrive and AutoSave is turned on.
If AutoSave is turned off, Excel will show the traditional Save As option instead.
Although the names are different, Save As and Save a Copy perform the same action. They both create a new copy of your workbook instead of overwriting the original file.
If your file is stored on OneDrive, AutoSave may automatically save changes without asking. However, creating a copy is still recommended before making major edits.
Use Save As or Save a Copy when:
- You want to keep the original file unchanged.
- You’re experimenting or practicing.
- You’re creating versions (v1, v2, final).
Example file names:
Budget_January_V1.xlsxBudget_January_v2.xlsxBudget_January_Final.xlsx
This habit helps prevent accidental data loss.
Choosing the Correct File Type
Excel supports multiple file formats, but the most common are .xlsx, .xls, and .csv. Choosing the correct format ensures compatibility and prevents data loss when sharing files.
There are three commonly used formats:
- Excel Workbook (
.xlsx) Recommended for almost all cases - Excel 97–2003 Workbook (
.xls) Old format, avoid unless required - CSV (
.csv) Used for sharing data with other systems No formulas or formatting saved
For beginners, always use .xlsx unless you have a specific reason. Once your file is saved properly, you also need to know how to close it safely without losing changes.
How to Close Excel Files Safely
Closing an Excel file may look simple, but this is one of the most common places where beginners accidentally lose their work.
Before closing any file, always make sure your changes are saved. There are three safe and reliable ways to close a workbook.
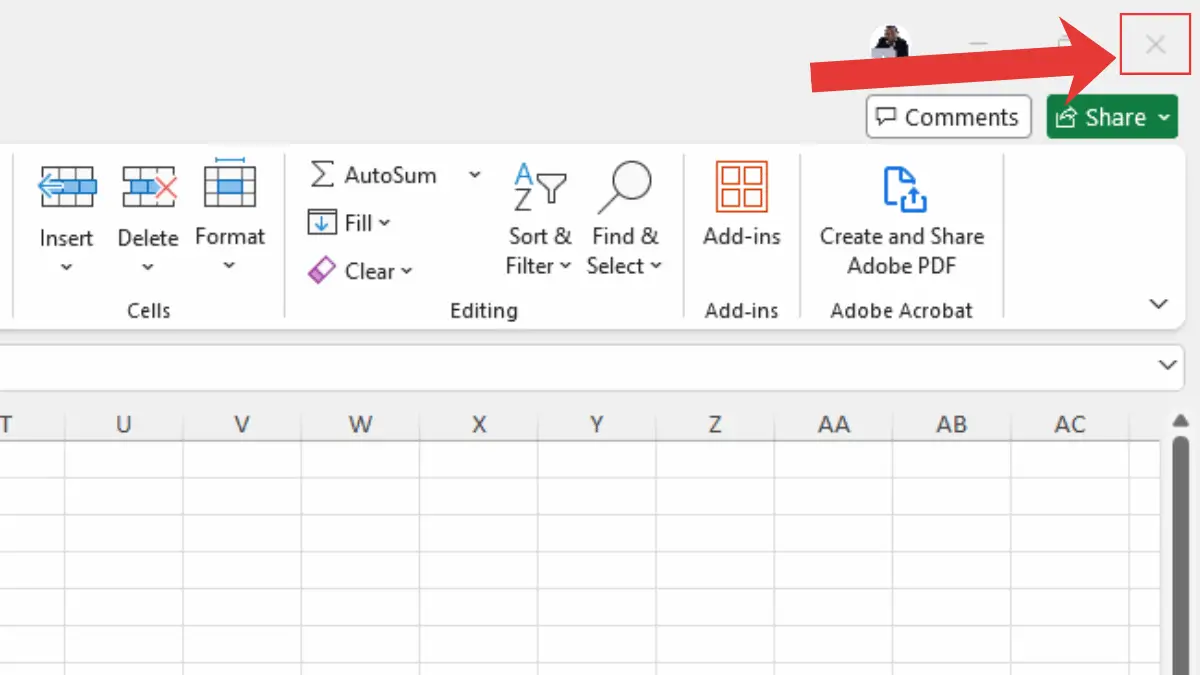
Method 1: Click the Close (X) Button
The easiest way to close a file is by clicking the Close (X) button. At the top-right corner of the Excel window, you will see three buttons:
- Minimize
- Maximize/Restore
- Close (X)
Click the Close (X) to close the Excel file.
Method 2: Use the File Menu
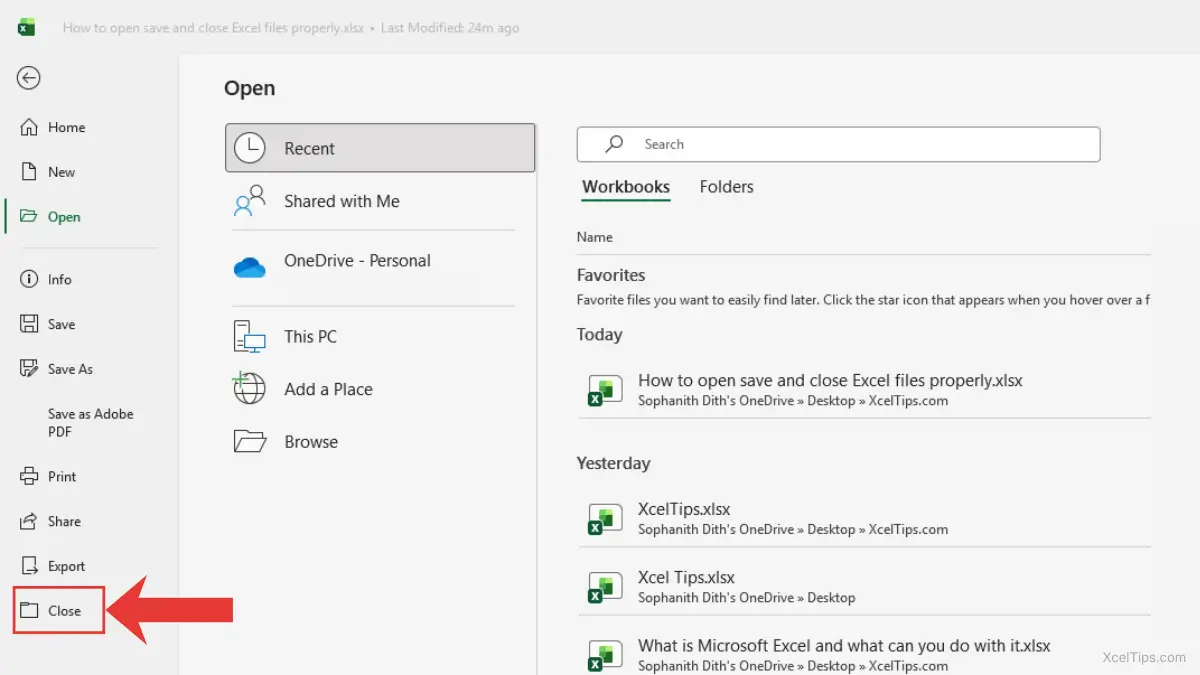
This method is slightly more controlled and is good when you want to close only the current workbook. To do this:
- Click File in the top-left corner. Then, Excel will show the Backstage view.
- In Backstage view, click Close.
This will:
- Close the current workbook.
- Keep Excel open.
This is useful when:
- You have multiple files open.
- You want to continue working in Excel after closing one file.
If you prefer working faster, you can close a workbook using a keyboard shortcut instead of navigating through the File menu.
Method 3: Use a Keyboard Shortcut
You can also close the active workbook using a keyboard shortcut.
Press Ctrl + W on your keyboard.
This closes only the current workbook. Excel will remain open if other workbooks are still open.
If this is the only workbook open, Excel will close completely.
Do not confuse Ctrl + W with Alt + F4. Ctrl + W closes the workbook, while Alt + F4 closes the entire Excel application.
Important:
If there are unsaved changes, Excel will display a save prompt before closing.
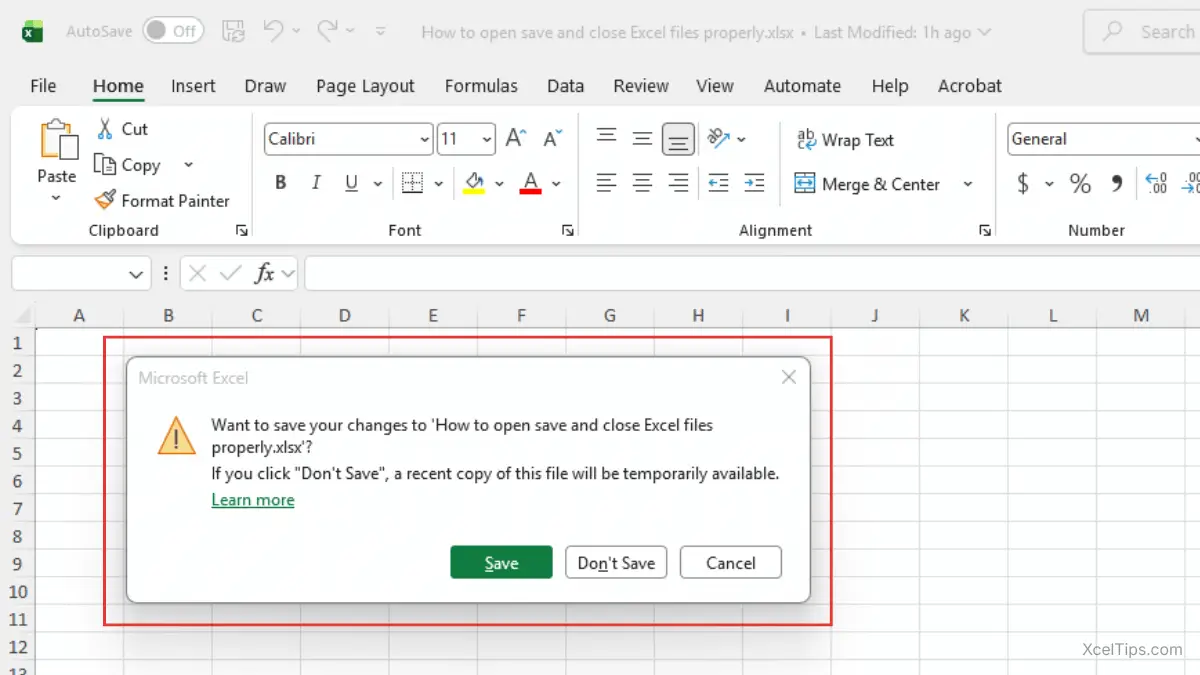
Understanding Save Prompts (Do Not Ignore This)
When closing a file, Excel may display a save prompt with three options:
- Save → Keeps your latest changes.
- Don’t Save → Closes the file without saving recent changes.
- Cancel → Returns you to the workbook.
Important:
Beginners often click Don’t Save by mistake. If you’re unsure, always click Save.
Avoiding mistakes is important, but building strong habits is even better. The following best practices will help you work safely and confidently every time.
Common Beginner Mistakes (And How to Avoid Them)
Even simple actions like saving and closing files can cause problems if you’re not careful. Below are the most common beginner mistakes, and how to prevent them.
Mistake 1: Not Knowing Where the File Is Saved
Many beginners save a file but later cannot find it.
- Always check the folder location in the Save As window before clicking Save.
- Use the Documents folder or create a dedicated folder like:
Documents → Excel Files - Give your file a clear, meaningful name (for example:
Sales_Report_March.xlsx)
Tip:
After saving, look at the top of Excel to confirm the file name.
Mistake 2: Overwriting Important Files
Editing an existing file and clicking Save can permanently replace the original version.
- Before making major changes, click File → Save As (or Save a Copy).
- Rename the new version (example:
Budget_v2.xlsx). - Keep older versions as backups.
Important:
This is especially important for financial or business files.
Mistake 3: Closing Excel Without Saving
Some beginners close Excel too quickly and lose their recent work. If that happens, here is how to recover unsaved Excel files before you start over.
- Press Ctrl + S before closing.
- Read save prompts carefully.
- If unsure, click Save, not Don’t Save.
Mistake 4: Saving in the Wrong Format
Choosing the wrong file type can cause formatting or formula issues.
- Use
.xlsxfor normal Excel work. - Avoid
.csvunless you specifically need plain data for importing into another system. - Do not use older formats like
.xlsunless required.
Note:
The default format in Excel 365 is .xlsx — keep it that way unless there’s a reason to change it.
Best Practices for Beginners
Now that you understand how to open, save, and close Excel files properly, it’s important to develop strong habits that protect your work.
Building good habits early will save you time, prevent data loss, and reduce frustration while learning Excel.
Save Your File Immediately
As soon as you create a new workbook:
- Click File → Save As
- Choose a folder
- Give the file a clear name
Do not wait until you finish working — unexpected shutdowns can happen.
Save Frequently While Working
Even after saving your file for the first time, you should continue saving regularly while you work.
- Press Ctrl + S every few minutes
- Save before closing Excel
- Save before making major changes
This simple habit greatly reduces the risk of accidental data loss.
Use Clear, Descriptive File Names
Avoid vague names such as:
Book1.xlsxNewFile.xlsx
Instead, use specific names like:
Monthly_Budget_January_2026.xlsxSales_Report_Q1.xlsx
Clear file names make your work easier to locate and manage later.
Keep Files Organized in Folders
Create a simple and logical folder structure. For example:
Documents → Excel Files → 2026 Projects
Organizing files into folders helps you find them quickly and keeps your work professional.
Let’s apply what you’ve learned with a short hands-on exercise.
Quick Practice
Follow these steps to practice what you’ve learned:
- Open Excel.
- Click Blank workbook.
- Type your name in cell
A1. - Click File → Save As → Browse.
- Save the file as:
Practice_File.xlsx. - Press Ctrl + S.
- Close the file using File → Close.
If Excel asks to save changes, click Save. This simple exercise helps reinforce safe file handling habits. Try completing this exercise without looking at the steps the second time.
Now let’s summarize the most important ideas before moving on.
Key Takeaways
Managing Excel files correctly is a foundational skill.
Remember:
- Always save your work early.
- Save frequently while working.
- Use Save As to avoid overwriting important files.
- Choose the correct file format (.xlsx for most situations).
- Read save prompts carefully before closing.
Strong file habits prevent most beginner Excel problems.
If you still have questions, the answers below will help clarify common beginner concerns.
Frequently Asked Questions (FAQs)
Here are some common questions beginners often have when learning how to open, save, and close Excel files, along with simple answers to help you avoid mistakes.
What is the difference between Save and Save As in Excel?
Save updates the current file. Save As creates a new copy or allows you to change the file name, format, or location.
Why did Excel not ask me to save before closing?
If AutoSave is enabled and your file is stored on OneDrive, changes may be saved automatically.
Can I recover a file if I clicked Don’t Save?
In most cases, no. Unsaved changes are lost unless AutoRecover was enabled.
What is the safest file format to use?
The .xlsx format is recommended for Excel 365 in most situations.
How often should I save my work?
Every few minutes, and always before closing Excel or making major changes.
Why does Excel show Save a Copy instead of Save As?
This usually happens when the workbook is stored online and AutoSave is being used.
Now that you’ve seen the most common questions and mistakes, let’s quickly recap what you’ve learned and how to apply it with confidence.
Conclusion
You now know how to open Excel files, save them correctly, and close them safely without losing changes. These simple file management habits will help you avoid some of the most common beginner mistakes in Excel.
Take a few minutes to practice these steps in your own workbook. Create a simple file, save it with a clear name, and try closing and reopening it. Repeating these actions helps build confidence and prevents mistakes later when working with important data.
This lesson is part of the Beginner Learning Path, a structured series designed to help you learn Microsoft Excel step by step from the basics.