Written By Sophanith Dith
Last Updated March 21, 2026
Applies to Microsoft Excel 365 (Windows only)
Part of the Beginner Learning Path
Module 1 Excel Fundamentals
Lesson 5 of 12
You’ve already learned what Microsoft Excel is used for and how to open, save, and close a workbook properly in the previous lesson. Now it’s time to take the next step in your beginner roadmap — understanding the Excel interface.
When you first open Microsoft Excel, the screen may feel overwhelming. The Excel interface includes the Ribbon, tabs, and toolbar — and understanding these parts is the first step toward using Excel confidently. In this beginner-friendly guide, you’ll learn exactly what each part of the Excel interface does and how to navigate it.
Why does this matter for beginners? Because every formula you enter, every table you build, and every chart you create starts with knowing where to click. If you understand the Excel interface, you can work faster, avoid confusion, and build strong Excel skills from the beginning.
Before we explore each section in detail, let’s start with a quick overview so you can see how everything fits together.
Quick Reference: Excel Interface Overview
Before exploring each section of the Excel interface individually, here’s a quick overview to help you see the big picture.
Definition:
The Excel interface is the visual layout of tools, tabs, buttons, and controls you use to work inside Microsoft Excel.
Purpose:
It helps you access formatting tools, formulas, data options, and workbook controls quickly.
Where to Find It:
When you open Excel, the interface appears automatically at the top and around your worksheet.
Mini Summary:
- Ribbon = The wide command area at the top of Excel.
- Tabs = The categories at the top of the Ribbon (Home, Insert, Data, etc.).
- Groups = Sections inside each Tab (Font, Alignment, Number, etc.).
- Commands = Individual buttons inside groups (Bold, Wrap Text, Merge & Center).
- Quick Access Toolbar = Small shortcut icons above the Ribbon.
- Worksheet Area = The grid where you enter data.
To make these parts easier to remember, the table below summarizes what each one does.
| Interface Part | What It Does |
|---|---|
| Ribbon | Main command bar containing Excel tools |
| Tabs | Categories that organize tools |
| Groups | Sections inside tabs that organize related commands |
| Commands | Individual buttons used to perform actions |
| Quick Access Toolbar | Shortcut icons for frequently used commands |
Now that you understand the overall structure, let’s take a closer look at the most important part — the Ribbon.
Excel Ribbon Explained
When you open Excel, the first major feature you’ll notice at the top of the screen is the Ribbon.
What Is the Ribbon?
The Ribbon is the central control panel of Excel. Almost every action you take begins here. It is the large horizontal bar at the top of Excel that contains commands organized into tabs and groups.
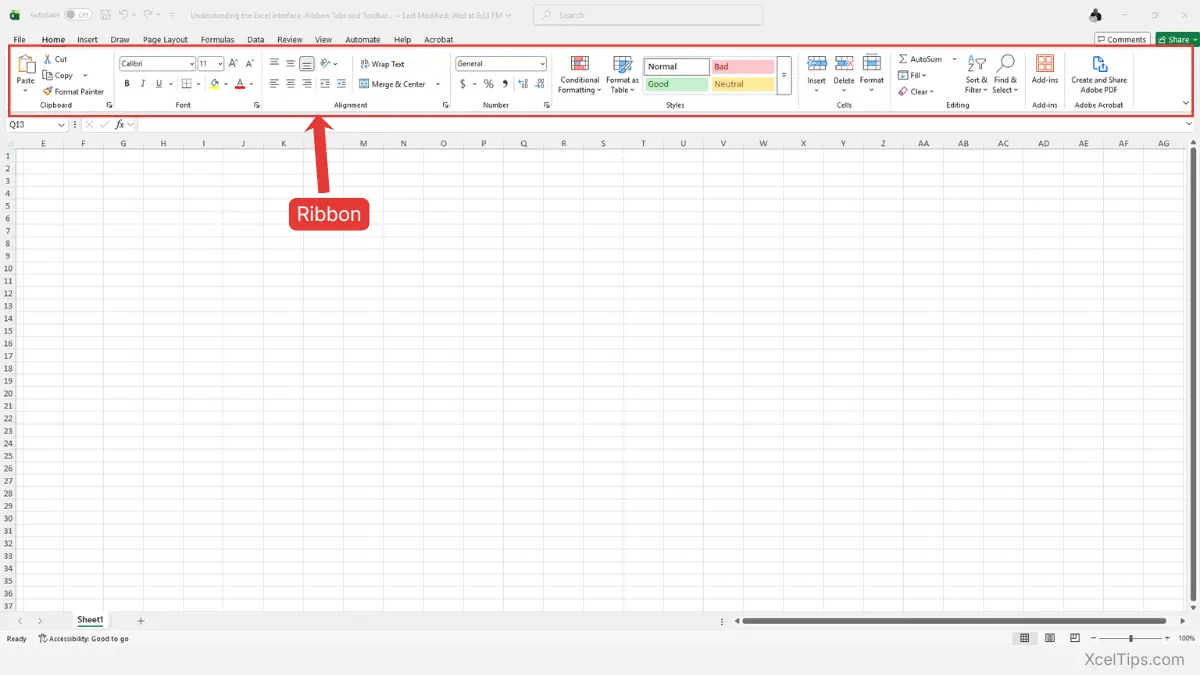
It stretches across the top of the Excel window, directly below the title bar.
Now that you know what the Ribbon is, let’s understand why it plays such an important role in your daily Excel tasks.
Why the Ribbon Matters
Without the Ribbon, you would not be able to:
- Format cells.
- Insert charts.
- Create formulas.
- Manage data.
- Print or save files.
In short, the Ribbon is your command center. Understanding its importance makes it easier to use confidently. So let’s see exactly how it works in practice.
If you later want to personalize the tools that appear in the Ribbon, see our guide on how to customize the excel ribbon (beginner guide).
How to Use the Ribbon (Step by Step)
To see how the Ribbon responds when you interact with it, follow these simple steps:
- Open Excel.
- Look at the top of the screen.
- Click any tab (for example, Home).
- Notice how tools appear underneath in organized groups.
For example, here’s how a typical navigation path looks:
Home tab → Font group → Bold command.
If you click the Bold button in the Font group, the selected cell text becomes bold.
Before moving forward, keep this important point in mind:
Beginner Warning:
Do not confuse the Ribbon with the worksheet grid. The Ribbon is always at the top — the grid is where your data lives.
If the worksheet grid still feels unclear, this guide explains cells, rows, columns, and worksheets in Excel in a beginner-friendly way.
Now let’s apply this in a real workbook so you can see it in action.
Example in Real File
Open a practice file called XcelTips_Practice.xlsx.
- Type
January Salesin cellA1. - Select cell
A1. - Go to Home tab on the Ribbon.
- In the Font group, click Bold.

You just used the Ribbon to format a cell as bold.
Once you’ve tried this yourself, you’ll start recognizing how the Ribbon organizes tools. However, beginners often make a few common mistakes.
Common Beginner Mistakes
As you practice using the Ribbon, watch out for these common beginner mistakes:
- Thinking tools disappear (they only change when you switch tabs).
- Not selecting a cell before applying formatting.
- Clicking the wrong tab and getting confused.
One common concern beginners have is thinking the Ribbon has disappeared completely. In most cases, it’s simply minimized — and it’s very easy to restore.
How to Restore or Show the Ribbon If It Disappears
If your Ribbon suddenly looks smaller or only shows the tab names (like Home, Insert, Data), don’t worry. Excel has not removed your tools: the Ribbon is simply collapsed to save space.
Here’s how to restore it.
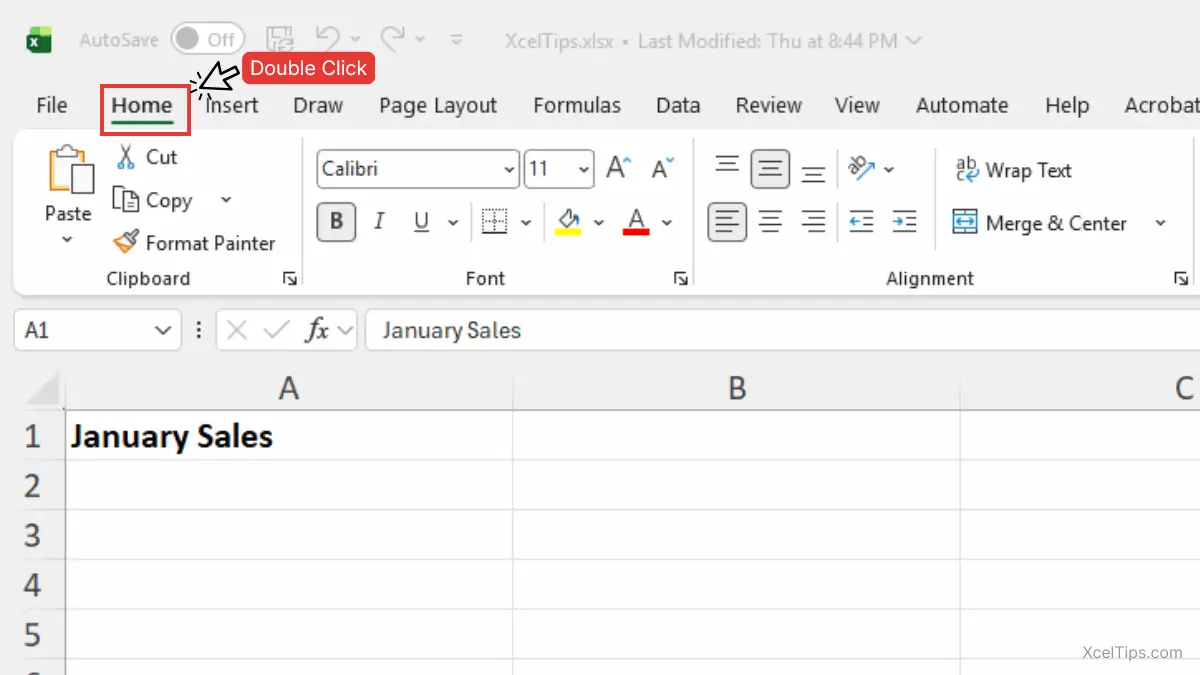
Method 1: Double-Click a Tab (Quickest Way)
This is the fastest method:
- Double-click any tab at the top (for example, Home).
- The full Ribbon with command groups will appear again.
- It will stay expanded until you double-click a tab again.
Method 2: Keyboard Shortcut (Fastest Option)
You can also toggle the Ribbon using a keyboard shortcut:
Press: Ctrl + F1.
Press it again to expand the Ribbon back. This shortcut quickly collapses or restores the Ribbon without using the mouse.
Beginner Tip:
If you only see the tab names but not the commands underneath, the Ribbon is just minimized — it has not been deleted or removed.
Method 3: Use the Ribbon Display Options Button
If you want the Ribbon to always remain visible and avoid hiding it again later, follow these steps:
- Look at the top-right corner of the Excel window. Click the Ribbon Display Options icon (next to the Minimize button).
- Select Always show Ribbon.
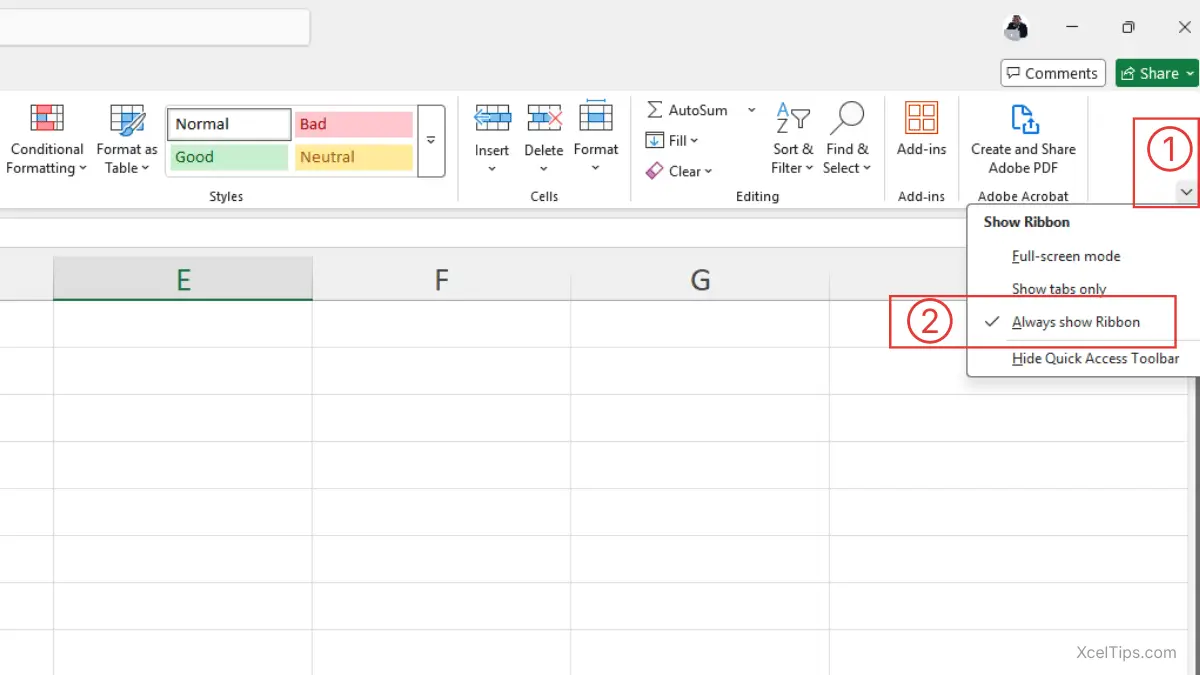
Your Ribbon will now stay fully expanded. For more detailed information about Ribbon display settings, you can visit Microsoft’s official guide on showing or hiding the Ribbon in Office.
Now that you know how to restore the Ribbon if it disappears, let’s take a closer look at the tabs that organize everything inside it.
Understanding Excel Tabs
What Are Excel Tabs?
If the Ribbon is the control center, tabs are the categories that organize its tools. Tabs are the labeled sections across the top of the Ribbon. Common default tabs in Excel include:
- File
- Home
- Insert
- Draw
- Page Layout
- Formulas
- Data
- Review
- View

Each tab organizes tools by task. Knowing what tabs are is helpful, but understanding why Excel uses them makes navigation much easier.
Why Tabs Matter
Tabs prevent clutter. Instead of showing all commands at once, Excel groups related tools together.
| Task | Best Tab |
|---|---|
| Format text | Home |
| Create a chart | Insert |
| Sort/filter data | Data |
This structure makes Excel logical and organized.
Once you understand their purpose, using them becomes much more intuitive. Let’s see how they work in action.
How Tabs Work (Step by Step)
Follow these steps to see how switching tabs changes your available tools:
- Click the Home tab.
- Observe formatting tools.
- Click the Insert tab.
- Notice chart and table options.
- Click the Formulas tab.
- See function categories like Financial, Logical, and Text.
Each time you click a tab, the Ribbon updates.
Important:
Tabs do not change your data. They only change the available tools.
Practical Example
Open XcelTips_Practice.xlsx, then follow these steps:
- In cell
A1, typeCategory, format as bold. - In cell
B1, typeNumber of Posts, format as bold. - In cells
A2toA5, enter the following categories:A2: Excel TutorialsA3: Excel Tips & TricksA4: Excel FormulasA5: Excel Templates - In cells
B2toB5, enter the following numbers:B2: 100B3: 150B4: 200B5: 250 - Select the entire data range
A1:B5. - Go to the Insert tab.
- In the Charts group, click Insert Column or Bar Chart, then choose Clustered Column under 2-D Column.
You’ve just created a column chart by switching to the Insert tab.

While tabs are powerful, beginners sometimes get confused when switching between them.
Common Mistakes with Tabs
When exploring different tabs for the first time, beginners often make these common mistakes:
- Searching for a chart inside the Home tab.
- Forgetting which tab contains formulas.
- Assuming tools are missing.
Now that tabs make sense, let’s explore the groups inside each tab.
Ribbon Groups Explained
If tabs organize tools into broad categories, groups break those tools into smaller, related sections. This makes the Ribbon easier to scan and navigate.
What Are Ribbon Groups?
Inside each tab, Excel organizes tools into smaller sections called groups. These groups make navigation even more efficient.
For example, inside the Home tab:
- Clipboard group
- Font group
- Alignment group
- Number group
- Styles group
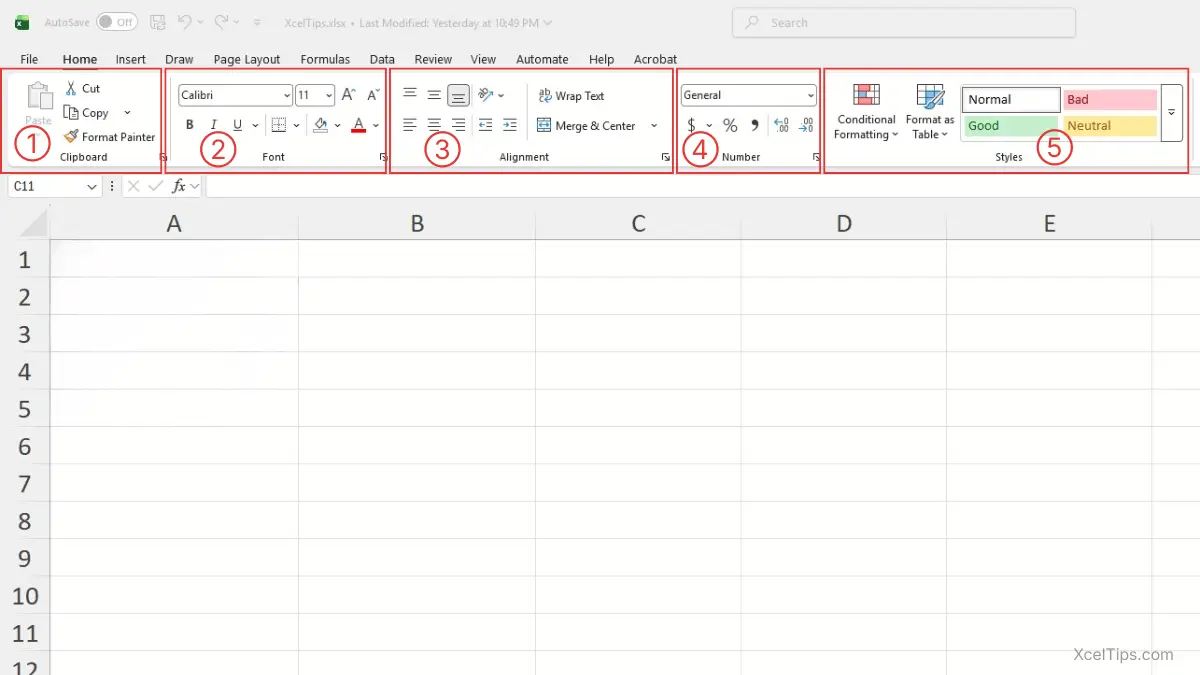
These group labels appear at the bottom of each section in small text.
Understanding what groups are is helpful, but understanding why they exist makes working in Excel much faster.
Why Groups Matter
Groups improve efficiency. Instead of scanning dozens of buttons across the entire Ribbon, you simply look for the labeled section that matches your task.
For example:
- Want to change text style? → Look in the Font group.
- Want to center content? → Look in the Alignment group.
This structured layout reduces confusion and speeds up your workflow.
Now let’s see how to identify these groups visually.
How to Identify Groups
To identify groups, follow these steps:
- Click the Home tab.
- Look at the bottom of each tool section in the Ribbon.
- Notice small labels such as Font, Alignment, and Number.
These labels define each group.
Once you can recognize groups quickly, navigating Excel becomes much easier.
Real Beginner Example
Let’s apply this in a simple worksheet.
Open XcelTips_Practice.xlsx, then follow these steps:
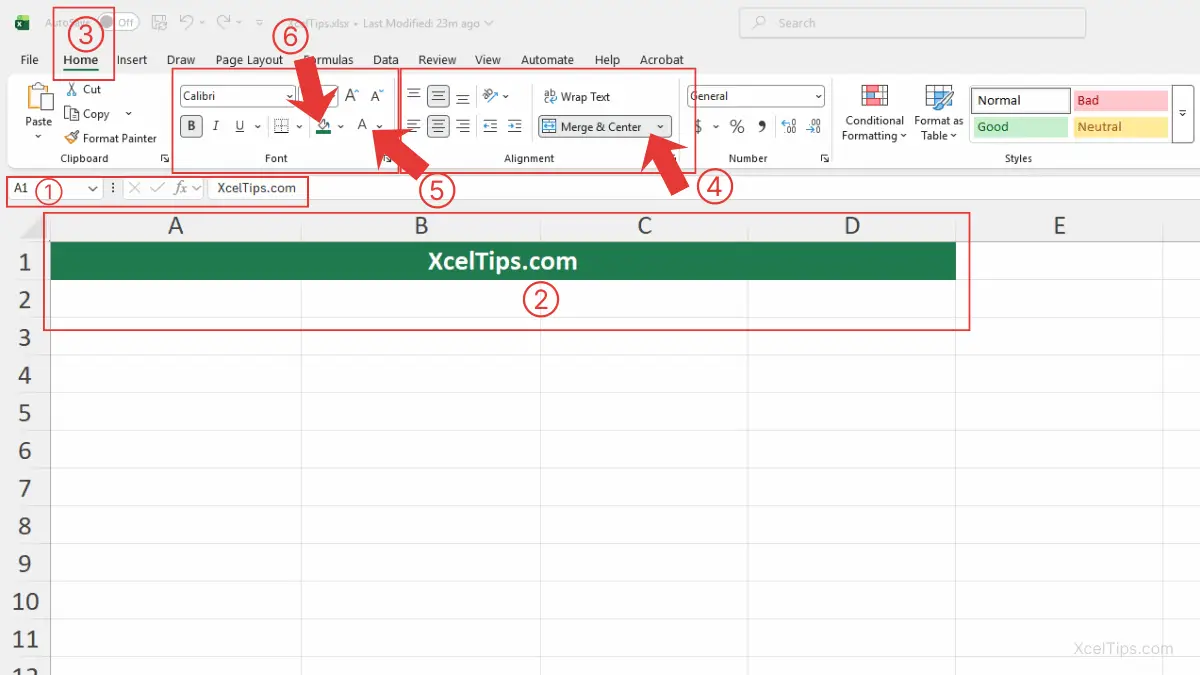
- In cell
A1, typeXcelTips.com. - Select cells
A1:D1. - Go to the Home tab.
- In the Alignment group, click Merge & Center.
- In the Font group, click Font Color and choose White.
- In the same group, click Fill Color and choose Green.
Your header is now centered across multiple columns with a clean color design.
Beginner Warning:
Avoid using Merge & Center excessively. It can create issues when sorting or filtering data later.
Now that you understand how tabs organize tools and groups organize commands within those tabs, let’s explore another helpful part of the interface — the Quick Access Toolbar.
Understanding the Quick Access Toolbar
While tabs organize tools by category, the Quick Access Toolbar gives you instant access to the commands you use most often.
What Is the Quick Access Toolbar?
The Quick Access Toolbar is the small row of icons located at the top-left corner of Excel.
By default, it may include:
- Autosave (if enabled)
- Save
- Undo
- Redo
Understanding what this toolbar does helps you work more efficiently.
Why It Matters?
The Quick Access Toolbar provides one-click access to frequently used commands without switching tabs. This saves time, especially when working on larger projects or performing repetitive tasks.
Even better, you can customize it to match your personal workflow.
For a more detailed walkthrough, see how to use the Quick Access Toolbar in Excel effectively.
Let’s see how to adjust it.
How to Customize It
You can add commands in two simple ways.
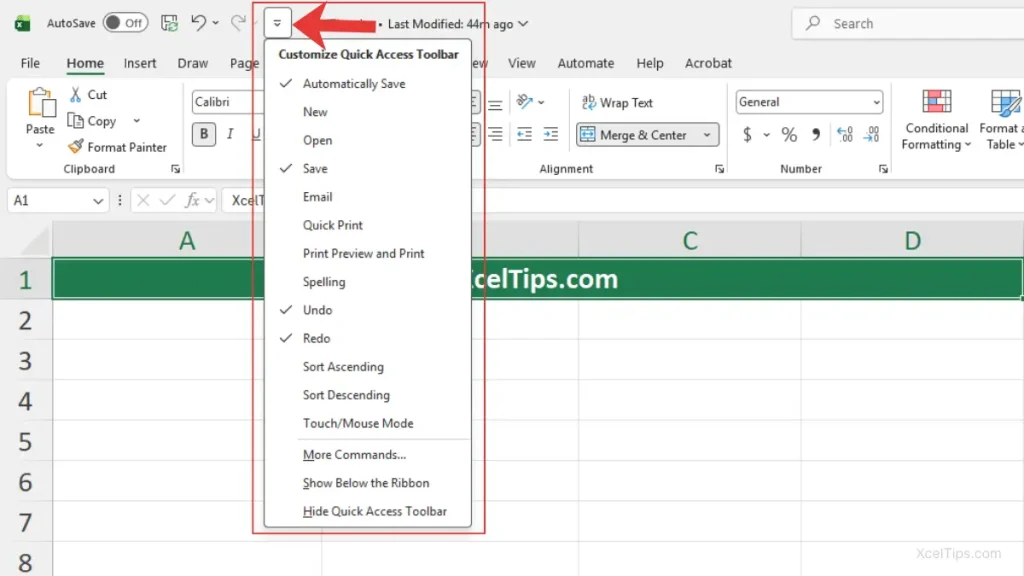
Method 1: Use the Toolbar Dropdown
To quickly add common commands directly from the Quick Access Toolbar menu, follow these steps:
- Click the small dropdown arrow at the end of the Quick Access Toolbar.
- Select a command such as New, Open, or Quick Print.
The selected command will immediately appear in the toolbar.
Method 2: Add Commands Directly from the Ribbon
If the command you want isn’t listed in the dropdown menu, you can add it directly from the Ribbon:
- Right-click any command in the Ribbon.
- Click Add to Quick Access Toolbar.
The command will now remain accessible at the top of the screen.
Productivity Tip:
• Only add commands you use frequently. Adding too many icons can make the toolbar cluttered and harder to scan.
• If you frequently use commands like Format Painter, Freeze Panes, or Sort, add them to the Quick Access Toolbar so you can access them with a single click instead of switching tabs.

Now that you understand how to customize the Quick Access Toolbar, you’ve explored all the major parts of the Excel interface. Let’s bring everything together and see how these components work as one complete system.
How All Parts of the Excel Interface Work Together
The real power of the Excel interface comes from how its parts work together seamlessly. Each component supports the others to help you complete tasks efficiently.
When working in Excel:
- You select a cell or data range in the worksheet.
- You use the Ribbon tabs to locate the right category of tools.
- You choose commands from the appropriate group.
- You use the Quick Access Toolbar for shortcuts to frequently used actions.
Everything is connected. For example, imagine creating a chart:
- Select your data.
- Click the Insert tab.
- In the Charts group, choose a chart type.
- Switch to the Home tab to apply formatting if needed.
By understanding how the Ribbon, tabs, groups, and toolbar interact, you can move confidently between tools without feeling lost.
Understanding how these interface elements work together helps you navigate Excel more confidently. To reinforce what you’ve learned, try this short practice exercise.
Quick Practice
Open a practice workbook and follow these steps to apply what you’ve learned:
- Open
Xceltips_Practice.xlsx. - Type
Monthly Budgetin cellA1. - Apply: Home tab → Font group → Bold command.
- Select
A1:C1, then Home tab → Alignment group → Merge & Center. - Enter 3–4 numbers in column
B. - Then, Insert tab → Charts group → Column Chart.
You’ve now applied the Ribbon, tabs, groups, and Quick Access Toolbar in a real scenario. Before moving on, let’s quickly summarize the most important points you should remember from this lesson
Key Takeaways
Understanding the Excel interface is the foundation of working confidently in Excel.
Here’s what you should remember:
- The Ribbon is the main command center at the top of Excel.
- Tabs organize tools by task (Home, Insert, Data, etc.).
- Groups divide each tab into smaller labeled sections (Font, Alignment, Number).
- The Quick Access Toolbar gives you fast access to frequently used commands.
- Switching tabs changes available tools — it does not change your data.
When you understand how these parts connect, Excel becomes logical instead of overwhelming.
If anything still feels unclear, the following questions and answers may help reinforce your understanding.
Frequently Asked Questions (FAQs)
If you still have a few questions about how the Excel interface works, the answers below will help clarify common beginner concerns.
Why does the Ribbon change when I click a different tab?
Each tab contains tools related to a specific task. When you switch tabs, Excel updates the Ribbon to display the commands associated with that category.
Can I hide the Ribbon?
Yes. Click the Ribbon Display Options button in the top-right corner of Excel and choose your preferred view. You can also press Ctrl + F1 to collapse or expand the Ribbon.
What if I accidentally remove something from the Quick Access Toolbar?
Click the dropdown arrow at the end of the Quick Access Toolbar and reselect the command from the list. You can also right-click the command in the Ribbon and choose Add to Quick Access Toolbar.
Why do I only see tab names but not the commands underneath?
The Ribbon is likely minimized. Double-click any tab or press Ctrl + F1 to restore the full command groups.
Can I customize which tabs appear in Excel?
Yes. Right-click anywhere on the Ribbon and select Customize the Ribbon to show or hide specific tabs based on your preferences.
Where is the Quick Access Toolbar located in Excel?
The Quick Access Toolbar is located in the top-left corner of Excel above the Ribbon. It usually contains shortcuts such as Save, Undo, and Redo.
Do all Excel versions have the Ribbon?
Yes. Modern versions of Excel, including Excel 365, use the Ribbon interface to organize commands and tools.
With these common questions addressed, let’s briefly summarize what you’ve learned and how to continue building your Excel skills.
Conclusion
Understanding the Excel interface is an important first step toward using Excel confidently. In this lesson, you learned how the Ribbon, Tabs, Groups, and Quick Access Toolbar work together to organize the tools you use every day.
Take a few minutes to practice inside your own workbook. Try switching between tabs, exploring different groups, and applying simple formatting. The more you interact with the interface, the more comfortable Excel will feel.
This lesson is part of the Beginner Learning Path, a structured series designed to help you learn Microsoft Excel step by step from the basics.
← Previous Lesson
How to Recover Unsaved Excel Files (Step-by-Step Guide for Beginners)