Written By Sophanith Dith
Last Updated April 28, 2026
Applies to Microsoft Excel 365 (Windows only)
Have you ever typed a long name, date, or number in Excel and noticed that it gets cut off or hidden inside the cell? Instead of dragging column borders or guessing the right size manually, you can use AutoFit. In this quick guide, you will learn how to autofit in Excel so columns and rows resize automatically to fit your content.
AutoFit is useful because it saves time and keeps your worksheet easier to read. It works especially well when you are cleaning imported data, preparing a simple report, or adjusting a worksheet before sharing it.
Before using the steps, it helps to see why AutoFit is such a useful shortcut for everyday worksheets.
Why AutoFit Is Useful in Excel
AutoFit quickly adjusts the size of rows or columns based on the content inside them. This means you do not have to manually drag borders until the text looks right.
It is especially helpful when your worksheet has long text labels, wider numbers, dates, or wrapped text. Instead of learning how to change the width of a column in Excel by trial and error, you can use AutoFit to let Excel choose a better width automatically.
Microsoft also explains how to change the column width and row height in Excel, including AutoFit options for columns and rows.
For beginners, this is one of the easiest layout tricks to learn because the result is visible immediately.
The most common AutoFit task is fixing column width, especially when long text or numbers are cut off.
How to AutoFit Columns in Excel Using the Mouse
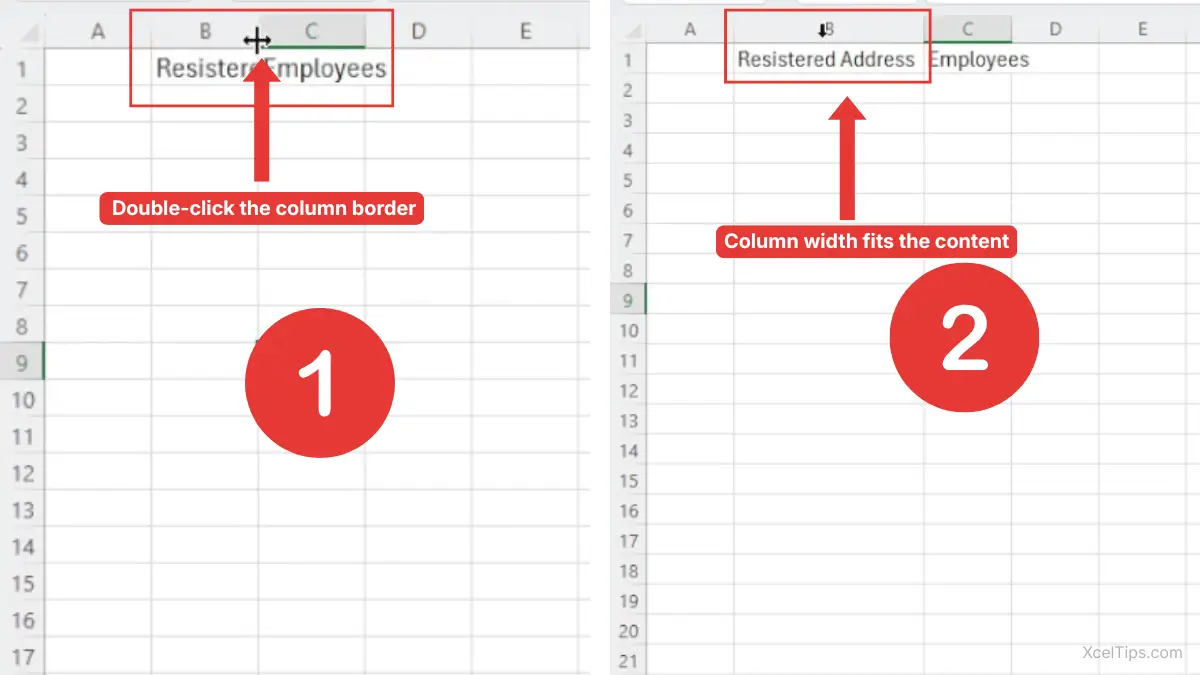
AutoFitting columns makes each selected column wide enough to show the longest visible entry inside that column. This is the fastest way to fix cut-off text or numbers.
To autofit one column using the mouse:
- Move your pointer to the column header, such as
A,B, orC. - Place the pointer on the right border of the column header.
- When the pointer changes to a double-sided arrow, double-click.
- Excel automatically adjusts the column width to fit the content.
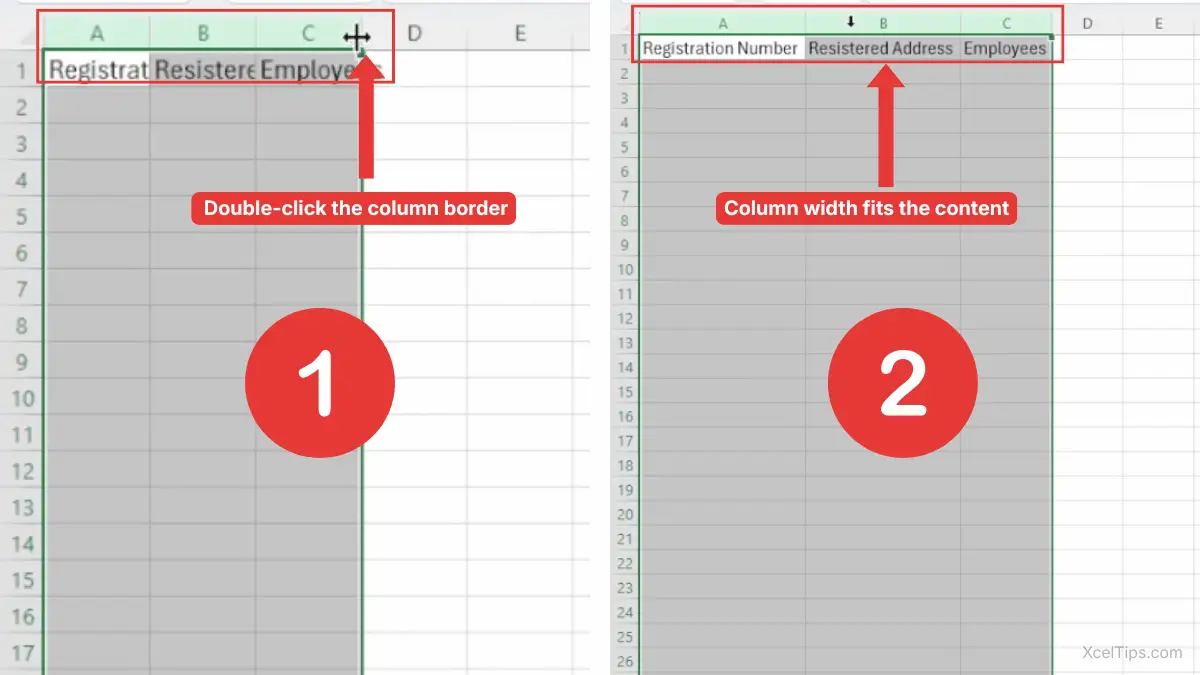
You can also autofit multiple columns at once:
- Select the columns you want to resize.
- Move your pointer to the right border of any selected column header.
- Double-click the border.
- Excel applies AutoFit to all selected columns.
This is the most direct answer to how to autoFit columns in Excel, especially when you want a quick fix without opening menus.
Once your columns fit properly, the next common problem is row height.
How to AutoFit Rows in Excel Using the Mouse
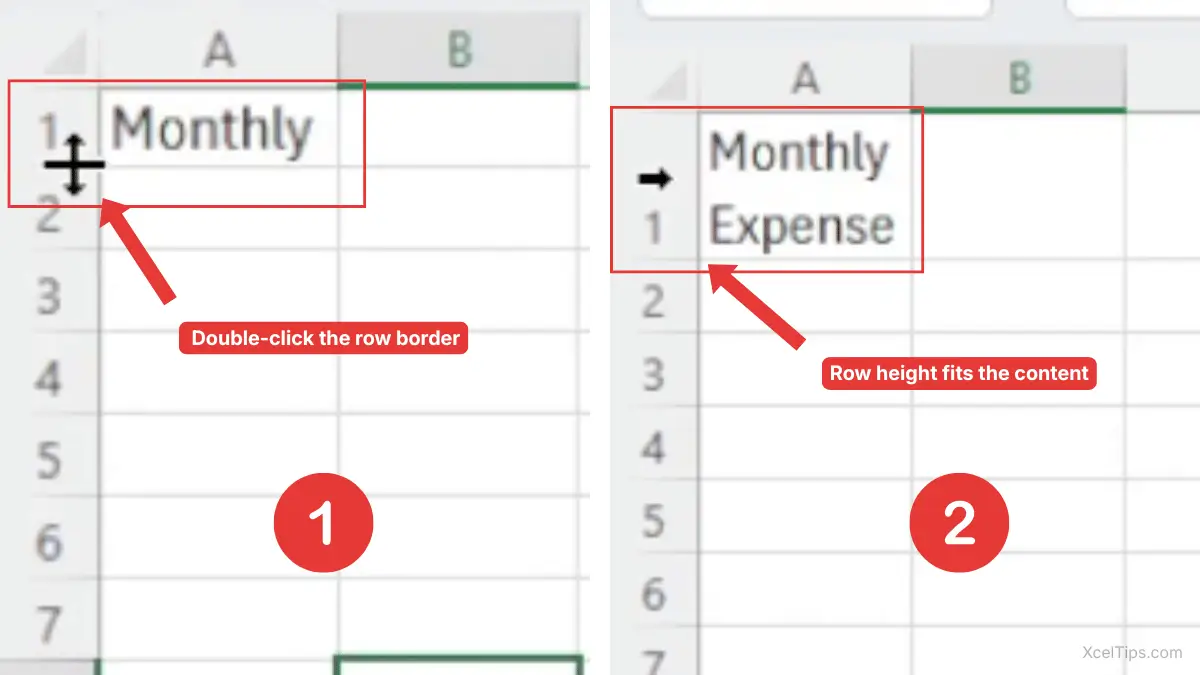
AutoFitting rows adjusts the row height so the content inside the row can be displayed properly. This is useful when cells contain wrapped text or multiple lines.
To autofit one row:
- Move your pointer to the row number on the left side of the worksheet.
- Place the pointer on the bottom border of the row number.
- When the pointer changes to a double-sided arrow, double-click.
- Excel adjusts the row height to fit the content.
To autofit multiple rows:
- Select the row numbers for the rows you want to resize.
- Move your pointer to the bottom border of any selected row number.
- When the pointer changes to a double-sided arrow, double-click.
- Excel adjusts the height of all selected rows to fit their content.
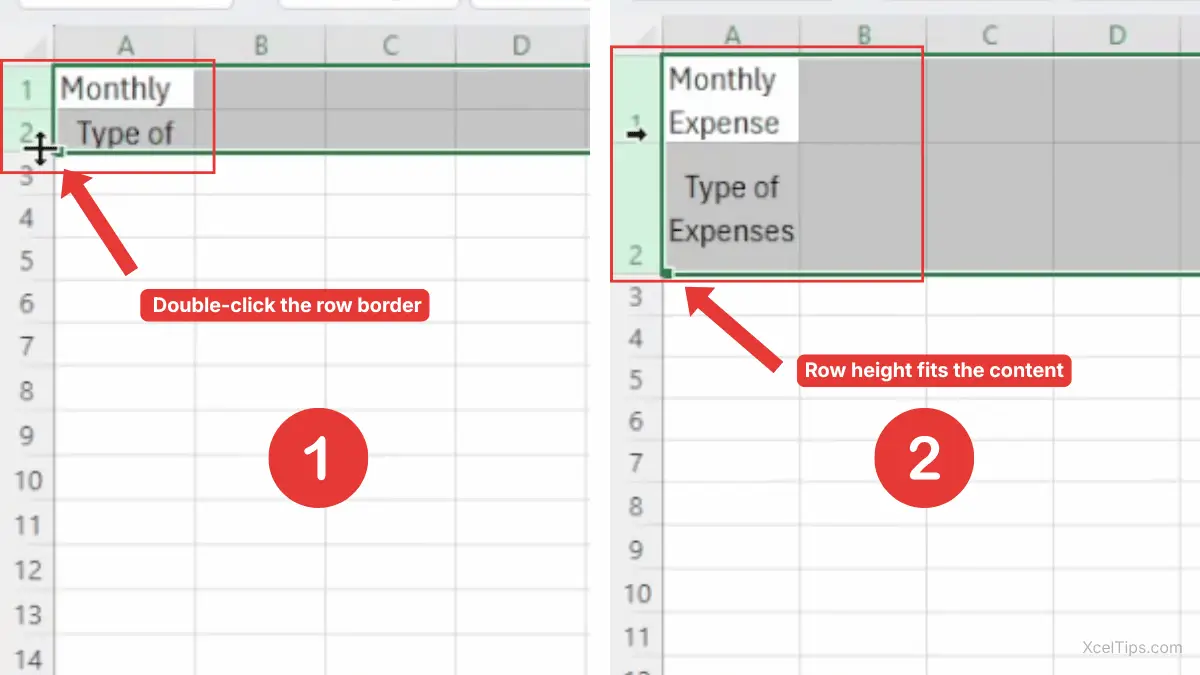
This is helpful when several rows contain wrapped text or longer content that needs more vertical space.
This is the easiest way to autofit rows in Excel when wrapped text or longer entries need more space. It is also faster than guessing how to change the height of a row in Excel by dragging.
The mouse method is fast, but the Ribbon method is useful when you prefer menu commands.
How to AutoFit in Excel from the Home Tab
The Home tab gives you another way to use AutoFit. This method is useful if you prefer menu commands instead of double-clicking row or column borders.
AutoFit Columns from the Home Tab
Use this method when you want to adjust selected columns from the Ribbon.
To autofit columns from the Home tab:
- Select the column or columns you want to adjust.
- Go to the Home tab.
- In the Cells group, click Format.
- Choose AutoFit Column Width.
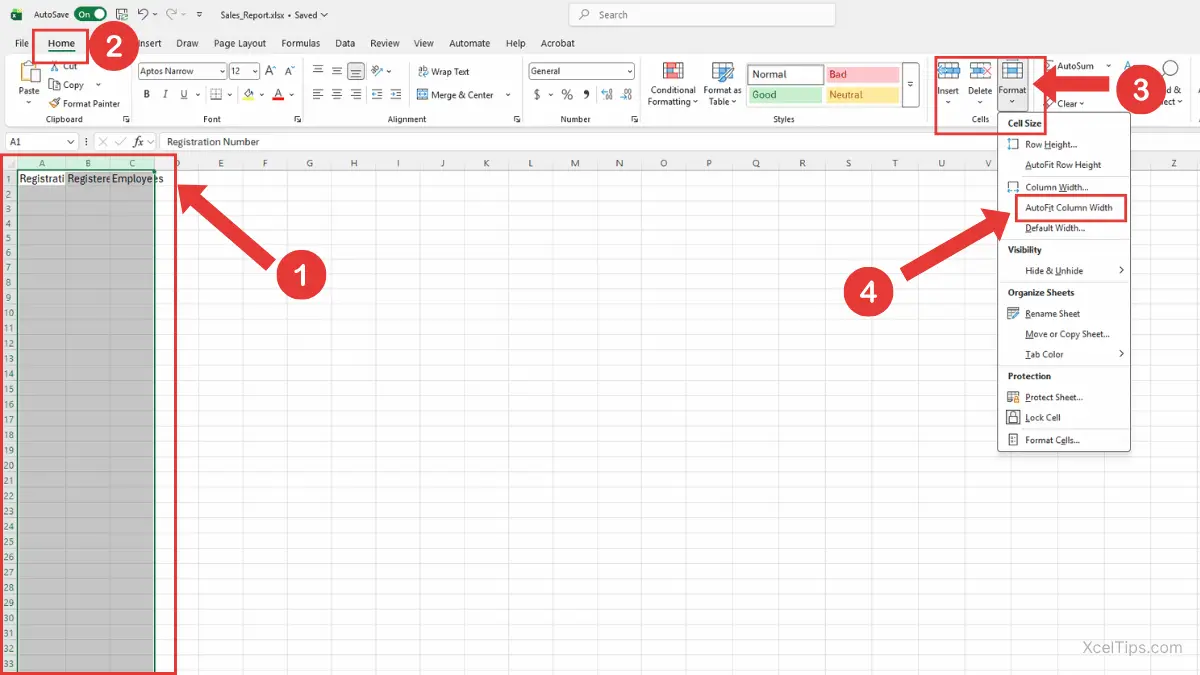
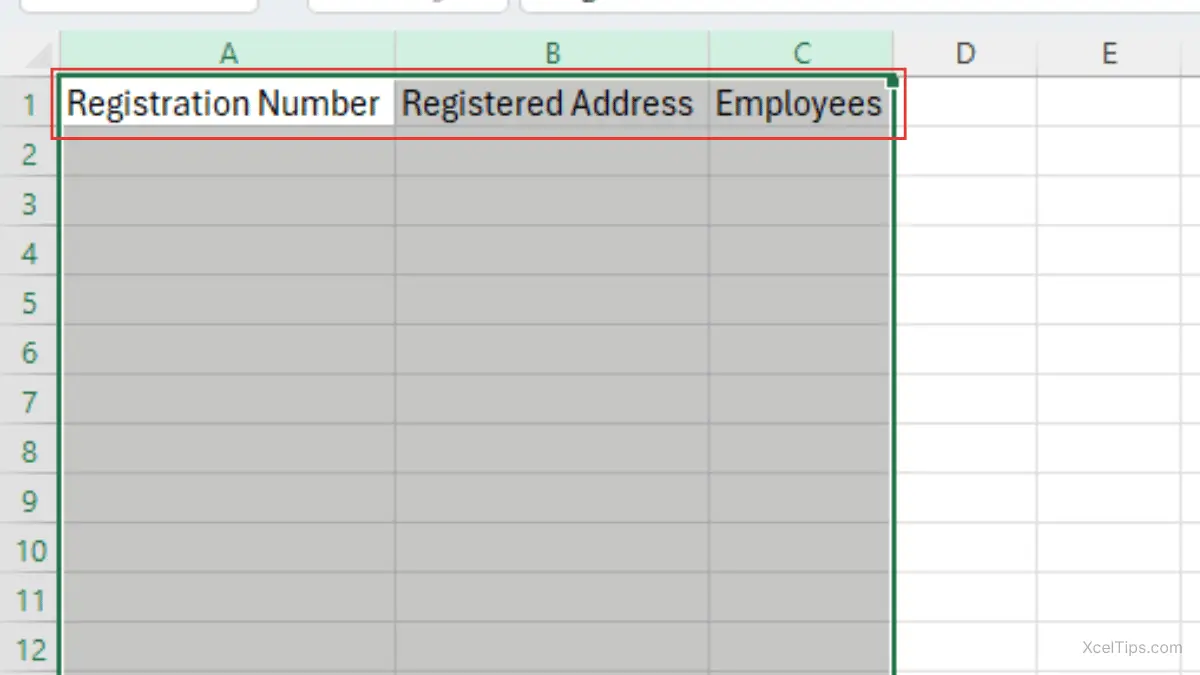
After you choose AutoFit Column Width, Excel widens the selected column so the full cell content is visible, as shown below.
AutoFit Rows from the Home Tab
You can use the same Format menu to adjust row height when text is wrapped or hidden vertically.
Steps:
- Select the row or rows you want to adjust.
- Go to the Home tab.
- Click Format in the Cells group.
- Choose AutoFit Row Height.
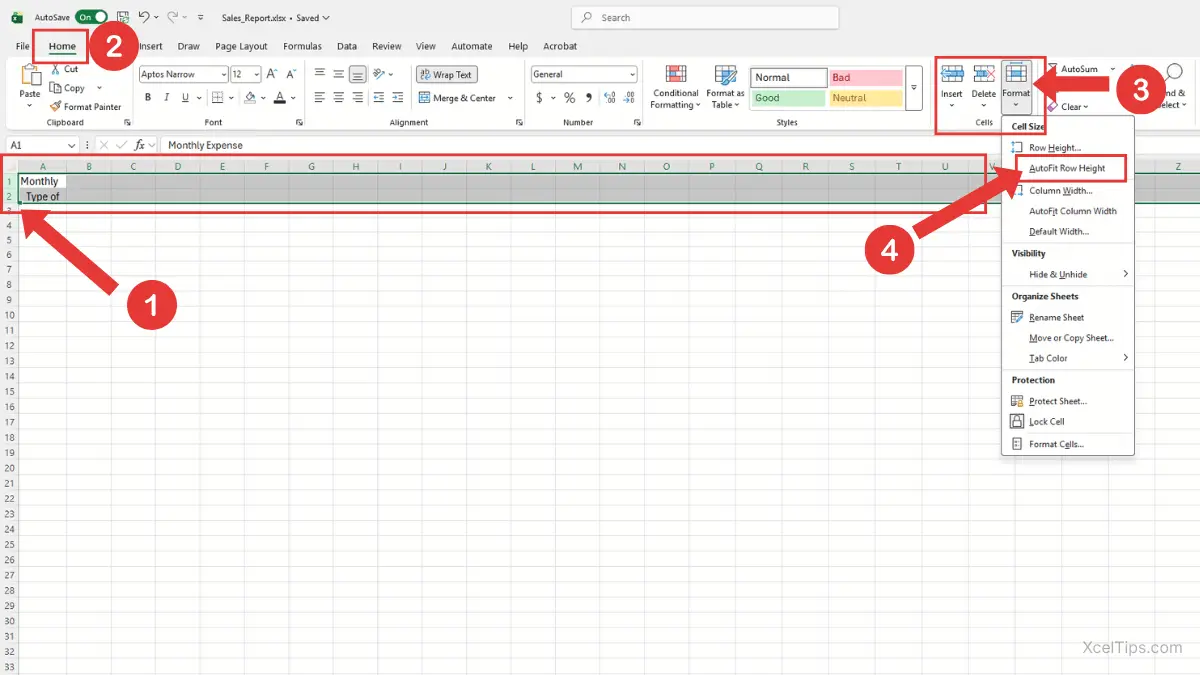
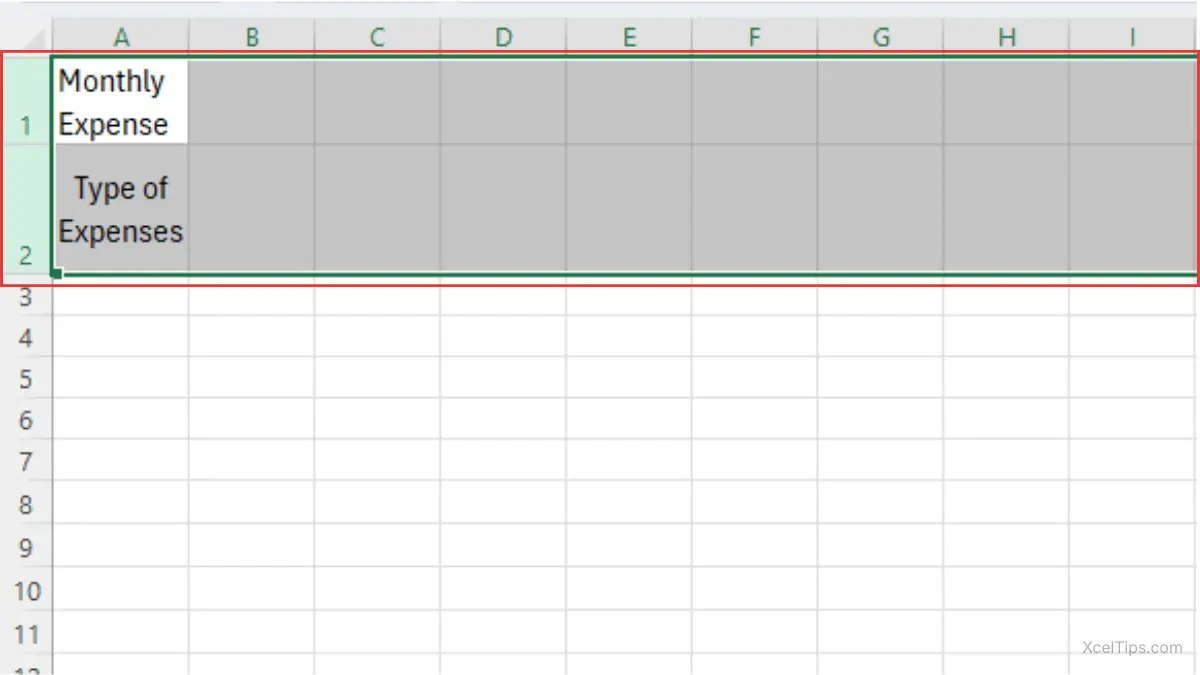
After you choose AutoFit Row Height, Excel adjusts the selected row so the full cell content is visible, as shown below.
This method is slower than double-clicking, but it is very clear for beginners because the command names explain exactly what Excel will do.
If you use AutoFit often, there is also a faster keyboard option.
AutoFit Shortcut in Excel
Excel does not have a simple Ctrl shortcut for AutoFit, but it does have Ribbon keyboard shortcuts. These shortcuts are useful when your hands are already on the keyboard.
Use these shortcuts by pressing the keys one after another, not all at the same time.
| Task | Shortcut |
|---|---|
| AutoFit column width | Alt, H, O, I |
| AutoFit row height | Alt, H, O, A |
Important Note:
Press the keys one after another, not all at the same time.
For example, to AutoFit selected columns, select the columns first, then press Alt, H, O, I in order.
This is a helpful faster variation, but beginners may find the double-click method easier to remember at first.
Once you know the mouse, Ribbon, and keyboard options, it helps to know when AutoFit is worth using.
When to Use AutoFit
AutoFit is best when your worksheet looks messy because the cell content does not fit neatly. It gives you a cleaner layout without spending time resizing each row or column manually.
Use AutoFit when:
- Imported
CSVdata looks too narrow or uneven. - Customer names, product names, or descriptions are cut off.
- Numbers show as #### because the column is too narrow.
- Wrapped text needs more row height.
- You are preparing a quick report for reading or printing.
If you are filling patterns or copying values instead of resizing cells, read How to Use AutoFill in Excel. AutoFill and AutoFit sound similar, but they do different jobs.
AutoFit is simple, but a few beginner mistakes can make the result confusing.
Common Mistakes When Using AutoFit
Most AutoFit problems happen because the wrong rows or columns are selected. A quick check before using AutoFit can prevent unexpected changes.
Common mistakes include:
- Selecting one cell instead of the full column or row.
AutoFit works best when you select the column header or row number. - Double-clicking the wrong border.
For columns, double-click the right border of the column header. For rows, double-click the bottom border of the row number. - Expecting AutoFit to resize hidden content perfectly.
Hidden rows, hidden columns, or merged cells may not behave the way beginners expect. - Confusing AutoFit with page scaling.
AutoFit changes row height and column width. It does not fit the whole worksheet onto one printed page. For that, see How to Fit Excel Sheet to One Page.
Once you understand these mistakes, AutoFit becomes a quick habit you can use almost every day.
Quick Practice
Try this once in a practice workbook so the shortcut becomes familiar. You can use XcelTips_Practice.xlsx.
- Type a long product name in cell
A1so the text is cut off. - Double-click the right border of column
Ato AutoFit the column. - Type two lines of text in cell
B2, then double-click the bottom border of row2to AutoFit the row height.
This small practice shows the difference between AutoFit column width and AutoFit row height.
After trying AutoFit once, these common questions can help clear up a few beginner doubts.
Frequently Asked Questions (FAQs)
What does AutoFit do in Excel?
AutoFit automatically adjusts column width or row height so the visible cell content fits better. It helps make your worksheet easier to read without manual resizing.
What is the fastest way to AutoFit columns in Excel?
The fastest way is to double-click the right border of the column header. You can also select multiple columns first, then double-click one selected column border.
How do I AutoFit rows in Excel?
Select the row or rows, then double-click the bottom border of one selected row number. You can also use Home → Format → AutoFit Row Height.
Is AutoFit the same as changing column width manually?
No. Manual resizing means you drag the border yourself. AutoFit lets Excel choose the width based on the content in the column.
Why is AutoFit not working correctly?
AutoFit may not work as expected with merged cells, hidden rows or columns, or certain wrapped text layouts. Try unmerging cells or checking whether rows and columns are hidden.
With those common questions answered, let’s wrap up with the main takeaway from this quick Excel tip.
Conclusion
Learning how to autofit in excel is a simple way to clean up messy worksheets fast. Instead of dragging column borders or row edges manually, you can double-click once and let Excel adjust the size for you.
Use AutoFit when text is cut off, numbers are hidden, or row height looks too small for wrapped text. For another useful layout skill, you can read How to Select Columns in Excel Using Keyboard and Mouse. To continue learning in order, visit the Beginner Learning Path.