Written By Sophanith Dith
Last Updated April 22, 2026
Applies to Microsoft Excel 365 (Windows only)
Part of the Beginner Learning Path
Module 2 Working with Data
Lesson 2 of 22
When you are new to Excel, selecting one cell feels simple, but selecting a full row can be confusing at first. Many beginners click inside the worksheet grid and expect the whole row to highlight, only to find that Excel selects only one cell instead.
Learning how to select multiple rows in Excel is an important beginner skill because full-row selection is useful in many everyday tasks. You may want to format a record, review a line of data, move related information together, or prepare rows for actions like sorting or deleting.
Once you understand basic Excel row selection, the worksheet becomes easier to control. Instead of clicking around and hoping you selected the right area, you can work with more confidence and avoid changing only part of the data by mistake.
If you want to review basic selection first, it helps to read How to Select Multiple Cells in Excel Using Keyboard and Mouse before practicing full-row selection.
Quick Answer:
To select an entire row in Excel, click the row number on the left side of the worksheet. To select multiple rows, drag across row numbers or use Shift to select adjacent rows and Ctrl to select different rows in Excel that are not next to each other. You can also use Shift + Space to select the current row with the keyboard.
Before going step by step, here is a quick reference to make the lesson easier to follow.
Quick Reference
Use this quick checklist as a simple reminder before you try the row-selection methods below.
- Click a row number to select one full row.
- Drag across row numbers to select multiple adjacent rows.
- Use Shift to select a continuous row range.
- Use Ctrl to select non-adjacent rows.
- Use Shift + Space to select the current row with the keyboard.
- Check the highlighted row numbers before making changes.
Now let’s begin with what Excel row selection means and why it matters.
What Excel Row Selection Means
Before you start selecting rows, it helps to understand what Excel is showing you. A row is a horizontal line of cells across the worksheet, and each row is identified by a number on the left side.
When you select a full row, Excel highlights every cell in that horizontal line, not just one cell. That means any action you take next may affect the entire row.
This matters because row selection is different from normal cell selection. If you click inside the worksheet grid, you usually select only one cell. If you click the row number, Excel understands that you want the whole row.
If you need a quick refresher on worksheet structure, see Understanding Cells, Rows, Columns, and Worksheets in Excel. That lesson explains how rows fit into the overall Excel grid.
How to recognize a selected row
When a row is selected, you will usually notice:
- The row number is highlighted.
- The full horizontal line across the worksheet is shaded.
- The active cell sits inside the selected row.
This visual feedback helps confirm that Excel is about to work on the full row.
Once you know what a selected row looks like, start with the simplest method: selecting one full row.
How to Select an Entire Row in Excel
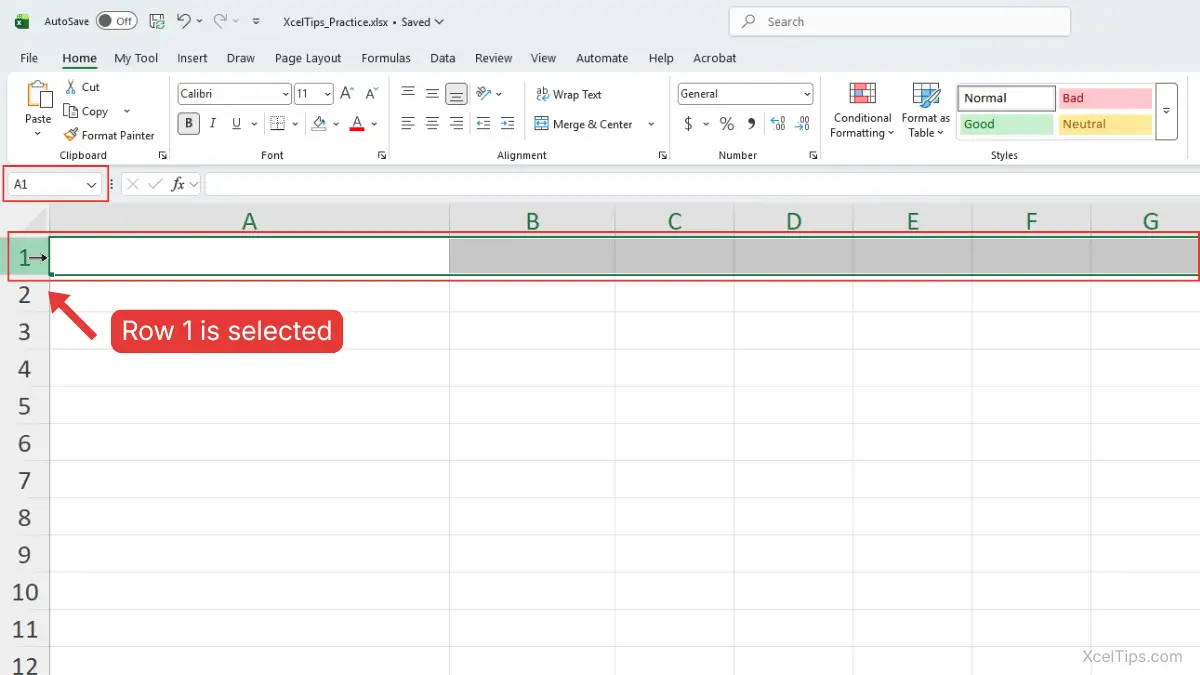
The easiest way to select an entire row in Excel is with the mouse. Start by clicking the row number on the left side of the worksheet. This is the method most beginners learn first.
Select a single row with the mouse
To select one full row:
- Move your mouse pointer to the row number on the left side of the worksheet.
- Click the row number once.
- Confirm that the whole row is highlighted across the worksheet.
For example, if you click row 5, Excel selects every cell in row 5.
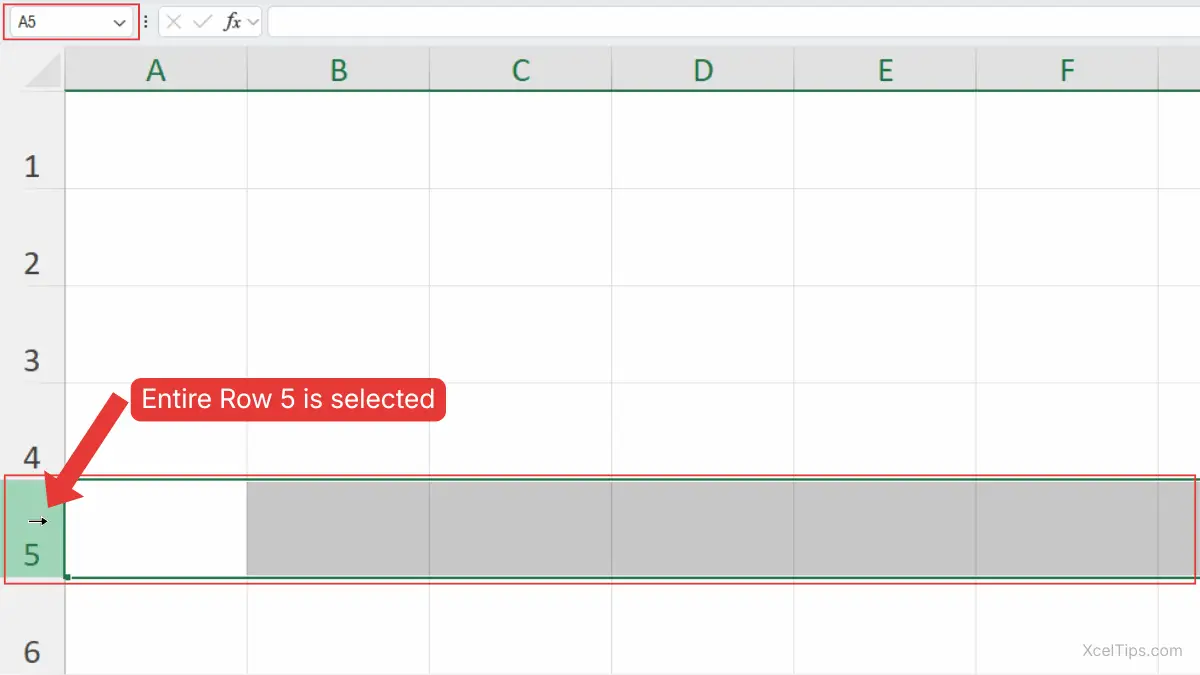
This is the most direct answer to how to select an entire row in Excel. The key detail is that you must click the row header, not a cell inside the row.
Beginner Tip:
If only one cell is selected, you probably clicked inside the worksheet grid instead of on the row number.
A simple beginner example
Imagine you have a small sales list where each row contains one transaction. If you want to highlight one full transaction in Sales_Report.xlsx, clicking only one cell is not enough. Clicking the row number selects the entire record at once.
That is why row selection is often more useful than cell selection when each row represents one item, one person, or one entry.
After selecting one full row, the next skill is selecting several rows together.
How to Select Multiple Rows in Excel
Once you know how to select one row, the next step is selecting several rows together. This is useful when multiple records need the same action.
Select Multiple Adjacent Rows by Dragging
When the rows are next to each other, dragging is one of the easiest methods.
- Click the first row number.
- Hold down the left mouse button.
- Drag up or down across the row numbers you want.
- Release the mouse button when all needed rows are highlighted.
For example, dragging from row 4 to row 8 selects rows 4, 5, 6, 7, and 8.
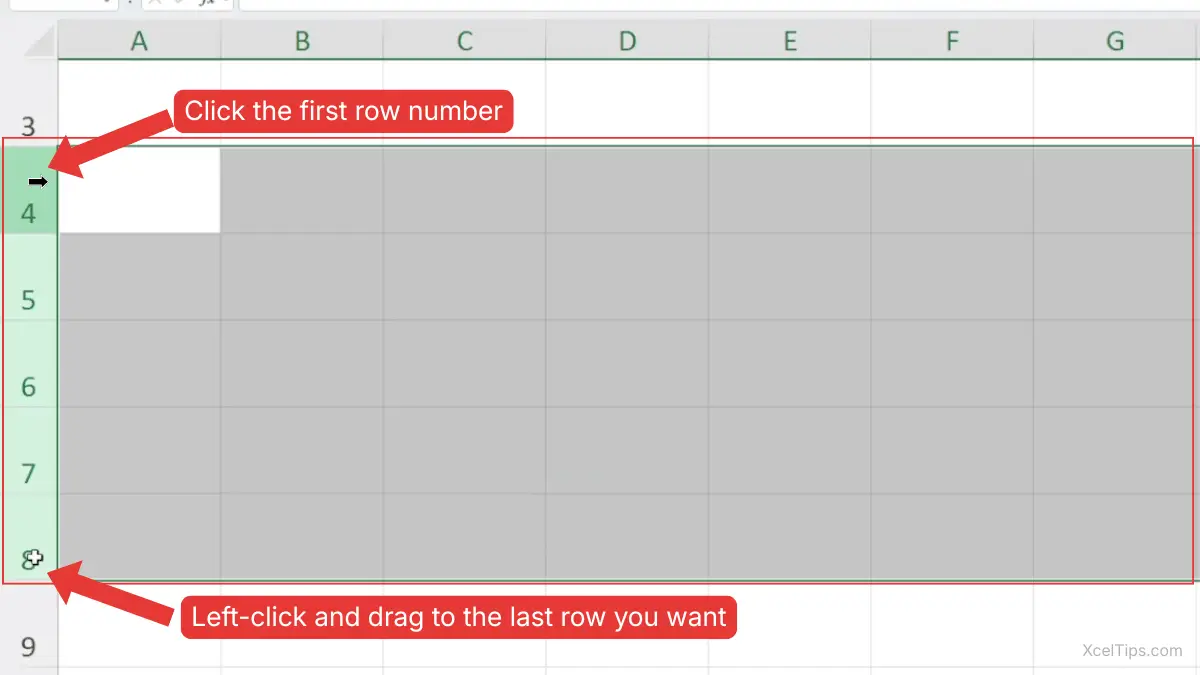
This is one of the most common ways to learn how to select multiple rows in Excel because it feels visual and easy to control.
Select Multiple Adjacent Rows with Shift
Dragging is useful, but sometimes a click-based method feels more accurate.
- Click the first row number.
- Hold Shift.
- Click the last row number in the group.
Excel will select all rows between those two points.
For example, if you click row 4, hold Shift, and click row 8, Excel selects rows 4 through 8.
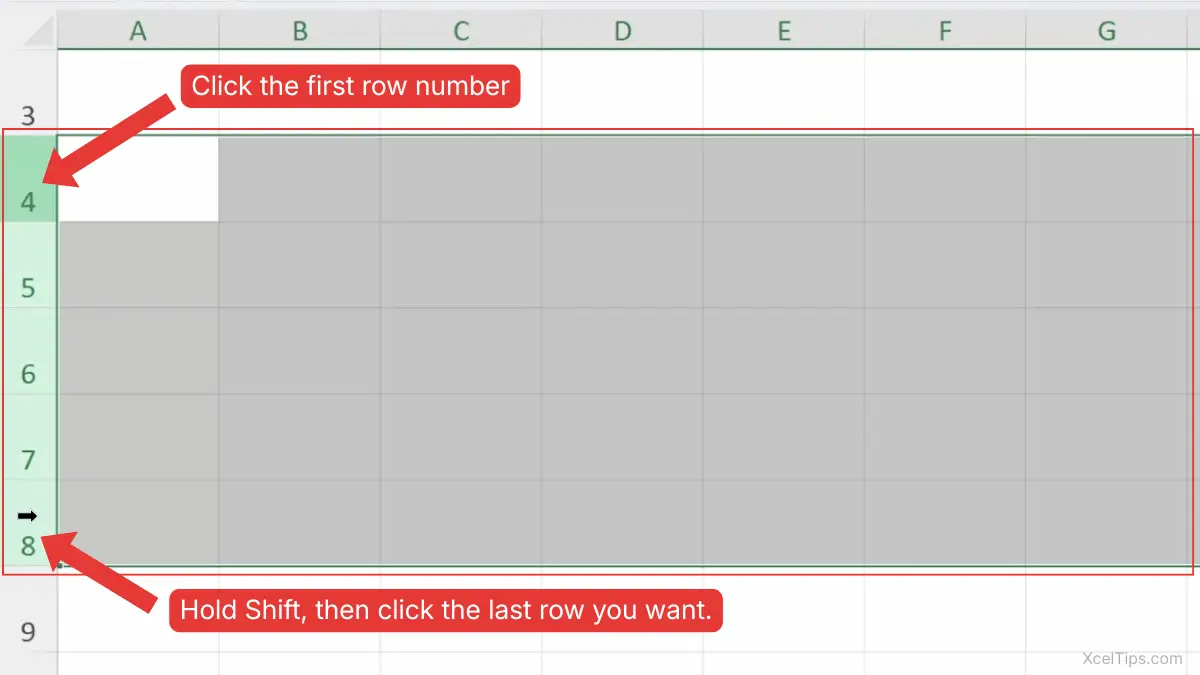
This method works well when the rows are visible on screen and you want a cleaner way to choose a precise range.
When to Use Dragging vs. Shift
Both methods are useful for adjacent rows, but each one feels better in different situations.
| Method | Best for | Why |
|---|---|---|
| Dragging | Nearby visible rows | Quick and visual |
| Shift + click | Precise row range | Easier to control when you know the first and last row |
If you often overshoot while dragging, the Shift method may feel easier.
These two methods work when the rows are next to each other. If the rows are separated, use Ctrl instead.
How to Select Different Rows in Excel
Sometimes the rows you need are separate rather than connected. In that case, you need a different method. In Excel, rows that are separated are often called non-adjacent rows.
Select Non-Adjacent Rows with Ctrl
To select rows that are not next to each other:
- Click the first row number.
- Hold Ctrl.
- Click each additional row number you want.
- Keep holding Ctrl until all needed rows are selected.
For example, you can select rows 2, 6, and 10 without selecting rows in between.
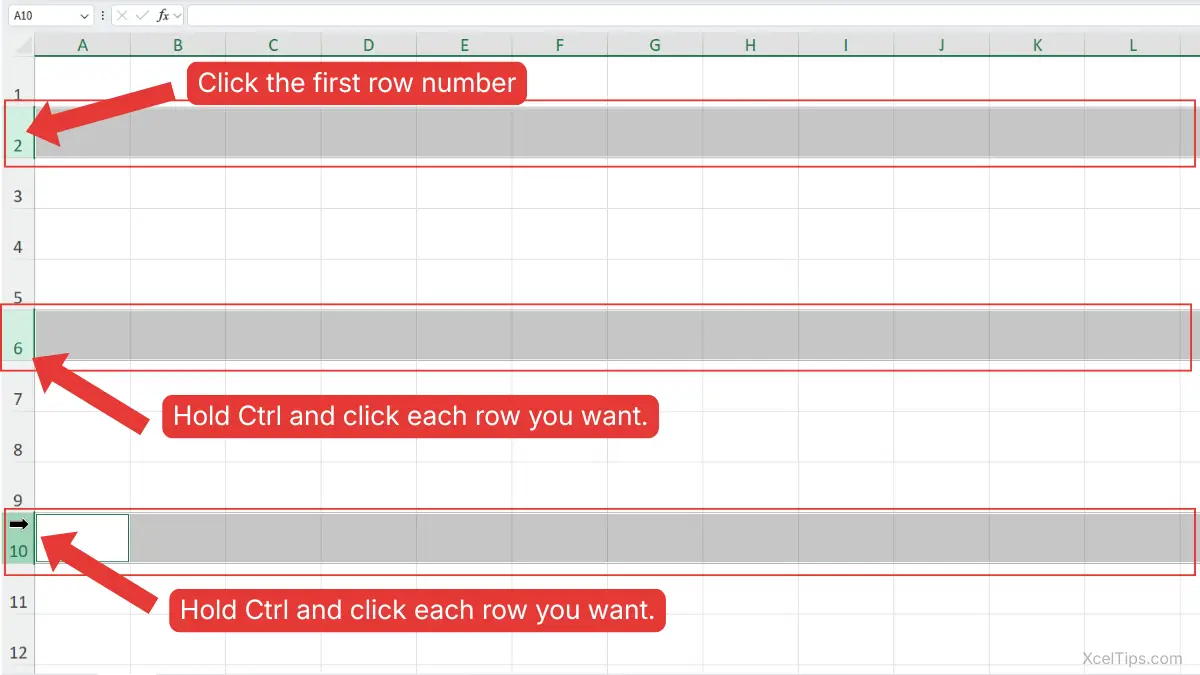
This is the main method for how to select different rows in Excel and for selecting non-adjacent rows in the same worksheet.
Beginner Warning:
If you forget to hold Ctrl, Excel replaces the old row selection with the new one.
A Practical Example
Imagine you are reviewing a worksheet and only a few rows need attention because they contain missing details. Those rows may not sit next to each other. Using Ctrl lets you select only the rows you need without affecting the others.
That makes non-adjacent row selection especially useful for targeted cleanup or formatting.
If you want a faster option without relying on the mouse, Excel also gives you a simple row-selection shortcut.
How to Select Rows in Excel with Keyboard Shortcuts
Keyboard shortcuts can make row selection faster and more accurate. They are especially useful when your hands are already on the keyboard.
Row Selection Shortcut in Excel: Shift + Space
The most useful row shortcut for beginners is:
Shift + Space
This selects the entire row of the active cell.
To use it:
- Click any cell inside the row you want.
- For example, click cell
B2if you want to selectrow 2. - Press Shift + Space.
- Excel will highlight the full row.
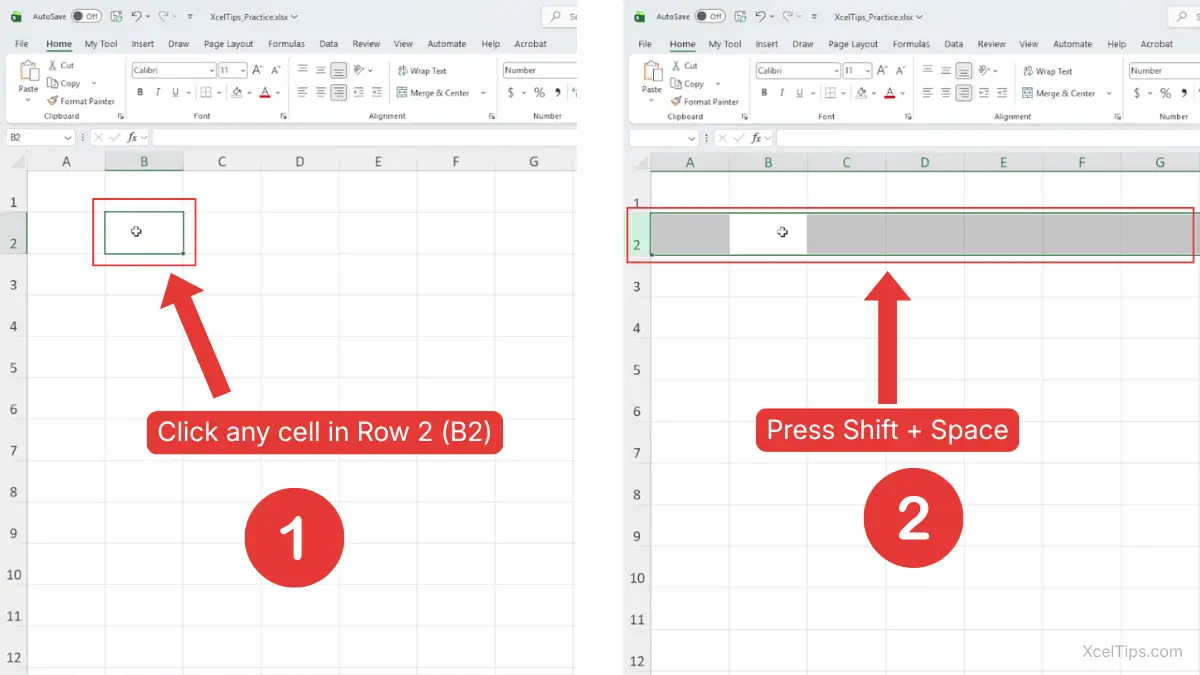
This is one of the best answers to how to select rows in Excel with keyboard because it is simple and easy to remember.
You can also review Microsoft’s guide to selecting rows and columns in Excel if you want to see the official instructions for row selection methods.
Select Multiple Rows with Shift + Arrow Keys
Once a row is selected, you can extend the selection with the keyboard.
- Select a cell in the row you want.
- Press Shift + Space.
- Hold Shift and press Down Arrow or Up Arrow to extend the selection.
This lets you build a continuous row range without using the mouse.
Use the Name Box to Jump to a Row Area
The Name Box is mainly known for cell and range references, but it can also help you move quickly within the worksheet.
For example, if you type a cell reference like A20 into the Name Box, Excel jumps to row 20. From there, you can press Shift + Space to select that row immediately.
This is useful when the target row is far down the sheet.
Remember:
The Name Box helps you jump to the row area, but the full row is not selected until you press Shift + Space.
Useful Row-Related Shortcut Reference
Here is a simple shortcut table to keep the main methods clear.
| Task | Shortcut | Result |
|---|---|---|
| Select current row | Shift + Space | Selects the full row of the active cell |
| Extend selection downward | Shift + Down Arrow | Adds the next row below |
| Extend selection upward | Shift + Up Arrow | Adds the next row above |
| Jump to a known row area | Type cell in Name Box | Moves selection to that location |
After learning the methods, it also helps to know when selecting a full row is the better choice.
When You Should Select a Full Row Instead of Cells
Beginners often wonder when a row should be selected instead of just a few cells. The answer depends on what the row represents in your worksheet.
A full row is usually the better choice when:
- One row contains one complete record.
- You want to apply the same formatting across the record.
- You want to move or review all fields in that row together.
- You want to prepare data for a later task that affects full entries.
For example, in a contact list, one row might contain a person’s name, phone number, email, and department. If you want to work with that person’s full record, selecting the whole row makes more sense than selecting one or two cells.
This is also why accurate row selection matters later in lessons like How to Sort Data in Excel. Selecting the correct structure helps keep related data together.
Row selection feels straightforward once you know the method, but a few common mistakes still cause confusion.
Common Beginner Mistakes When Selecting Rows in Excel
These mistakes are common when you are still getting used to row headers and keyboard shortcuts.
Clicking Inside the Row Instead of the Row Number
This is the most common mistake. Clicking a cell inside the row selects only that cell, not the whole row.
The fix is simple: move your pointer left and click the row number instead.
Selecting Too Many Rows by Dragging Too Far
Dragging is convenient, but it is easy to go farther than intended.
To reduce this problem:
- Drag slowly.
- Watch the highlighted row numbers.
- Release the mouse as soon as the last needed row is selected.
Forgetting Ctrl for Non-Adjacent Rows
When rows are separate, Ctrl is required. Without it, the earlier selection disappears.
This is normal for beginners and becomes easier with practice.
Thinking Shift + Space Selects Multiple Rows Immediately
Shift + Space selects only the current row first. To add more adjacent rows, you still need to extend the selection with the arrow keys or use the mouse.
The best way to make these methods feel natural is to try them in a short practice exercise.
Quick Practice
Open a blank workbook such as XcelTips_Practice.xlsx and try the steps below.
- Click row number
3to select one row. - Drag from
row 5torow 8. - Click
row 2, hold Shift, then clickrow 6. - Click
row 1, holdCtrl, then clickrows 4and7. - Click a cell in
row 10and press Shift + Space. - Press Shift + Down Arrow two times to extend the row selection.
- Type
A20into the Name Box, press Enter, then press Shift + Space.
This short exercise helps all the main row-selection methods feel more natural.
After a little practice, these are the questions beginners usually ask next.
Frequently Asked Questions (FAQs)
After practicing, beginners usually have a few common questions about row selection. Here are the most useful answers.
How to select an entire row in Excel?
Click the row number on the left side of the worksheet. Excel will highlight the entire row.
How to select multiple rows in Excel that are next to each other?
Drag across the row numbers, or click the first row, hold Shift, and click the last row.
How do I select multiple rows in Excel that are not next to each other?
Hold Ctrl and click each row number you want to include.
What is the row selection shortcut in Excel?
Press Shift + Space after clicking a cell in that row. Excel will select the full row.
How to select rows in Excel with keyboard?
Click any cell in the row you want, then press Shift + Space. To extend to more adjacent rows, use Shift + Up Arrow or Shift + Down Arrow.
Why is Excel selecting only one cell instead of the whole row?
This usually happens because you clicked inside the worksheet grid instead of on the row number. Click the row header on the left side to select the full row.
With those common questions answered, here is the key idea to remember from this lesson.
Key Takeaways
Before you finish, here are the most important points to remember from this lesson:
- Click the row number on the left side of the worksheet to select an entire row.
- To select multiple adjacent rows, drag across the row numbers or use Shift + Click.
- To select different rows that are not next to each other, hold Ctrl while clicking each row number.
- To select the current row with the keyboard, press Shift + Space.
- Always check the highlighted row numbers before making changes so you do not affect the wrong rows.
With these basics in place, you are ready to wrap up the lesson and move on with more confidence. The goal is not just to memorize the methods, but to make Excel row selection feel natural.
Conclusion
Learning how to select multiple rows in Excel gives you a simple but very useful skill for handling full records correctly. When you can select one row, multiple rows, and non-adjacent rows with confidence, you reduce errors and work more efficiently.
Practicing these small selection skills now will make many later Excel tasks easier. Once row selection feels automatic, you can work faster and with fewer mistakes.
This lesson is part of the Beginner Learning Path, a structured series designed to help you learn Microsoft Excel step by step from the basics.
← Previous Lesson
How to Select Multiple Cells in Excel Using Keyboard and Mouse