Written By Sophanith Dith
Last Updated April 25, 2026
Applies to Microsoft Excel 365 (Windows only)
Typing the same pattern again and again in a worksheet takes more time than it should. If you are wondering how to use AutoFill in Excel, the good news is that Excel already has a built-in way to fill numbers, dates, text patterns, and formulas much faster.
Once you know how to autofill in Excel, you can complete routine tasks with a quick drag instead of typing every cell manually. This small trick saves time right away and is one of the easiest ways to work faster in everyday spreadsheets.
Why AutoFill in Excel Matters
AutoFill is useful because many worksheets contain repeated patterns. You may need to continue weekdays, copy formulas down a column, repeat labels, or extend a date list for a schedule.
Learning how to use AutoFill in Excel helps you finish these jobs faster with fewer clicks. It is especially helpful when entering simple data, building basic reports, or preparing a worksheet before moving on to other tasks. If you are still getting comfortable with typing and editing, it also connects well with How to Enter and Edit Data in Excel.
Now that you know why this feature is useful, let’s look at how to use AutoFill in Excel step by step.
How to Use AutoFill in Excel
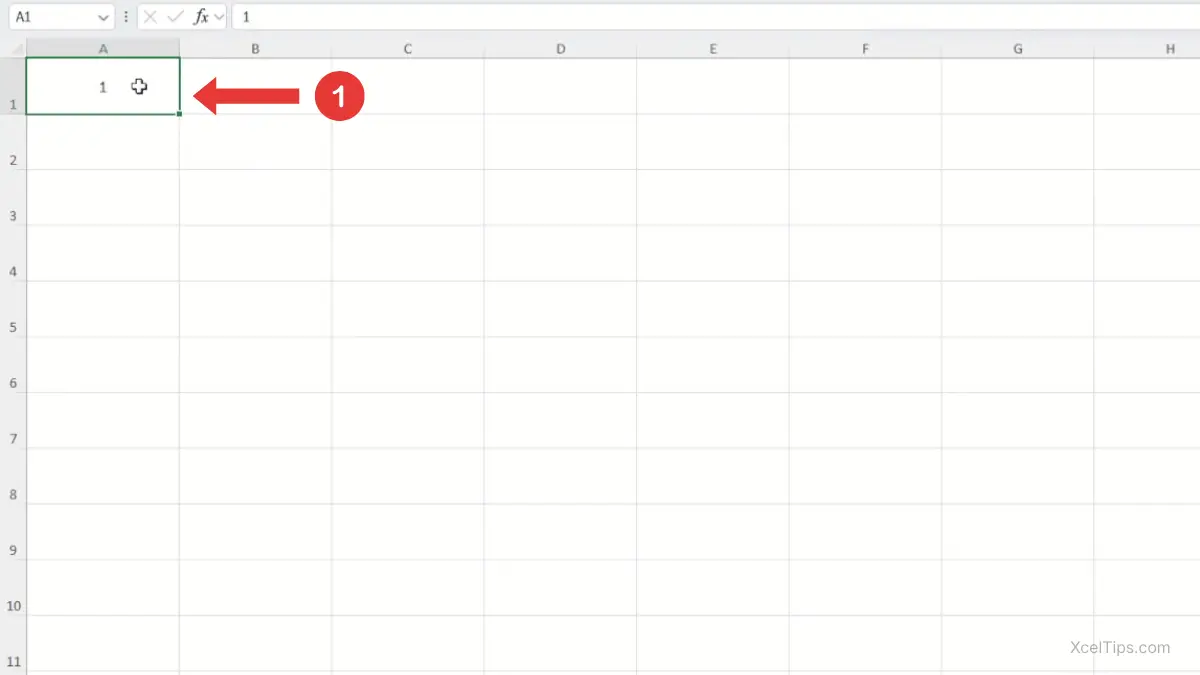
The fastest way to learn how to use AutoFill in Excel is to start with the small square in the bottom-right corner of a selected cell. This small square is called the fill handle in Excel.
- Click the cell that contains the value, date, text, or formula you want to continue.
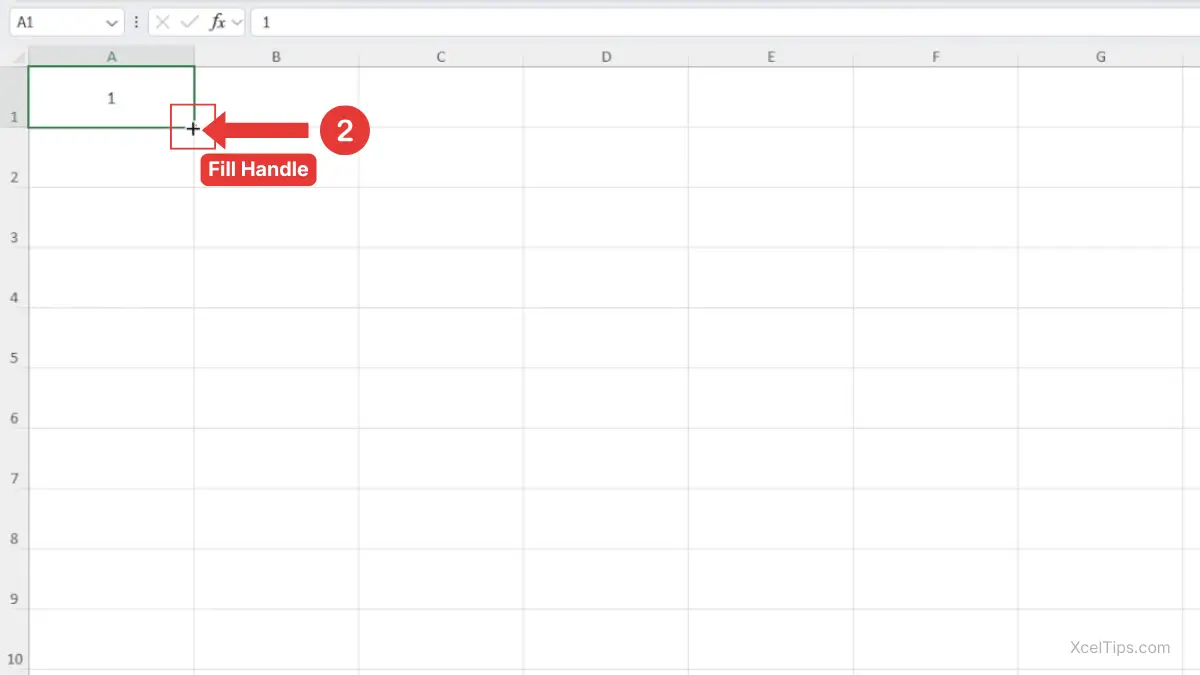
- Move your mouse to the bottom-right corner of the selected cell. When the pointer changes to a small black plus sign, you are on the fill handle.
- Click and drag the fill handle down, up, left, or right over the cells you want to fill.
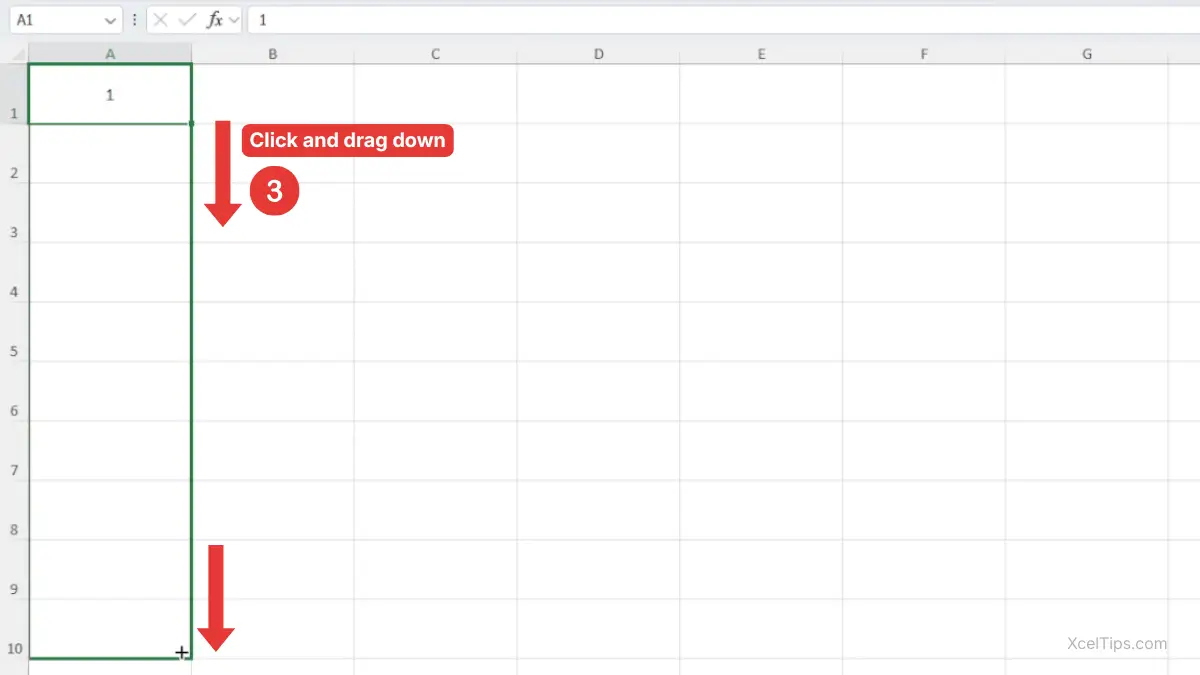
- Release the mouse button.
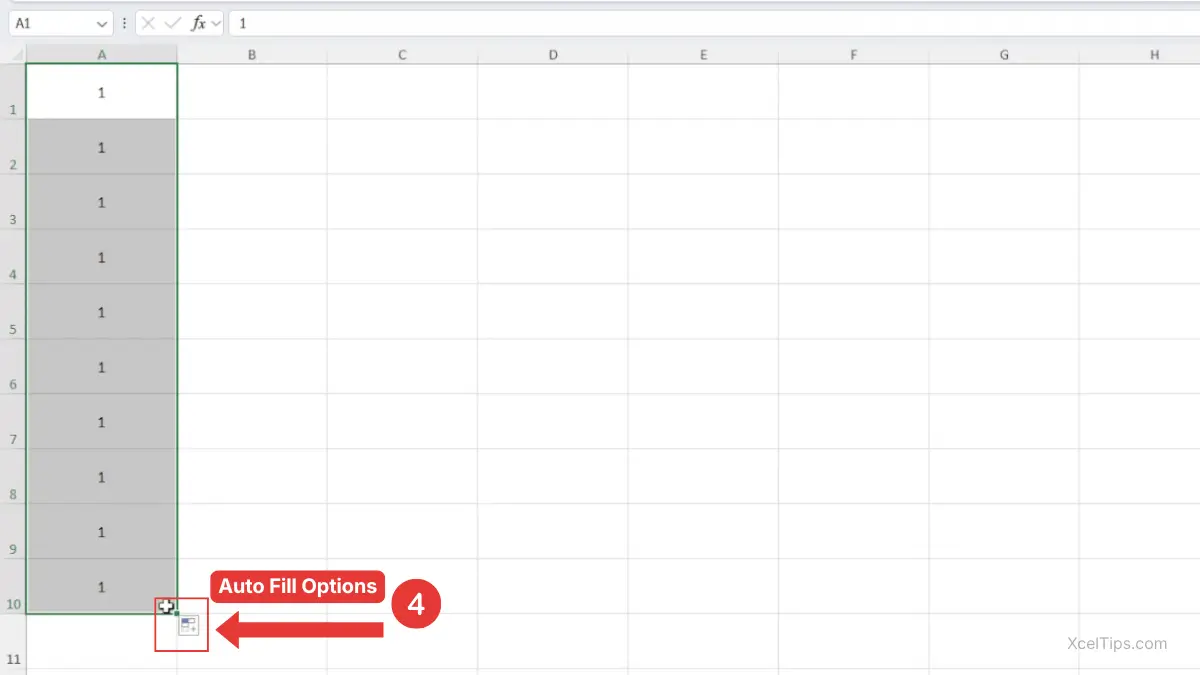
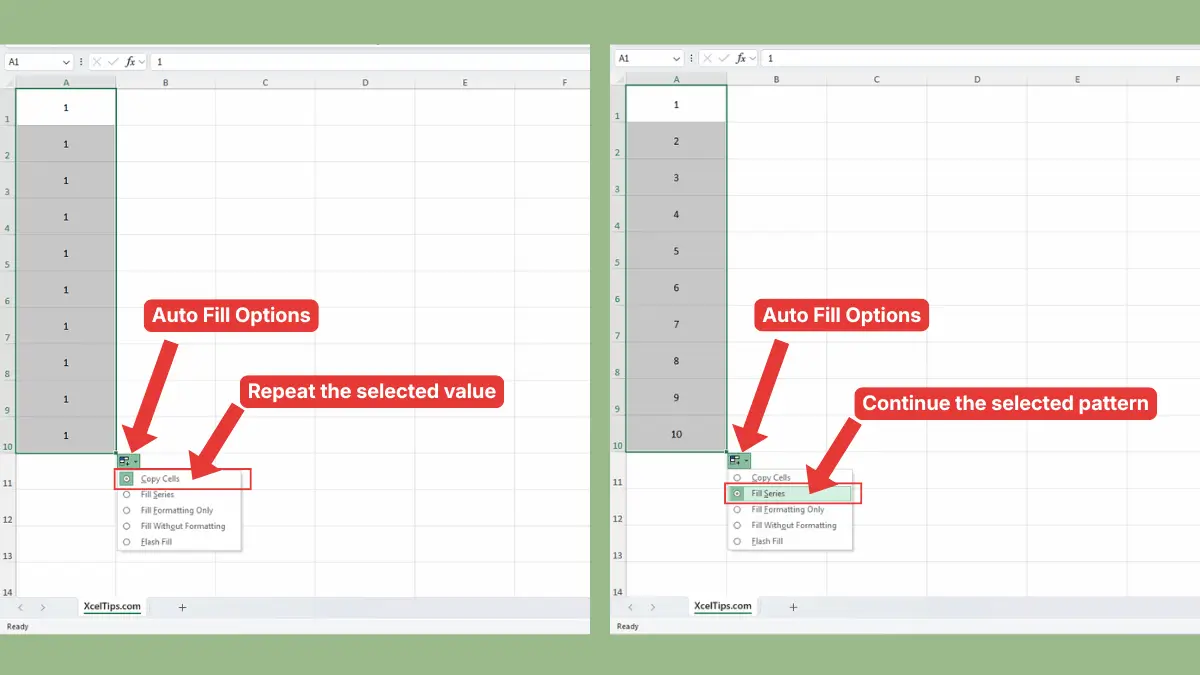
- Excel may shows the Auto Fill Options button, click it to choose the fill result you want.
For example:
- Choose Copy Cells if you want Excel to repeat the selected value or formula.
- Choose Fill Series if you want Excel to continue a pattern such as numbers, dates, or weekdays.
This is the basic answer to how to autofill in Excel. In many cases, Excel will understand what you want automatically.
Here are a few common results:
- If you drag one word or one number, Excel may copy it.
- If you give Excel a pattern first, it may continue the series.
- If you drag a formula, Excel usually copies it while adjusting the references.
For example:
- Type
Mondayand drag down to continue weekdays. - Type
1in one cell and2in the next cell, select both, then drag to continue the number pattern. - Enter a formula in one row, then drag down to fill the same formula for the rest of the records.
A useful beginner tip is to give Excel a clearer pattern when needed. If one starting value is not enough, use two starting values. That makes AutoFill in Excel much more reliable.
For more detail on fill patterns and Auto Fill Options, see Microsoft’s guide on fill data automatically in worksheet cells.
After learning the basic steps, it helps to know the situations where AutoFill is most useful.
When to Use Autofill
This trick works best when your worksheet contains a simple repeat, pattern, or sequence. Here are some practical times to use it:
- Fill weekday names in a planner or checklist.
- Continue dates in a simple schedule.
- Copy the same formula down a results column.
- Repeat labels such as department names or status values.
- Extend a numbered list without manual typing.
If you need to prepare ranges before filling, How to Select Multiple Cells in Excel is a useful related guide.
Even though AutoFill is simple, beginners often run into a few common issues when using it for the first time.
Common AutoFill Mistakes Beginners Make
Most AutoFill problems come from small setup mistakes rather than from the feature itself. Knowing what to watch for will help you get more consistent results and avoid unnecessary rework.
- Dragging from the wrong place. You need to drag from the tiny square in the corner, not from the cell border. The correct spot is the fill handle in Excel.
- Starting with only one value when Excel needs a pattern. If you want
1,2,3,4, Excel often needs the first two numbers before it can continue the series properly. - Assuming Excel will always guess correctly. Sometimes Excel copies instead of filling a sequence. When that happens, check the Auto Fill Options button and choose a better option.
- Not checking the result after filling formulas. AutoFill adjusts formulas automatically, but you should still confirm that the filled formulas are returning the results you expect.
If you fill the wrong cells by mistake, How to Use the Undo Redo Shortcut in Excel can help you reverse it quickly.
Once you are comfortable with the basic method, there is also a faster variation that can save even more time.
Faster Variation: A Quick Excel AutoFill Shortcut
Many users search for an excel autofill shortcut, but there is not a single keyboard shortcut that works exactly like dragging the fill handle for every case. In practice, the fastest variation is often to double-click the fill handle.
This works especially well when the column beside your data already contains entries all the way down.
- Click the cell that contains the value or formula.
- Move to the fill handle.
- Double-click it instead of dragging.

Excel will fill downward automatically to match the adjacent data range, as shown in the image below.
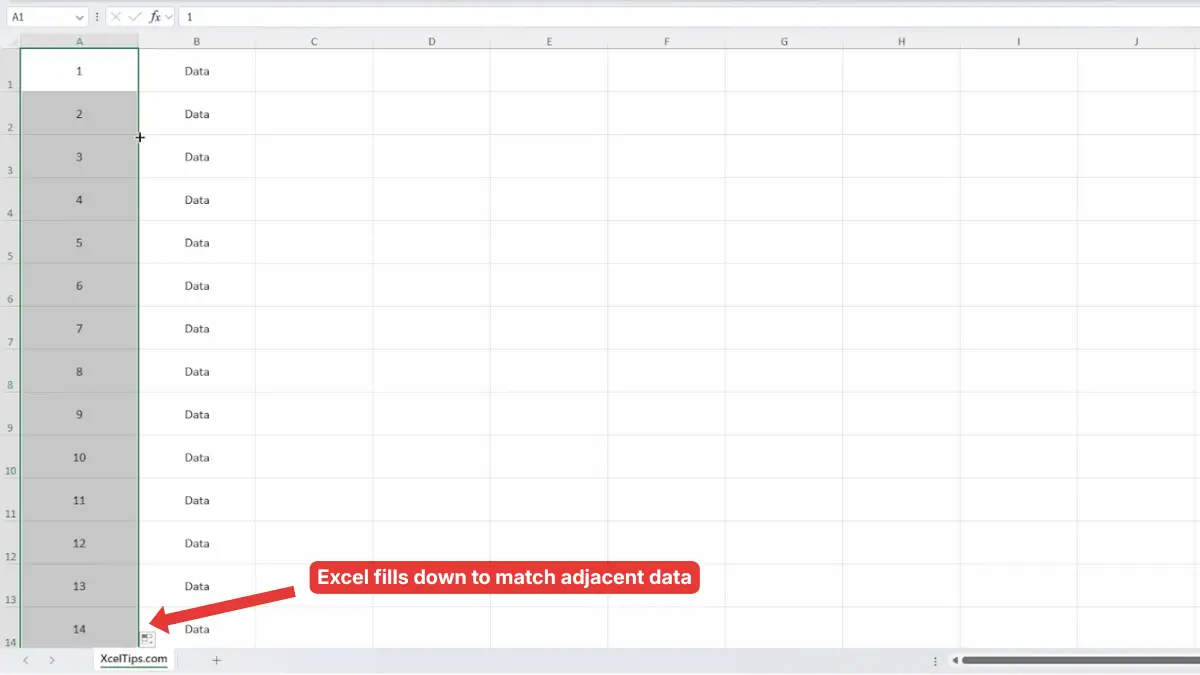
Double-clicking the fill handle is useful because it saves time when filling long columns. Instead of dragging through many rows, you can fill the data instantly as long as the adjacent column contains a continuous list.
The best way to remember this trick is to practice it once or twice with a simple example.
Quick Practice
Open XcelTips_Practice.xlsx and try the feature right away so the steps feel natural.
- In cell
A2, typeMonday, then drag the fill handle down to continue the weekdays. - In cell
B2, type1and inB3type2, select both cells, then drag down to continue the number series. - In cell
C2, enter a simple formula, then use AutoFill to copy it downward.
After trying it yourself, a few common beginner questions are worth clearing up.
Frequently Asked Questions (FAQs)
These quick answers address the most common questions beginners have after using AutoFill for the first time. They also help clear up confusion about copying, patterns, and the fill handle.
What is AutoFill in Excel?
AutoFill is a feature that lets Excel copy data, continue patterns, and extend formulas using the fill handle.
How do I autofill in Excel?
Click a cell, move to the bottom-right corner until you see the small black plus sign, then drag across the cells you want to fill.
Why is Excel copying instead of continuing a pattern?
Excel may not have enough information to detect the pattern. Try entering two starting values first, then drag again.
What is the fill handle in Excel?
The fill handle in Excel is the tiny square in the bottom-right corner of a selected cell. You drag or double-click it to use AutoFill.
Is there an Excel AutoFill shortcut?
There is no one universal keyboard shortcut that fully replaces every AutoFill action, but double-clicking the fill handle is often the fastest method for filling down a column.
With those common questions answered, let’s finish with the main takeaway from this Excel tip.
Conclusion
Now you know how to use AutoFill in Excel to save time with repeated data, simple series, and copied formulas. It is a small feature, but once you start using it regularly, it can speed up everyday worksheet tasks a lot.
AutoFill is a simple feature, but it can make everyday Excel work much faster. Once you get used to the fill handle and how Excel recognizes patterns, you can save time on many repetitive tasks.
For another practical skill, read How to Enter and Edit Data in Excel. To keep building your skills step by step, visit the Beginner Learning Path.