Written By Sophanith Dith
Last Updated April 30, 2026
Applies to Microsoft Excel 365 (Windows only)
Part of the Beginner Learning Path
Module 2 Working with Data
Lesson 5 of 22
It is very common to build a worksheet and then notice that something is missing in the middle. Maybe you forgot to add one employee, skipped a product, or need a blank line between sections. That is why learning how to insert rows in Excel is one of the most useful beginner skills.
In Excel, inserting a row creates new space without forcing you to retype the rest of your worksheet. Existing rows move down automatically, which makes it easier to keep lists clean and organized.
For beginners, the key idea is simple: Excel adds a new row above the row you select. Once that rule makes sense, the rest of the process becomes much easier.
Before going step by step, here is the quick answer and a simple overview of what you will learn.
Quick Answer
To insert a row in Excel, click the row number where you want the new row to appear above, then use Insert from the right-click menu or go to Home tab→ Cells group→ Insert → Insert Sheet Rows. To insert multiple rows, first select the same number of existing rows.
Quick Reference
This lesson shows the easiest beginner methods first and then introduces a useful shortcut. If you only remember a few points, these are the most important ones:
- A new row is inserted above the row you select.
- You can add one row or multiple rows at the same time.
- The easiest beginner methods are the right-click menu and the Home tab.
- To insert multiple rows, select the same number of row numbers first.
- The most common full-row shortcut is Shift + Space, then Ctrl + Shift + Plus (+).
- If Excel shows a dialog box instead of adding a full row, you probably selected a cell instead of the row number.
With that quick summary in mind, let’s start with the basic idea that makes row insertion easier to understand.
Understand Where Excel Inserts a New Row
Before clicking anything, it helps to understand how Excel decides where the new row goes. This prevents one of the most common beginner mistakes: selecting the wrong row and inserting the new row in the wrong place.
The key rule is that Excel inserts the new row above the selected row. That means you should select the row that you want to move downward.
Simple Example:
Suppose your worksheet has names in rows 2, 3, and 4, but you forgot to add one name between rows 2 and 3. To make space for it, you would select row 3 and insert a row there.
Excel then creates a new blank row above row 3. The old row 3 moves down to row 4, and the rest of the rows below also move down.
This sounds small, but it matters a lot. Once you understand that the selected row moves down, it becomes much easier to place new rows correctly.
Beginner Tip:
Select the row that should move down, not the place where you want to click inside the sheet.
With the placement rule clear, the easiest next step is to try the simplest method.
How to Insert Rows in Excel with the Right-Click Menu
The right-click method is usually the easiest way for beginners to insert rows. It is visual and direct, so it is easy to confirm the correct row before Excel makes the change.
This is the best place to start if you are still getting comfortable with Excel’s layout.
Insert One Row with Right-Click
Follow these steps to add one new row:
- Click the row number on the left side of the worksheet where you want the new row to appear above.
- Right-click the selected row number.
- Click Insert.
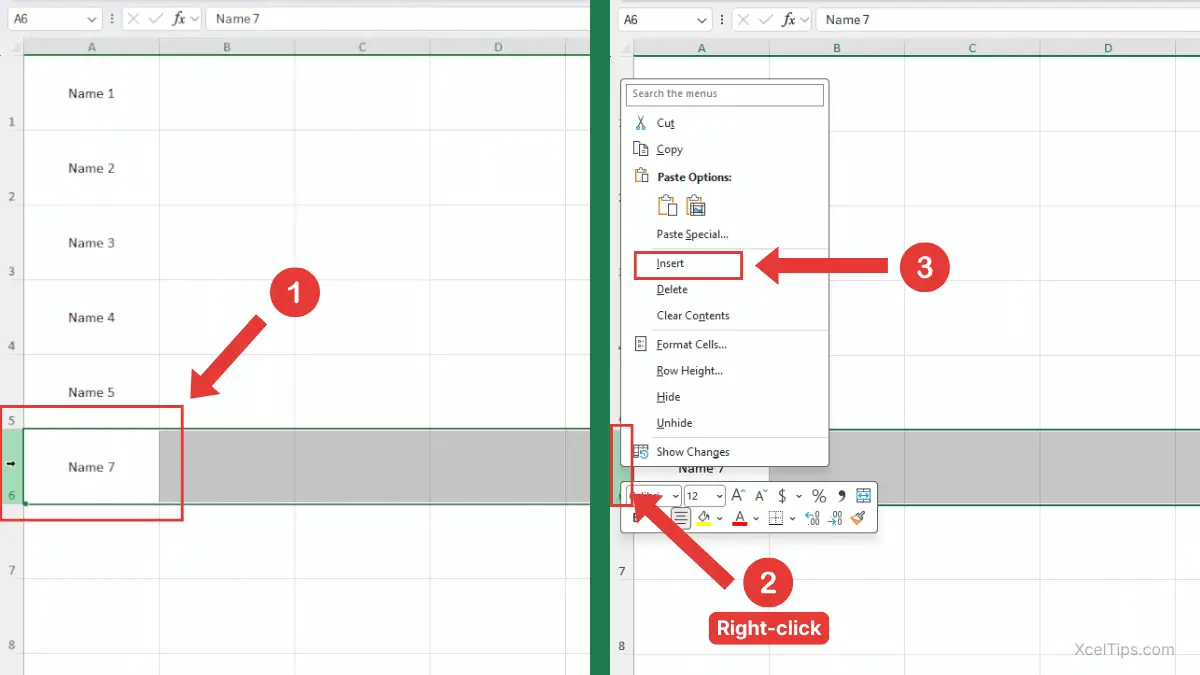
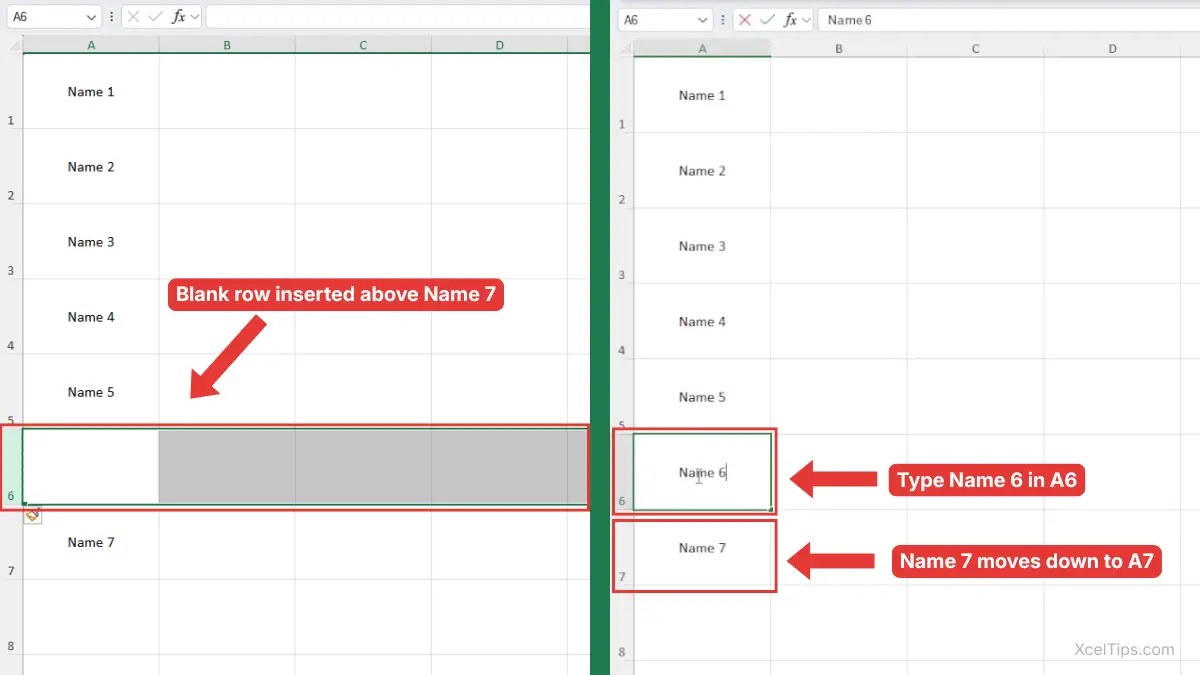
For example, suppose you want cells A1:A7 to contain Name 1 to Name 7, but you accidentally skip Name 6 and type Name 7 in A6. To fix this, select row 6 and click Insert. Excel adds a new blank row above row 6, so you can type Name 6 in A6, and Name 7 moves down to A7.
If you want to compare these steps with the official instructions, see Microsoft’s guide to inserting or deleting rows and columns in Excel.
Beginner Warning:
If you right-click inside a cell instead of the row number, Excel may not treat it as a full-row action.
Why This Method Is Useful
This method is useful because it makes row insertion feel very clear. You select the full row first, you see the row number highlighted, and then you tell Excel exactly what to do.
For absolute beginners, that visual clarity often makes this easier than relying on shortcuts right away.
Some beginners prefer using the Ribbon, so it helps to know where the same command appears there.
How to Add a Row in Excel from the Home Tab
The Home tab method is another beginner-friendly way to insert rows. It is especially helpful if you like working from Excel’s Ribbon and want to learn where the command is located.
It performs the same action as the right-click method, but it also helps you learn where Excel keeps row commands.
Insert One Row from the Ribbon
Here is how to add a row using the Home tab:
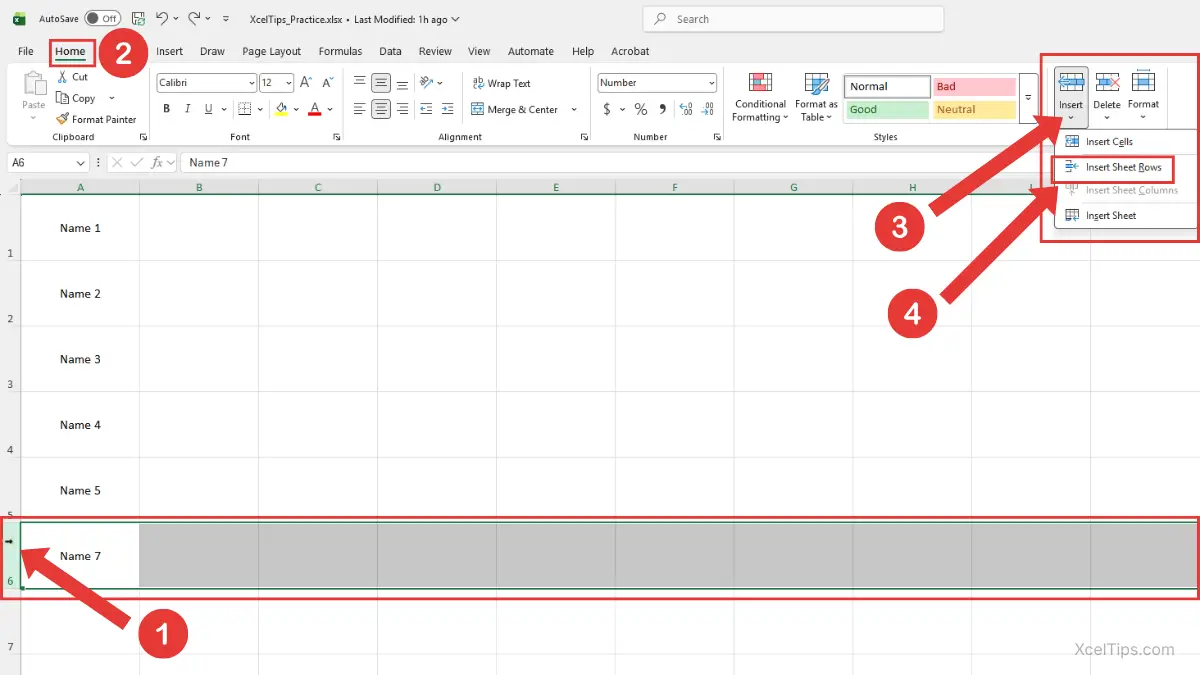
- Click the row number where you want the new row to appear above.
- Go to the Home tab.
- In the Cells group, click Insert.
- Choose Insert Sheet Rows.
Excel inserts a new blank row above the selected row.
This method is a good answer to how to add a row in excel if you prefer menu-based steps instead of right-clicking.
When to Use This Method
This method works well when you are still learning Excel’s layout or when you want to remember where row commands are stored. It also helps beginners connect the action with the Ribbon instead of depending only on the mouse right-click menu.
Once you are comfortable inserting one row, the next useful skill is adding several rows at once.
How to Insert Multiple Rows in Excel
In real worksheets, you often need more than one blank row. Maybe you are adding several new products, inserting space for a group of names, or creating a section break in a long list.
That is why it is important to learn how to insert multiple rows in excel instead of repeating the single-row method over and over.
Insert Multiple Rows at the Same Time
The trick is simple: select the same number of existing rows as the number of new rows you want to add.
- Select the same number of full rows as the number of new rows you want.
- Right-click one of the selected row numbers.
- Click Insert.
Excel inserts the same number of blank rows above your selection.
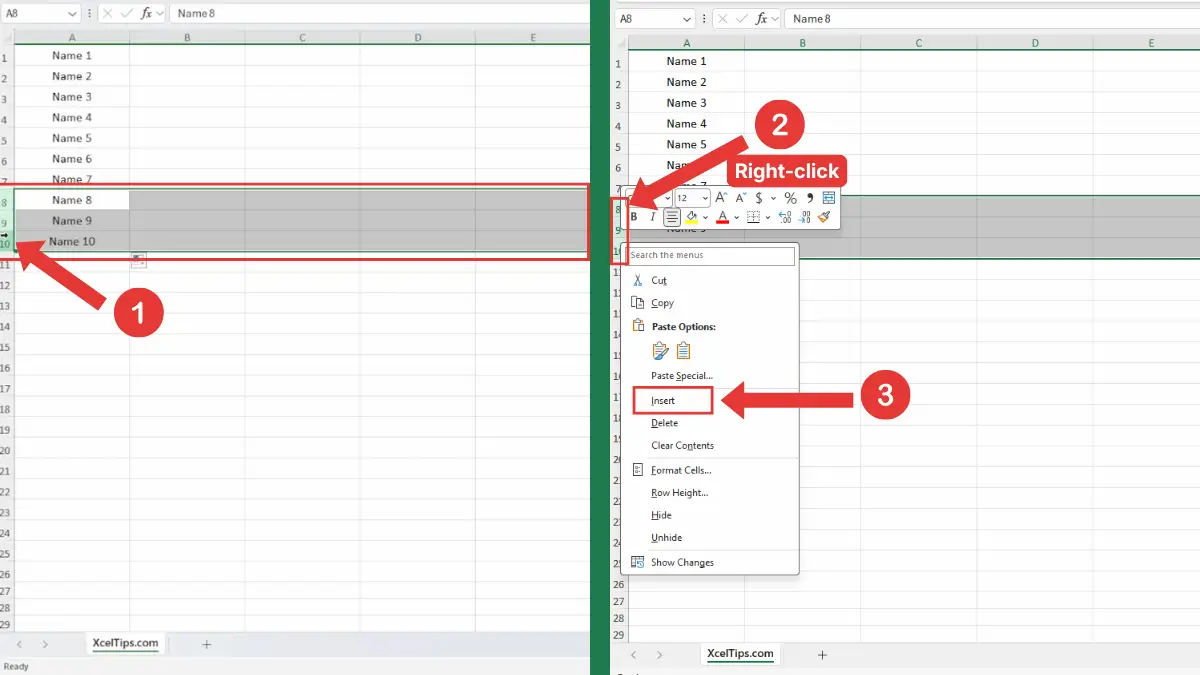
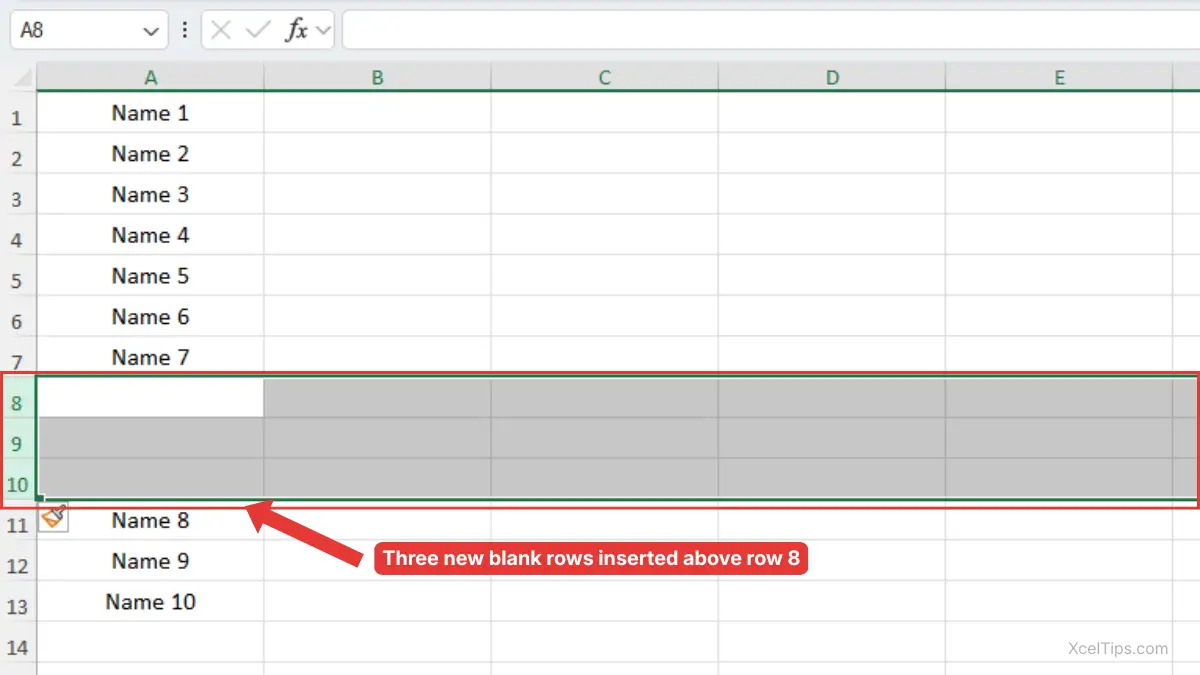
Excel adds the same number of blank rows above the selected rows. For example, when you select rows 8 to 10 and click Insert, Excel creates three new blank rows above row 8, as shown below.
This is one of the easiest ways to understand how to add multiple rows in excel when working with growing lists.
Beginner Warning:
If you want to insert three rows but only select one row first, Excel inserts only one row.
A Quick Way to Think About It
If you want to add:
- 1 new row, select 1 row
- 2 new rows, select 2 rows
- 5 new rows, select 5 rows
That one rule makes multiple-row insertion much easier to remember.
If selecting full rows still feels confusing, it may help to review How to Select Rows in Excel before continuing. That lesson explains the row selection part in more detail.
After learning the mouse-based methods, you can speed things up with a keyboard shortcut.
Shortcut to Add Rows in Excel
Keyboard shortcuts are optional at first, but they can save time once the basic method feels comfortable. For many beginners, the best approach is to first learn the right-click or Ribbon method, then add the shortcut later.
This section focuses on the simplest full-row shortcut workflow.
Insert a Full Row with a Keyboard Shortcut
Before using the shortcut, make sure Excel is working with a full row, not just one cell.
- Click any cell inside the row area where you want to insert the new row.
- Press Shift + Space to select the entire row.
- Press Ctrl + Shift + Plus (+).
Excel inserts a new row above the selected row.
On some keyboards, this may feel like pressing Ctrl + Shift + = because the plus sign shares the same key. The result is the same.
This is a practical answer to row insertion if you later want a faster method, especially when you repeat the same action many times.
Shortcut Reference Table
A small reference table can make the shortcut easier to remember.
| Task | What to select first | Shortcut |
|---|---|---|
| Select the current row | Any cell in the row | Shift + Space |
| Insert a new row above | Full row selected | Ctrl + Shift + Plus |
Beginner Tip:
If Excel opens a small dialog box instead of inserting a full row, it usually means Excel thinks you selected a cell range instead of the entire row.
Because shortcuts can sometimes feel less intuitive at first, let’s look at common mistakes that cause confusion.
Common Beginner Mistakes When Inserting Rows
Most row-insertion mistakes are easy to fix once you know what caused them. Beginners usually run into the same few problems, especially when they are still learning the difference between a cell and a full row.
Knowing these mistakes in advance makes practice much less frustrating.
Mistake 1: Clicking a Cell Instead of the Row Number
If you click only a cell, Excel may treat the action as a cell insert instead of a full-row insert. That can lead to confusing results.
To avoid this, click the row number on the left side of the worksheet whenever you want to insert a full row.
Mistake 2: Expecting the New Row to Appear Below
This is one of the most common beginner misunderstandings. Excel inserts the new row above the selected row, not below it.
A simple way to remember this is: select the row that should move down.
Mistake 3: Inserting the Wrong Number of Rows
If you want several new rows, you must first select the same number of existing rows. Otherwise Excel only inserts as many rows as you selected.
This matters when editing lists such as attendance sheets, employee data, or product tables.
Mistake 4: Forgetting to Check Nearby Data
Inserting rows changes the worksheet structure. Before doing it, take a quick look at labels, totals, or notes nearby so you understand what will move downward.
This is especially important in sheets that are already partly built.
Mistake 5: Inserting a row in the wrong place because the row was not selected first
Sometimes beginners click inside the worksheet and insert a row without first checking which row number is selected. This can place the new row in the wrong location and shift data you did not mean to move.
To avoid this, always click the row number first, then confirm it is the row that should move down. If the new row appears in the wrong place, use Undo and try again with the correct row selected.
The easiest way to remember these points is to try them in a short practice exercise.
Quick Practice
A short practice task helps turn the steps into habit. The goal here is not speed. The goal is to get comfortable selecting rows and seeing how Excel makes room for new data.
Try this in XcelTips_Practice.xlsx or a blank practice worksheet:
- Type five names in rows 2 to 6.
- Insert one new blank row above row 4.
- Type a new name in the inserted row.
- Select two row numbers together and insert two blank rows above them.
- Use the Ribbon method once.
- Use the shortcut method once.
When you finish, notice how Excel automatically moves the existing rows downward. That is the key behavior to understand.
Key Takeaways
This lesson covered one of the most practical worksheet structure skills for beginners. Once you can insert rows confidently, updating lists becomes much easier.
- Excel inserts a new row above the selected row.
- The easiest beginner methods are the right-click menu and the Home tab.
- To insert multiple rows, select the same number of full rows first.
- A useful full-row shortcut is Shift + Space, then Ctrl + Shift + Plus.
- Selecting the row number is safer than selecting only a cell.
- Understanding where the row appears helps prevent placement mistakes.
Frequently Asked Questions (FAQs)
These are some common beginner questions that often come up when learning how to add rows.
How to insert rows in Excel without replacing existing data?
Excel does not replace the existing rows when you insert a full row. Instead, it creates a new blank row and shifts the rows below downward.
How to add a row in Excel between two existing rows?
Click the row number of the lower row, then insert a row. Excel will place the new blank row above that selected row.
How to insert multiple rows in Excel at once?
Select the same number of row numbers as the number of rows you want to add, then use Insert. Excel inserts that many blank rows above the selected area.
How to add multiple rows in Excel without repeating the step again and again?
Select several row numbers first, then insert them all at once. This is much faster than adding one row at a time.
What is the shortcut to insert a row in Excel?
Select the full row with Shift + Space, then press Ctrl + Shift + Plus to insert a new row above it.
With those common questions answered, you are ready to insert rows more confidently in your own worksheet.
Conclusion
Learning how to insert rows in excel makes it much easier to manage lists, fix missing entries, and create space exactly where you need it. Once you understand that Excel inserts the new row above the selected row, the rest of the process becomes much more predictable.
Practice with a small sample list until the steps feel natural.
This lesson is part of the Beginner Learning Path, a structured series designed to help you learn Microsoft Excel step by step from the basics.
← Previous Lesson
How to Enter Data in Excel and Edit Cell Contents for Beginners