Written By Sophanith Dith
Last Updated May 04, 2026
Applies to Microsoft Excel 365 (Windows only)
Part of the Beginner Learning Path
Module 2 Working with Data
Lesson 7 of 22
Sometimes you build a worksheet and then realize something is missing. Maybe you entered names and phone numbers, but forgot to add an email column. Maybe your sales list needs a new “Region” column between “Customer” and “Amount.” This is when it helps to know how to add columns in Excel without disturbing the data you already entered.
Adding a column means inserting a blank vertical space into your worksheet. Excel moves the existing columns to the right, so your current data stays in the workbook instead of being replaced.
In this tutorial, you will learn several beginner-friendly ways to add one column, add multiple columns, and avoid common mistakes when changing your worksheet layout.
Quick Answer:
To add a column in Excel, select the column letter to the right of where you want the new column to appear. Right-click the selected column letter, then choose Insert. Excel inserts a blank column to the left of the selected column and shifts existing data to the right.
Quick Reference
Use this quick guide before going into the full steps. It shows the main things beginners need to remember when inserting columns.
- Excel inserts a new column to the left of the selected column.
- Right-clicking a column letter is the easiest method for beginners.
- You can also use Home tab → Cells group → Insert → Insert Sheet Columns.
- To add multiple columns, select the same number of columns first.
- Use Ctrl + Space, then Ctrl + Shift + Plus (+) if you prefer a keyboard shortcut.
- Use Ctrl + Z if you insert a column in the wrong place.
- Always check where your new column will appear before inserting it.
The main idea is simple, but the placement matters. Let’s start with the easiest method.
How to Add Columns in Excel by Right-Clicking the Column Letter
The right-click method is usually the easiest way for beginners to add columns in Excel. It is visual, direct, and helps you clearly see which column is selected before you insert anything.
Excel always inserts the new column to the left of the column you select. This is the most important rule to understand before using this method.
Steps to Add One Column
Use this method when you want to insert one blank column beside existing data.
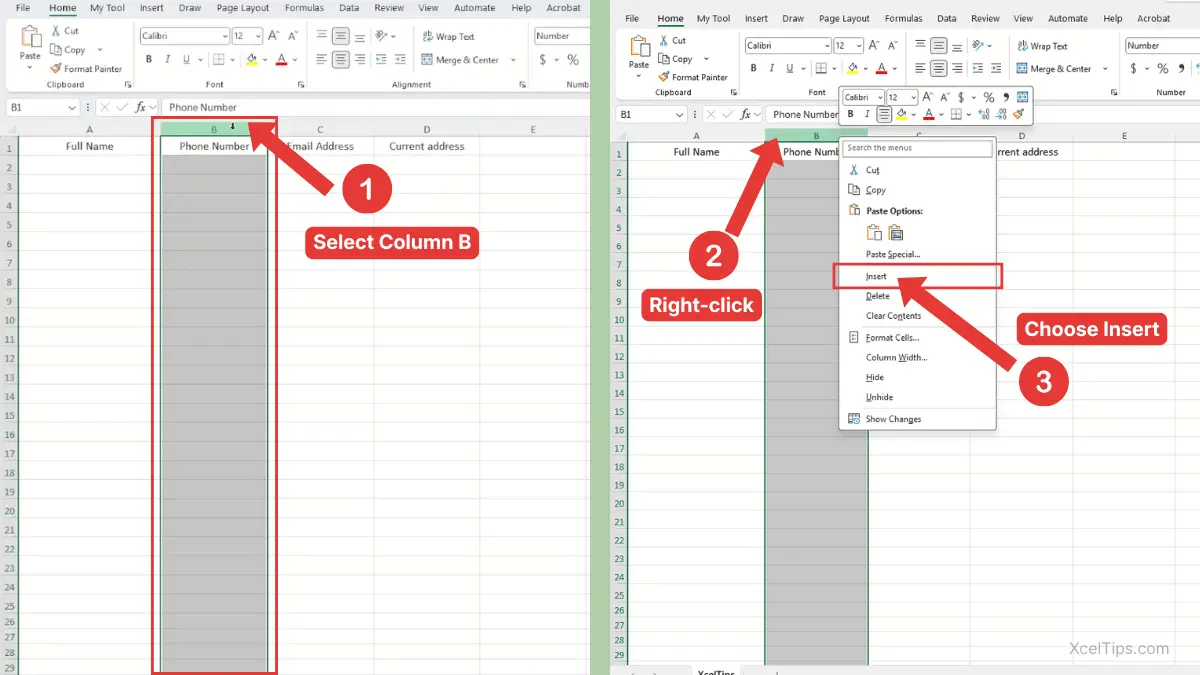
- Click the column letter on the right side of where you want the new blank column to appear.
- Right-click the selected column letter.
- Click Insert.
Excel adds a blank column to the left of the selected column.
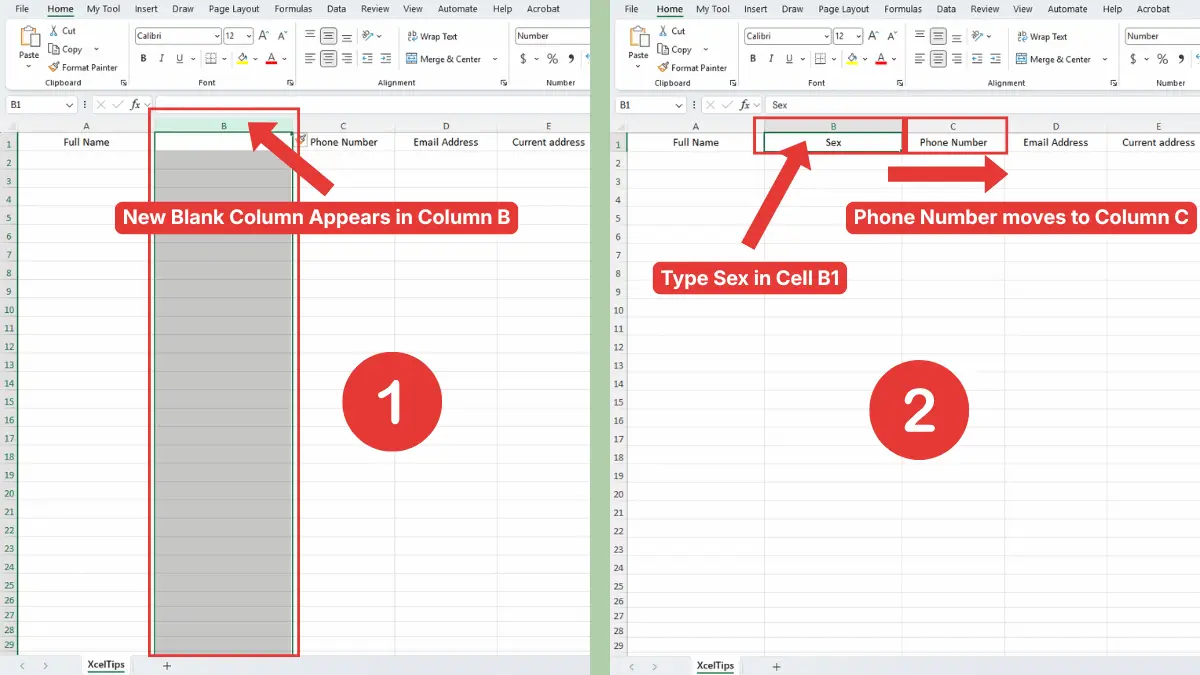
For example, suppose your worksheet has Full Name in column A, Phone Number in column B, Email Address in column C, and Current Address in column D. If you want to add a new Sex column between Full Name and Phone Number, right-click the B column letter and choose Insert.
Excel adds a blank column in the B position. The original Phone Number column moves one place to the right and becomes column C. You can then click cell B1 and type Sex, as shown in the image below.
Beginner Tip:
Think of the selected column as the column that will move right. The new blank column appears before it.
Beginner Warning:
Do not right-click inside a single cell if you want to add a full column. For this lesson, right-click the column letter at the top of the worksheet so Excel knows you want to insert a full worksheet column.
If selecting a full column still feels new, review the previous lesson on how to select columns in Excel before practicing this step.
Once you understand the right-click method, the Ribbon method gives you another way to do the same task from Excel’s main menu.
How to Insert a Column in Excel from the Home Tab
The Home tab method is helpful if you prefer using Excel’s Ribbon instead of the right-click menu. It also helps beginners become more familiar with where common worksheet commands are located.
This method uses the official Insert command in the Cells group. The result is the same: Excel inserts a blank column to the left of the selected column.
Steps to Use the Ribbon
Use this method when you want a menu-based option that does not depend on right-clicking.
- Click the column letter to the right of where the new column should appear.
- Go to the Home tab.
- In the Cells group, click the arrow below Insert.
- Choose Insert Sheet Columns.
Navigation path:
Home tab → Cells group → Insert → Insert Sheet Columns
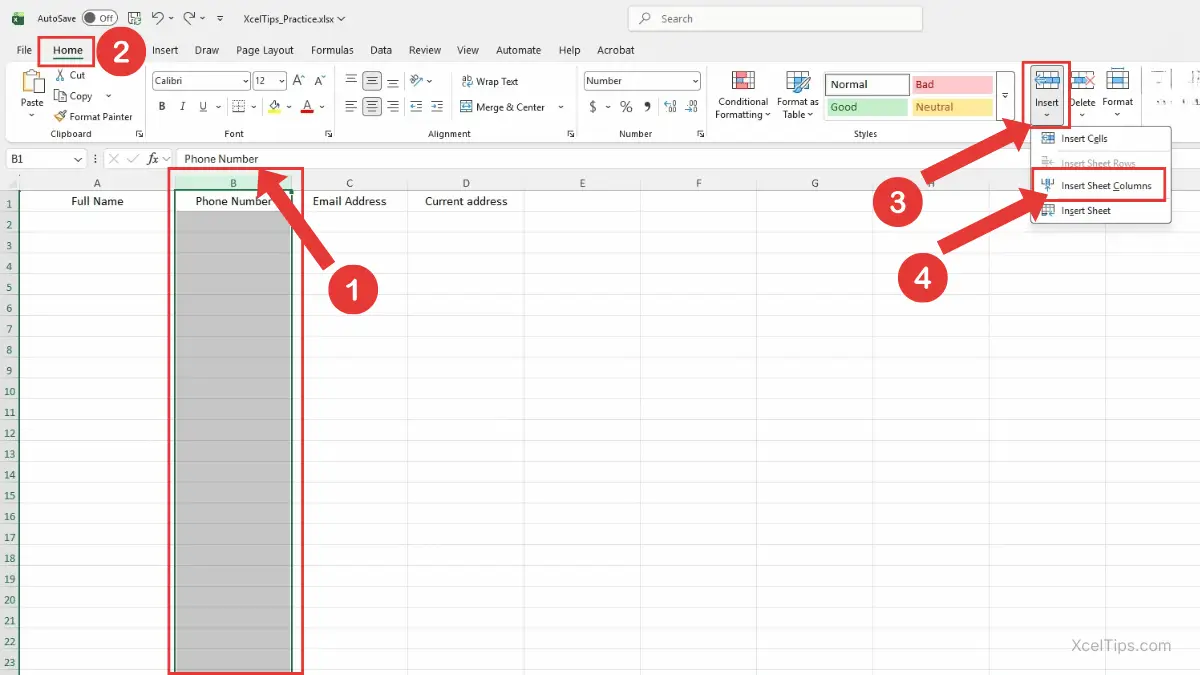
In this example, the Phone Number column is selected because it needs to move to the right. After choosing Insert Sheet Columns, Excel adds a new blank column in column B, where you can type such as Sex as the new column heading.
For the official reference, see Microsoft’s guide to inserting rows and columns in Excel.
This method is useful when you are already working from the Ribbon and want to keep your actions visible. It is also a good option for YouTube tutorials because viewers can clearly follow the menu path.
Beginner Tip:
If you click the main Insert button instead of the arrow, Excel may insert a column automatically when a full column is selected. However, using the arrow is clearer for beginners because it shows the exact Insert Sheet Columns option.
After learning the menu method, it helps to compare it with the faster keyboard method.
Add a Column in Excel with a Keyboard Shortcut
Keyboard shortcuts are useful when you repeat the same action many times. For beginners, the shortcut method may feel less visual at first, but it becomes fast once you understand the order.
The safest beginner method is to select the full column first, then use the insert shortcut. This avoids opening the wrong insert options.
Steps to Use the Keyboard
Follow these steps carefully so Excel inserts a full column instead of asking what type of cells you want to insert.
- Click any cell in the column to the right of where the new column should appear.
- Press Ctrl + Space to select the entire column.
- Press Ctrl + Shift + Plus (+).
- Excel inserts a new column to the left of the selected column.
On some keyboards, the plus sign shares the same key as the equals sign. In that case, the shortcut may feel like pressing Ctrl + Shift + =.
For example, if your active cell is in column C and you press Ctrl + Space, Excel selects column C. When you press Ctrl + Shift + Plus (+), Excel inserts a blank column to the left of column C.
Beginner Warning:
If you only select one cell and press the insert shortcut, Excel may show an Insert dialog instead of instantly adding a full column. Select the full column first to keep the result simple.
If you make a mistake, press Ctrl + Z right away. You can learn more about reversing actions in the guide to the Undo Redo shortcut in Excel.
The shortcut is fast for one column, but sometimes you need to insert more than one column at the same time.
How to Add Multiple Columns in Excel
When you need more than one new column, you do not have to repeat the insert command again and again. Excel can add multiple columns at once if you select the correct number of columns first.
The rule is simple: select the same number of columns as the number of new columns you want to add.
Steps to Add Multiple Columns Using Right-Click
Use this method when your worksheet needs several new fields beside existing data.
- Select the same number of existing column letters you want to insert.
- Right-click one of the selected column letters.
- Click Insert.
Excel inserts the same number of blank columns to the left of the selected columns.
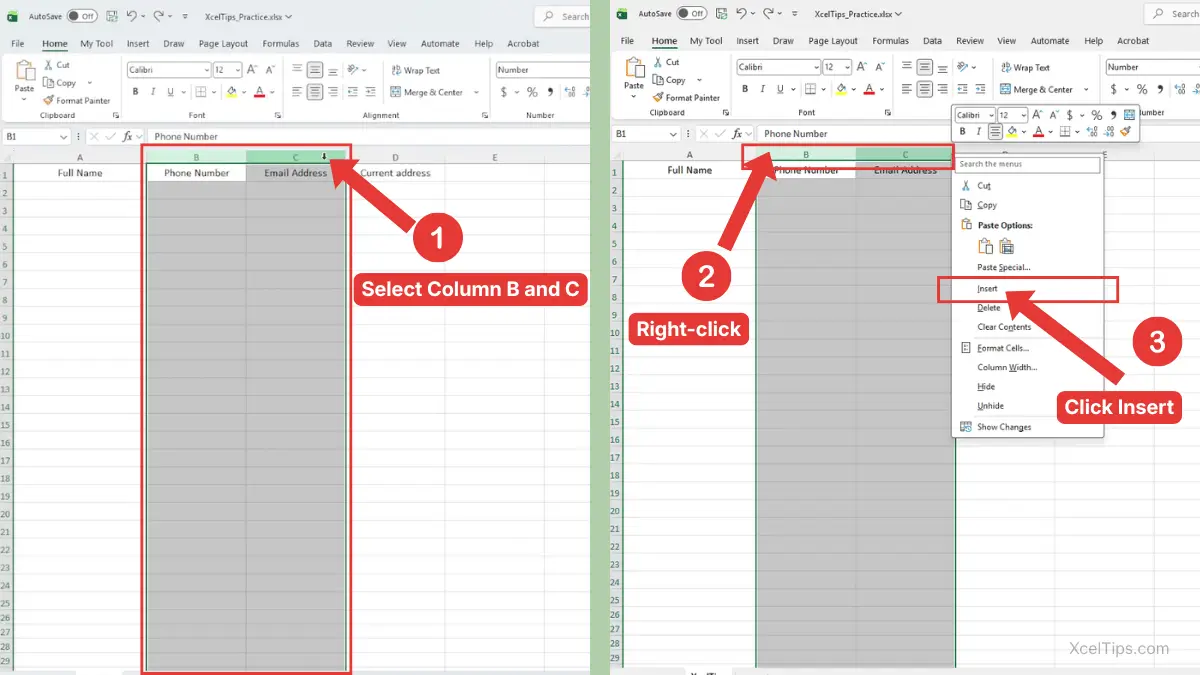
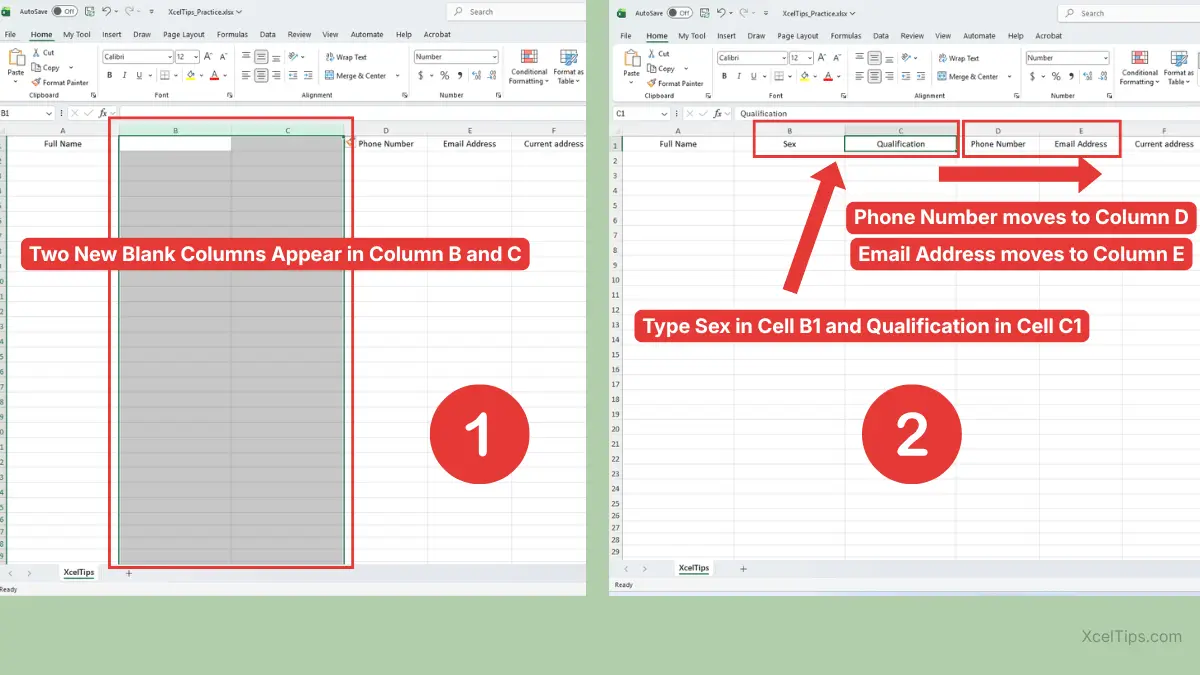
For example, suppose your worksheet has Full Name in column A, Phone Number in column B, Email Address in column C, and Current Address in column D. If you want to add two new columns, Sex and Qualification, before Phone Number and Email Address, select columns B and C first. Then right-click the selected column letters and choose Insert. Excel adds two blank columns before the original column B, so you can type Sex in cell B1 and Qualification in cell C1, as shown in the image below.
Can You Add Multiple Columns from the Home Tab or with a Keyboard Shortcut?
You can also add multiple columns from the Home tab or with a keyboard shortcut. The steps are the same as adding one column. The only difference is that you first select the same number of columns as the number of new columns you want to insert.
For example, to add two columns, select two column letters first. Then use Home tab → Cells group → Insert arrow → Insert Sheet Columns, or press Ctrl + Shift + Plus (+).
Here is a simple way to remember it. Use this table as a quick check before you select columns.
| New Columns Needed | Columns to Select First | Result |
|---|---|---|
| 1 new column | 1 column | 1 blank column is inserted |
| 2 new columns | 2 columns | 2 blank columns are inserted |
| 3 new columns | 3 columns | 3 blank columns are inserted |
Beginner Tip:
For best results, select adjacent columns when practicing. Non-adjacent selections can feel confusing because Excel may insert columns in more than one place.
Adding multiple columns is helpful when you are improving a data list. For example, a customer list may need new columns for email, city, and status. A sales sheet may need new columns for tax, discount, and final total.
Before choosing a method, it helps to know which option is best for different beginner situations.
Which Method Should You Use?
All three methods add columns in Excel, but each one feels different. Beginners usually start with the right-click method because it is easy to see what is happening.
The table below compares the main options so you can choose the method that fits your situation.
| Method | Best For | Why It Helps |
|---|---|---|
| Right-click column letter | Beginners adding one column | Simple and visual |
| Home tab command | Learning Excel’s Ribbon | Shows the official menu path |
| Keyboard shortcut | Repeated column insertion | Faster after practice |
| Multiple-column selection | Adding several columns | Saves time and reduces repeated steps |
If you are learning how to add a column in Excel for the first time, start with the right-click method. After that, practice the Home tab method once so you know where the command lives. Use the keyboard shortcut later when you feel comfortable selecting full columns.
No matter which method you use, the most important part is choosing the correct column first.
The next section explains what happens to your existing data.
What Happens to Existing Data When You Add a Column?
A common beginner worry is whether inserting a column will delete existing data. In normal use, Excel does not delete the data. It shifts the existing columns to the right to make space.
This is why selecting the correct column before inserting is important. The selected column moves right, and the new blank column appears in its old position.
Simple Example
Suppose your worksheet has this layout:
| Column A | Column B | Column C |
|---|---|---|
| Name | Phone | City |
If you want to add an Email column between Name and Phone, you should select column B first. Then insert a column. Excel moves Phone from column B to column C, and City from column C to column D.
The new layout becomes:
| Column A | Column B | Column C | Column D |
|---|---|---|---|
| Name | Phone | City |
This is why you should always ask: “Which column should move right?” The answer tells you which column to select.
Beginner Warning:
If your worksheet contains formulas, charts, or references, inserting columns may affect how those items appear or calculate. In many simple workbooks, Excel adjusts references automatically, but beginners should still check important formulas after changing the worksheet structure.
If your main goal is to enter information into the new column, the lesson on how to enter data in Excel can help you practice typing values, labels, and simple entries correctly.
After you understand how data moves, you can avoid the most common beginner mistakes.
Common Mistakes When Adding Columns
Most problems happen because the new column appears in a different place than expected. The good news is that these mistakes are easy to avoid once you know what to check.
This section covers the issues beginners are most likely to face when they add a column in Excel.
Mistake 1: Selecting the Wrong Column
The new column appears to the left of the selected column. If you select the wrong column, the blank column will appear in the wrong place.
Before inserting, pause and look at the column letter. Ask yourself whether that column is the one you want to move right.
Mistake 2: Right-Clicking a Cell Instead of the Column Letter
Right-clicking inside a cell can show different options. If you want a full column, use the column letter at the top of the worksheet.
This keeps the action clear and avoids inserting only cells or shifting part of your worksheet.
Mistake 3: Forgetting That Data Shifts Right
When Excel adds a column, existing columns move right. This is usually what you want, but it can surprise beginners when headings move to new letters.
The column letters may change, but the data itself remains in order.
Mistake 4: Adding Too Many Columns
If you accidentally add more columns than needed, use Ctrl + Z immediately. This removes the last action and returns the worksheet to its previous layout.
You can also delete extra columns later, but that belongs to the next lesson on how to delete columns in Excel.
Mistake 5: Not Checking the Header Row
After inserting a new column, add a clear header at the top. Without a header, the new column may be confusing later.
For example, instead of leaving the new column blank, type a simple label such as Email, Status, Region, or Notes.
With the common mistakes out of the way, let’s practice the full process in a blank worksheet.
Quick Practice
Use this short practice task to make the lesson stick. You can do it in a blank workbook or a simple sample worksheet.
- Create three headings in row 1:
Name,Phone, andCity. - Select column B.
- Insert a new column.
- Type
Emailin cellB1. - Select columns C and D.
- Insert two new columns.
- Type
StatusandNotesinto the new blank headings. - Press Ctrl + Z once to undo the last insertion.
This practice helps you understand where new columns appear and how Excel shifts existing data.
Before moving on, review the main points from this lesson. These are the rules and shortcuts you will use most often when adding columns in Excel.
Key Takeaways
Use this recap to remember the main rule and the fastest ways to insert columns.
- To add a column, select the column to the right of where the new column should appear.
- Excel inserts new columns to the left of the selected column.
- The right-click method is the easiest option for most beginners.
- The Ribbon method is Home tab → Cells group → Insert → Insert Sheet Columns.
- The keyboard method is Ctrl + Space, then Ctrl + Shift + Plus (+).
- To add multiple columns, select the same number of columns first.
- Use Ctrl + Z if you insert a column in the wrong place.
Even after learning the steps, beginners often have a few common questions about where new columns appear and what happens to existing data. The answers below clarify the most important points.
Frequently Asked Questions (FAQs)
Here are quick answers to common beginner questions about adding columns in Excel.
How do I add columns in Excel without deleting data?
Select the column to the right of where you want the new column to appear, then insert a column. Excel shifts the existing data to the right instead of deleting it.
How do I add a column in Excel between two existing columns?
Click the column letter on the right side of the space where you want the new column. For example, to add a column between B and C, select column C, right-click it, and choose Insert.
What is the difference between adding and inserting a column?
For beginners, they usually mean the same thing. Excel’s command is called Insert, but many people say “add a column” when they want to place a new blank column into the worksheet.
Can I add multiple columns in Excel at once?
Yes. Select the same number of existing columns as the number of new columns you want. Then right-click the selected column letters and choose Insert.
Why did Excel add the column in the wrong place?
Excel inserts new columns to the left of the selected column. If the column appears in the wrong place, you probably selected the wrong column letter before choosing Insert.
What shortcut adds a column in Excel?
Select the full column first with Ctrl + Space, then press Ctrl + Shift + Plus (+). This inserts a new column to the left of the selected column.
Once you understand how columns shift, adding new columns becomes simple. Let’s wrap up with the key idea and next step.
Conclusion
Learning how to add columns in Excel helps you adjust a worksheet when new information needs to be added. The key rule is simple: select the column to the right of the desired location, then insert. Excel creates a blank column and shifts existing data to the right.
For beginners, the right-click method is the best place to start. After that, practice the Home tab method and keyboard shortcut so you can choose the option that feels most comfortable.
This lesson is part of the Beginner Learning Path, a structured series designed to help you learn Microsoft Excel step by step from the basics.
← Previous Lesson
How to Delete Rows in Excel: Step-by-Step Guide for Beginners