Written By Sophanith Dith
Last Updated May 05, 2026
Applies to Microsoft Excel 365 (Windows only)
Part of the Beginner Learning Path
Module 2 Working with Data
Lesson 8 of 22
Deleting an unwanted column is one of the first worksheet cleanup skills beginners need to learn. Maybe you imported a file with extra information, added a temporary helper column, or no longer need part of your spreadsheet. Learning how to delete columns in Excel helps you remove unnecessary data and keep your worksheet easier to read.
In Excel, deleting a column removes the entire vertical column from the worksheet. The columns to the right then shift left to fill the empty space. This is different from simply clearing the contents, which removes the values but leaves the column in place.
In this tutorial, you will learn the safest beginner-friendly ways to delete columns, what to check before deleting, and how to avoid common mistakes.
Quick Answer:
To delete a column in Excel, click the column letter at the top of the worksheet, right-click the selected column, and choose Delete. Excel removes the full column and shifts the columns on the right to the left. You can also use Home tab → Cells group → Delete → Delete Sheet Columns.
Before going through each method step by step, here is a quick overview of the safest ways to delete columns in Excel and when each method is useful.
Quick Reference
Use this quick overview before going into the full steps. It gives you the main methods at a glance so you can choose the one that feels easiest.
- Select the column letter before deleting a full column.
- Right-click the selected column and choose Delete for the fastest mouse method.
- Use Home tab → Cells group → Delete → Delete Sheet Columns if you prefer the Ribbon.
- Select the full column first, then press Ctrl + - to delete it with a shortcut.
- Deleting a column removes the whole column, not just the visible data.
- Use Ctrl + Z immediately if you delete the wrong column.
The rest of the lesson explains each method slowly and clearly, with beginner warnings where mistakes often happen.
Before deleting anything, it helps to understand what Excel is actually removing.
What Happens When You Delete a Column in Excel?
When you delete a column, Excel removes the entire column from the worksheet. This includes all values, formulas, formatting, notes, and anything else stored in that column.
The columns on the right move left to close the gap. For example, if you delete column B, column C moves into the old column B position. This keeps the worksheet layout continuous, but it can also affect formulas or references if other parts of the workbook depend on that deleted column.
Delete vs Clear Contents
Beginners often confuse deleting a column with clearing a column. These actions are not the same, and choosing the wrong one can change your worksheet more than expected.
| Action | What It Does | When to Use It |
|---|---|---|
| Delete column | Removes the entire column and shifts other columns left | Use when the column is no longer needed |
| Clear contents | Removes the data but keeps the column in place | Use when you want an empty column |
| Hide column | Keeps the column but removes it from view | Use when you may need the column later |
This is why selecting the right command matters. Delete changes the worksheet layout, while Clear Contents only removes what is inside the selected cells.
Beginner Warning:
If you only want to remove the values inside a column, do not delete the column. Select the cells and press Delete on your keyboard instead.
If you are not fully sure whether the column should be removed forever, hiding it may be a safer choice. This lesson focuses on deleting, but hiding columns is a better option when you only want to remove information from view temporarily.
Once you understand what deleting means, the easiest method is the right-click menu.
How to Delete Columns in Excel with the Right-Click Menu
The right-click method is usually the easiest way for beginners to delete a column. It works because you can select the column first, then choose the action directly from the menu.
This method is best when you are working with one or a few columns and want a simple visual process.
Delete One Column
To delete one column, start by selecting the full column. The safest way is to click the column letter at the top of the worksheet.
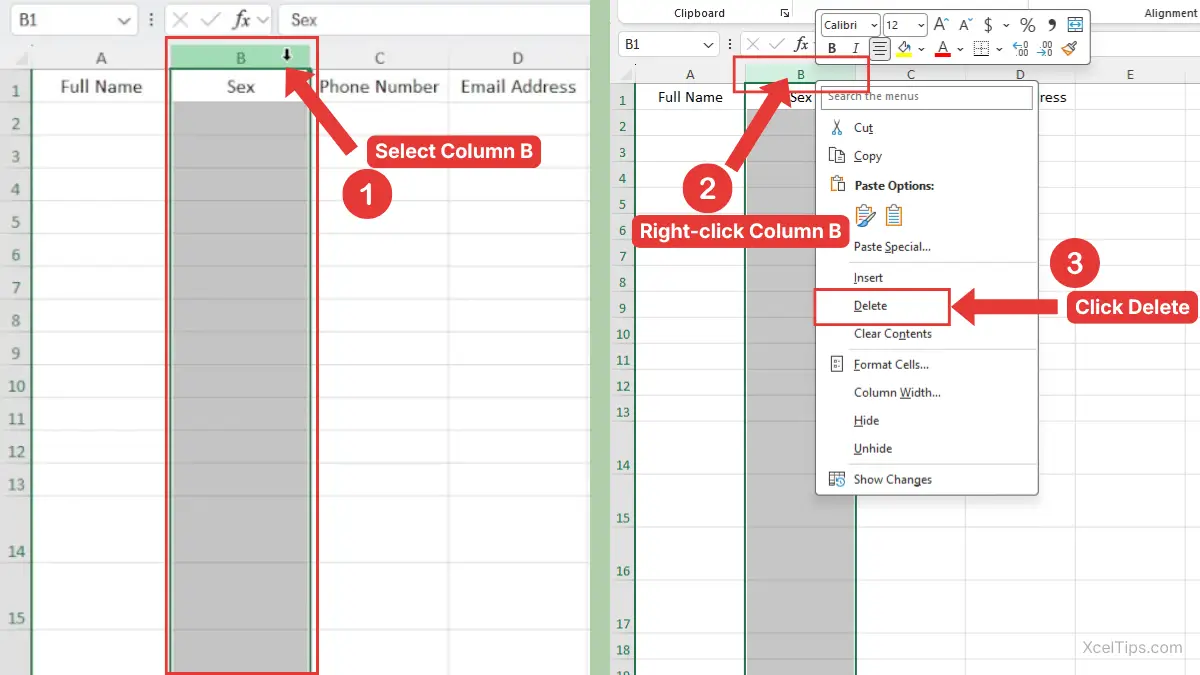
- Move your mouse pointer to the column letter at the top of the column you want to delete. Then Click the column letter once.
- Right-click the selected column letter.
- Click Delete.
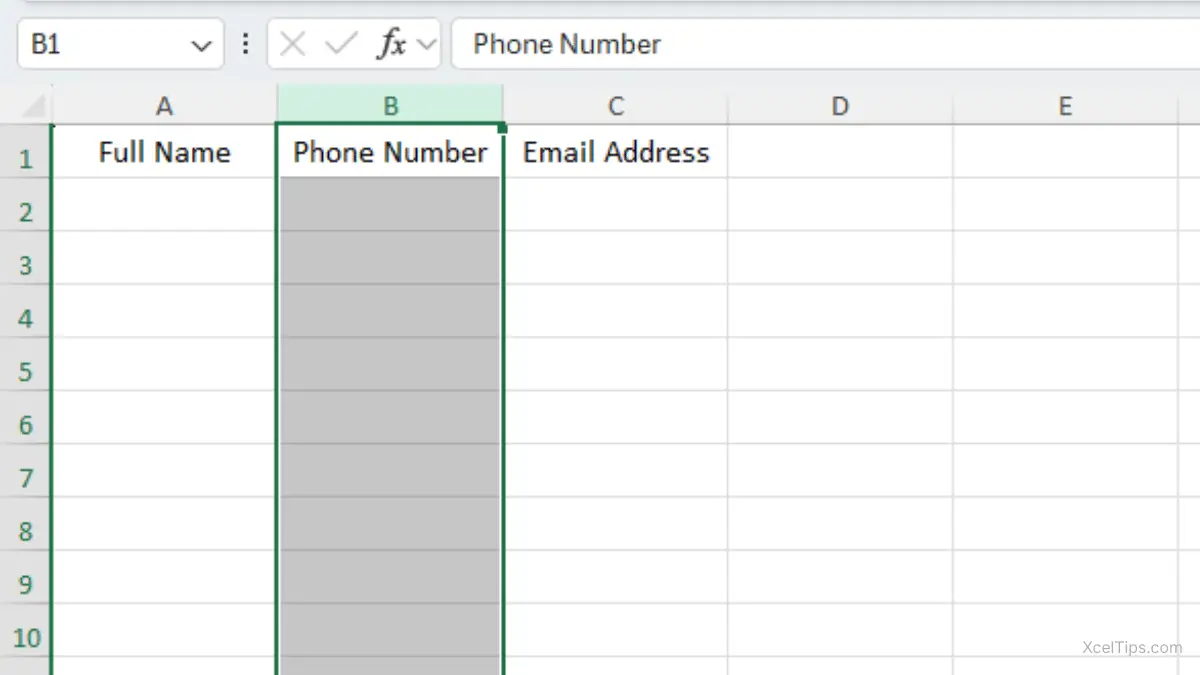
Excel removes the selected column immediately. The columns to the right shift left.
For example, suppose column A contains Full Name, column B contains Sex, column C contains Phone Number, and column D contains Email Address. If you delete column B, Excel removes Sex, moves Phone Number into column B, and moves Email Address into column C, as shown in the image below.
Beginner Tip:
Always click the column letter, not just a single cell inside the column. If you select only one cell, Excel may ask how you want to shift cells, which can be confusing for beginners.
Delete Multiple Adjacent Columns
Adjacent columns are columns that sit next to each other, such as columns B, C, and D. You can remove them together instead of deleting one at a time.
First, select the full group of columns. Then use the same right-click method.
- Click the first column letter you want to delete.
- Hold your mouse button and drag across the other column letters.
- Release the mouse button when all needed columns are selected.
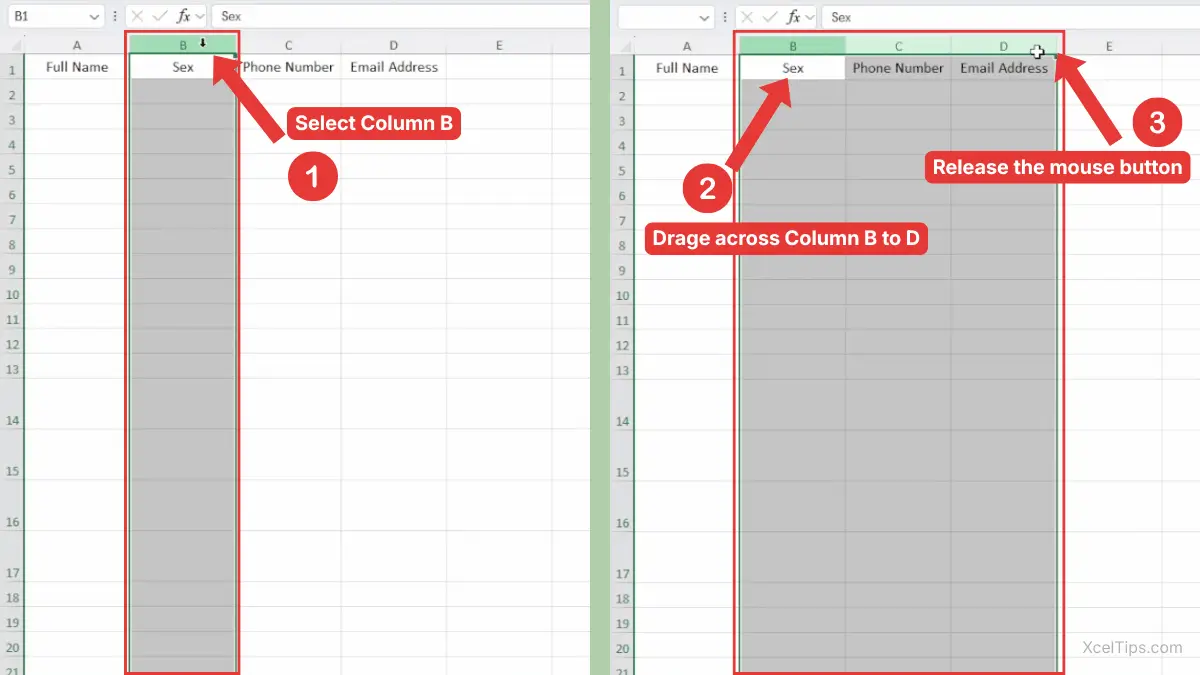
- Right-click any selected column letter.
- Click Delete.
- Excel removes all selected columns at the same time.
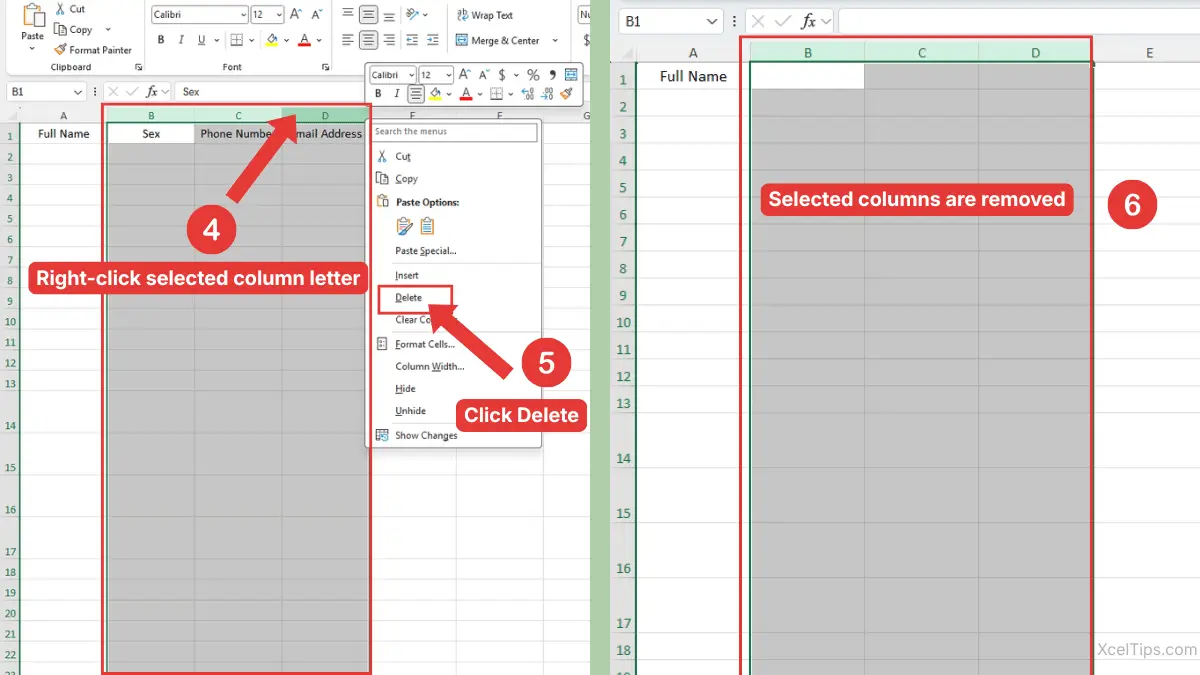
For example, suppose column A contains Full Name, column B contains Sex, column C contains Phone Number, and column D contains Email Address. If you delete columns B through D, Excel removes those three adjacent columns at the same time. Column A stays in place, and any columns to the right move left to close the gap.
If you need a refresher on selecting worksheet columns first, see this guide on how to select columns in Excel.
Delete Non-Adjacent Columns
Non-adjacent columns are columns that are not next to each other, such as columns B, D, and F. You can delete them together, but you need to select them carefully first.
This is useful when your worksheet has several separate columns you no longer need.
- Click the first column letter.
- Hold Ctrl on your keyboard.
- Click each additional column letter you want to delete.
- Release Ctrl after all columns are selected.
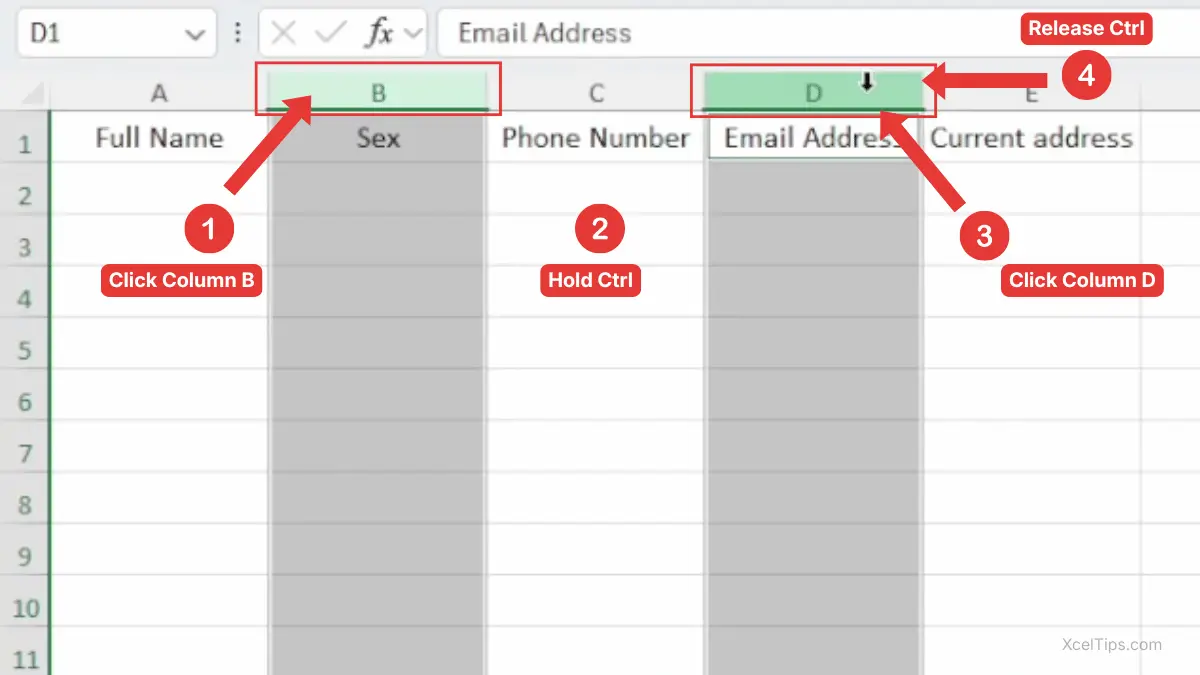
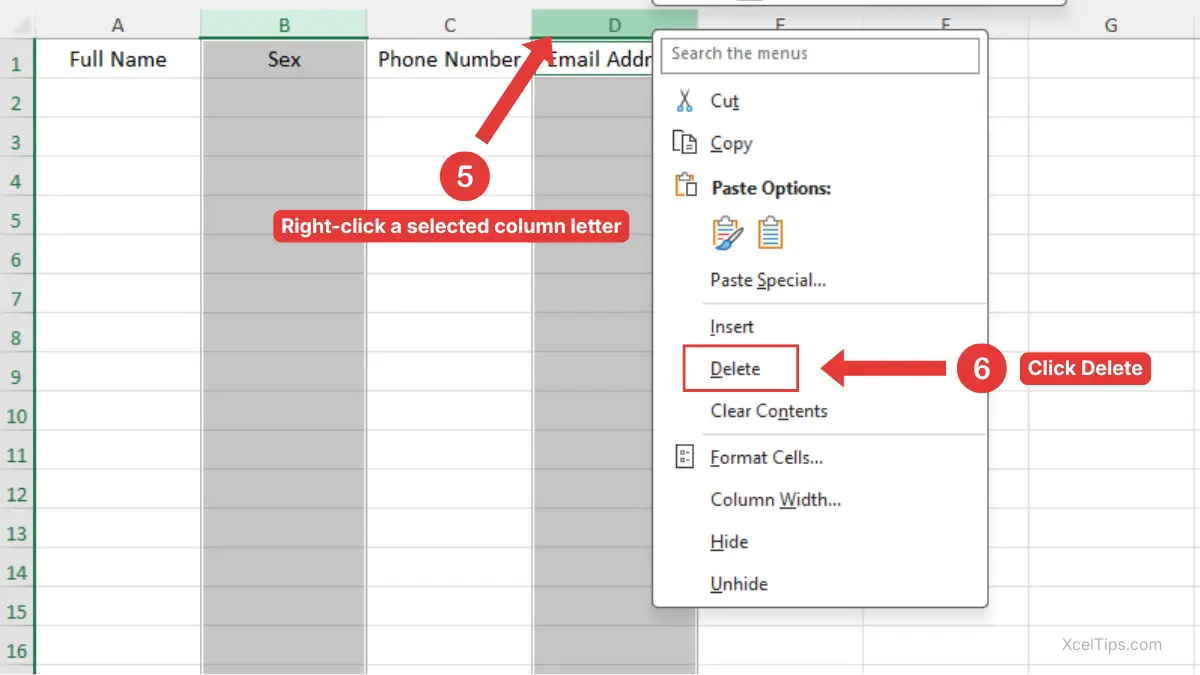
- Right-click one of the selected column letters.
- Click Delete.
Excel deletes all selected columns and shifts the remaining columns left.
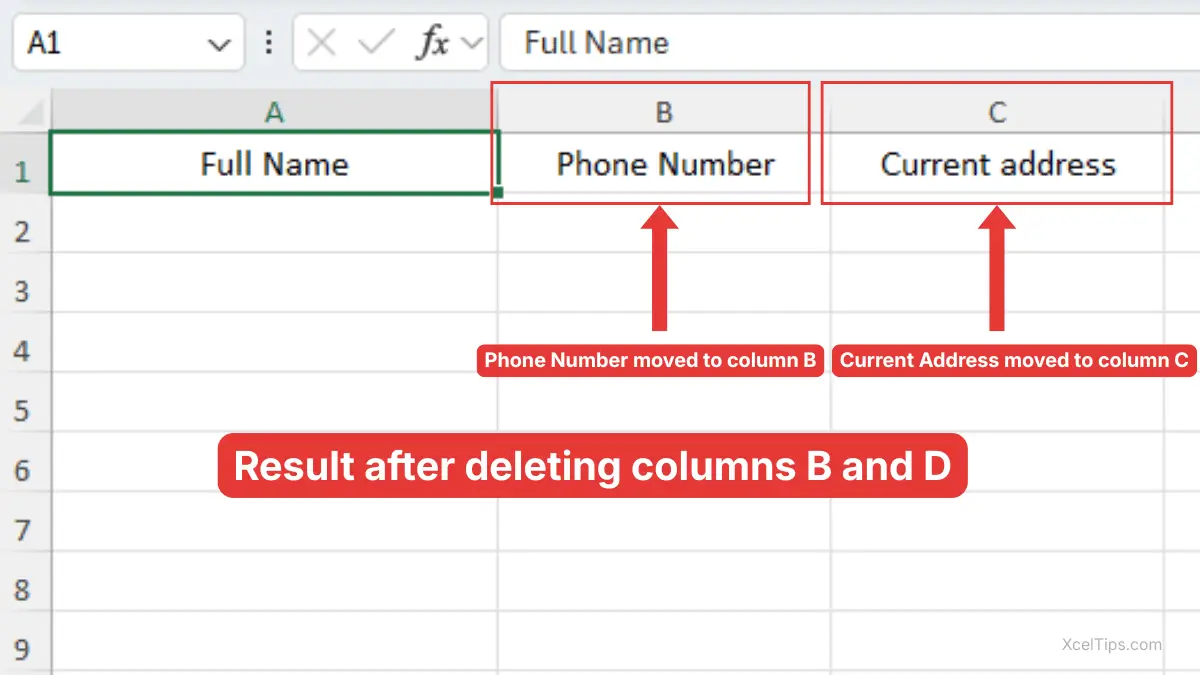
For example, suppose column A contains Full Name, column B contains Sex, column C contains Phone Number, column D contains Email Address, and column E contains Current Address. If you delete columns B and D, Excel removes Sex and Email Address at the same time. Full Name stays in column A, Phone Number moves from column C to column B, and Current Address moves from column E to column C, as shown in image below.
Beginner Warning:
Be careful when deleting non-adjacent columns. Because Excel shifts columns left after deletion, the worksheet layout may change more than you expect. Review your selection before clicking Delete.
The right-click method is fast, but Excel also gives you a Ribbon method if you prefer using visible commands.
How to Remove a Column in Excel from the Home Tab
The Home tab method is helpful if you are still learning Excel and prefer using buttons instead of right-click menus. It also shows where the delete command lives in the Excel interface.
This method uses the Cells group on the Ribbon. The Ribbon is the row of tabs and commands across the top of Excel.
Use Delete Sheet Columns
To remove a column in Excel from the Home tab, select the column first. Then use the delete command from the Ribbon.
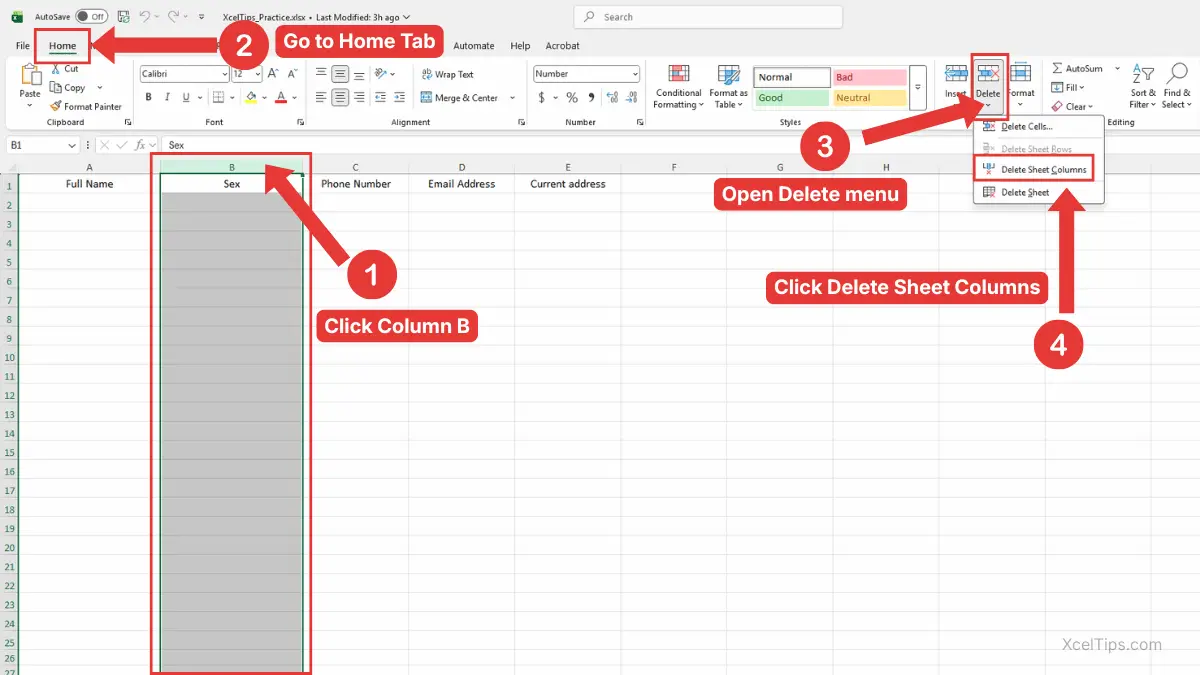
- Click the column letter you want to delete.
- Go to the Home tab.
- In the Cells group, click the arrow next to Delete.
- Click Delete Sheet Columns.
Excel deletes the selected column from the worksheet.
To delete multiple columns with the Home tab, select the columns first, then use the same Delete Sheet Columns command. This works for adjacent columns and non-adjacent columns as long as they are selected before you open the Delete menu.
The full navigation path is:
Home tab → Cells group → Delete → Delete Sheet Columns
This method is useful because it clearly tells Excel that you want to delete a sheet column, not just remove cell contents.
Microsoft also explains how to insert or delete rows and columns in Excel using the Home tab or the right-click menu.
When the Ribbon Method Is Better
The Ribbon method is not always faster, but it is very beginner-friendly. It is a good choice when you want to slow down and confirm the command before using it.
Use this method when:
- You are new to Excel commands.
- You want to avoid right-clicking the wrong place.
- You are following a tutorial step by step.
- You want to learn where Excel stores worksheet layout tools.
If you recently learned how to add columns in Excel, this method will feel familiar. The Insert and Delete commands are both found in the Cells group on the Home tab.
Once you are comfortable with the visual methods, you may want a faster way to delete columns while working.
Shortcut to Delete Columns in Excel
The main shortcut to delete columns in Excel is Ctrl + -, but it works best after you select the entire column first. If only one cell is selected, Excel may open a Delete dialog box instead of immediately removing the full column.
This method is quick, but it works best when you already know how to select the full column correctly. Beginners should practice it slowly at first.
Delete a Column with the Keyboard Shortcut
To use the shortcut safely, select the entire column before pressing the shortcut. This tells Excel that you want to delete the full worksheet column.
- Click the column letter you want to delete.
- Press Ctrl + -.
- Excel deletes the selected column.
For example, if you want to delete column C, click the C column letter and press Ctrl + -. Excel removes column C and shifts the columns on the right to the left.
Beginner Tip:
If you select a full column first, Excel usually deletes the full column directly. If you select only a cell, Excel may show a delete dialog box asking how to shift cells.
Use the Shortcut After Selecting Multiple Columns
The shortcut also works with multiple selected columns, including both adjacent and non-adjacent columns. The key is to select the columns first.
- Select the columns you want to remove.
- Press Ctrl + -.
- Excel deletes all selected columns.
This is a useful shortcut when cleaning up a worksheet with several unnecessary columns.
If you accidentally delete the wrong column, press Ctrl + Z right away. You can learn more about reversing mistakes in the guide to the Undo Redo shortcut in Excel.
Deleting columns becomes easier when you know which method fits each situation.
Which Method Should Beginners Use?
All three methods delete columns, but they do not feel the same when you are learning. Choosing the right method depends on whether you prefer clicking, using the Ribbon, or using the keyboard.
This table can help you decide which method to use while you are still building confidence.
| Method | Best For | Beginner Difficulty |
|---|---|---|
| Right-click menu | Fast everyday use | Easy |
| Home tab method | Learning Excel commands visually | Very easy |
| Keyboard shortcut | Deleting columns faster after you know how to select them | Medium |
| Clear contents | Removing data but keeping the column | Easy |
| Hide column | Temporarily removing a column from view | Easy |
For most beginners, the right-click method is the best starting point. It is simple, direct, and easy to remember.
The Home tab method is better when you are following a tutorial or want to understand where the command is located. The shortcut is best after you already feel comfortable selecting full columns.
Before deleting columns in a real worksheet, watch out for these common beginner mistakes.
Common Mistakes When Deleting Columns
Many Excel mistakes happen because a beginner selects the wrong thing before using Delete. The command itself is simple, but the selection matters.
Here are the most common issues to watch for when learning how to remove columns in Excel.
Mistake 1: Selecting One Cell Instead of the Whole Column
If you click only one cell and choose Delete, Excel may not delete the full column. Instead, it may open a dialog box asking whether to shift cells left or shift cells up.
That can change part of your worksheet in an unexpected way.
To avoid this, click the column letter at the top of the worksheet before deleting.
Mistake 2: Pressing the Delete Key Instead of Deleting the Column
The Delete key removes the contents inside the selected cells. It does not remove the column itself from the worksheet.
For example, if you select column E and press Delete, Excel removes the values from column E, but the column itself stays in place.
To delete the actual column, use right-click Delete, Delete Sheet Columns, or Ctrl + -.
Mistake 3: Deleting a Column That Should Be Hidden
Sometimes you do not need to permanently remove a column. You may only want to hide it because it is not needed on screen.
For example, a worksheet might contain a helper column used for calculations. If you delete it, formulas may stop working. If you hide it, the column stays in the workbook but does not distract the reader.
Mistake 4: Not Reviewing Multiple Selected Columns
When selecting several columns, especially non-adjacent columns, it is easy to include the wrong column by accident. Always look at the highlighted column letters before deleting.
If the wrong column is selected, click somewhere else and start again.
Mistake 5: Forgetting to Undo Immediately
If you notice a mistake right away, press Ctrl + Z before making more changes. Undo is easiest when used immediately after the mistake.
Once you continue editing, it may become harder to return the worksheet to the exact earlier state.
After reviewing the common mistakes, it helps to try the process on a simple sample worksheet before using it in a real file.
Quick Practice
Practice is the best way to make column deletion feel natural. Use a simple sample worksheet so you can make mistakes without worrying about real data.
Create a small worksheet with sample headings before trying the steps below.
- In row 1, type these headings:
Name,Email,Old Code,Department,Notes. - Enter a few sample rows of data.
- Click the
Old Codecolumn letter. - Right-click the selected column.
- Click Delete.
- Press Ctrl + Z to undo the deletion.
- Select the
Old Codecolumn again. - Press Ctrl + - to delete it with the shortcut.
This quick practice helps you compare the right-click method and the keyboard shortcut. It also shows why Undo is useful when learning.
Once you can delete a sample column confidently, the main ideas are easy to remember.
Key Takeaways
Deleting columns is a basic Excel layout skill, but it affects the structure of the worksheet. Always check what you selected before using the delete command.
- Click the column letter to select a full column.
- Right-click and choose Delete for the easiest beginner method.
- Use Home tab → Cells group → Delete → Delete Sheet Columns if you prefer the Ribbon.
- Use Ctrl + - as the shortcut to delete columns in Excel.
- Pressing the Delete key clears contents but does not remove the column.
- Use Ctrl + Z right away if you delete the wrong column.
- Hide a column instead of deleting it if you may need the data later.
These points cover the main skill, but beginners often have a few extra questions before using it in real files.
Frequently Asked Questions (FAQs)
Here are quick answers to common beginner questions about deleting worksheet columns.
How do I delete columns in Excel without deleting the wrong data?
Click the column letter first so the entire column is selected. Then review the highlighted column before choosing Delete. If you are unsure, save a copy of the workbook before deleting anything.
How do I delete a column in Excel using the keyboard?
Select the full column by clicking its column letter, then press Ctrl + -. Excel deletes the selected column and shifts the columns on the right to the left.
What is the difference between Delete and Clear Contents?
Delete removes the full column from the worksheet. Clear Contents removes the values inside the selected cells but keeps the column in place.
Can I delete more than one column at the same time?
Yes. Select multiple column letters first, then right-click and choose Delete. You can select adjacent columns by dragging across the column letters, or non-adjacent columns by holding Ctrl while clicking each column letter.
Why did Excel show a delete dialog box?
Excel usually shows a delete dialog box when you selected a cell or range instead of a full column. To avoid this, click the column letter before deleting.
Can I recover a deleted column?
If you just deleted it, press Ctrl + Z immediately. If you saved and closed the workbook after deleting the column, recovery may be harder unless you have a backup or version history.
With those common questions answered, let’s wrap up the main idea and the best next step for your Excel learning path.
Conclusion
Learning how to delete columns in Excel is an important beginner skill because it helps you clean up worksheet structure, remove unwanted information, and keep your spreadsheet easier to read. The safest method is to select the column letter first, then use right-click Delete, the Home tab command, or the Ctrl + - shortcut.
Practice with sample data before using this skill in an important workbook.
This lesson is part of the Beginner Learning Path, a structured series designed to help you learn Microsoft Excel step by step from the basics.