Written By Sophanith Dith
Last Updated May 13, 2026
Applies to Microsoft Excel 365 (Windows only)
Part of the Beginner Learning Path
Module 2 Working with Data
Lesson 14 of 22
If you often type the same kind of information repeatedly in Excel, there is a faster way to do it. You might need to copy a number down a column, continue a list of dates, repeat a formula, or fill months across a row. Learning how to use the fill handle in Excel can save you from typing everything manually.
The fill handle is a small square that appears at the bottom-right corner of a selected cell or range. When you drag it, Excel can copy values, continue patterns, or extend formulas into nearby cells.
This tool is simple, but it is one of the most useful beginner skills in Excel. Once you understand how it works, many everyday worksheet tasks become much faster.
Quick Answer:
To use the fill handle in Excel, select a cell or range, move your pointer to the small square at the bottom-right corner of the selection, then drag down, across, up, or left. Excel can copies the data, continues a pattern, fills dates, or copies formulas based on what you selected.
Before you follow the full steps, use this quick reference to see what the fill handle can do and when to use it.
Quick Reference
The fill handle is useful when you want Excel to help you enter repeated or patterned data quickly. Here are the main things beginners should know before using it.
- The fill handle is the small square at the bottom-right corner of a selected cell.
- You can drag it down, across, up, or left.
- Excel can copy values, continue number patterns, fill dates, and copy formulas.
- The Auto Fill Options button lets you choose how Excel fills the cells.
- If Excel copies when you expected a series, use Auto Fill Options to change the result.
- The fill handle is different from Flash Fill, which recognizes text patterns.
Let’s start by identifying the fill handle so you know exactly what to look for.
What Is the Fill Handle in Excel?
Before you use the tool, it helps to understand what it is. Many beginners see the small square on a selected cell but do not realize it has a special purpose.
The fill handle in Excel is the small square that appears in the bottom-right corner of the active cell or selected range. When you point to it, your mouse pointer changes to a thin black plus sign.
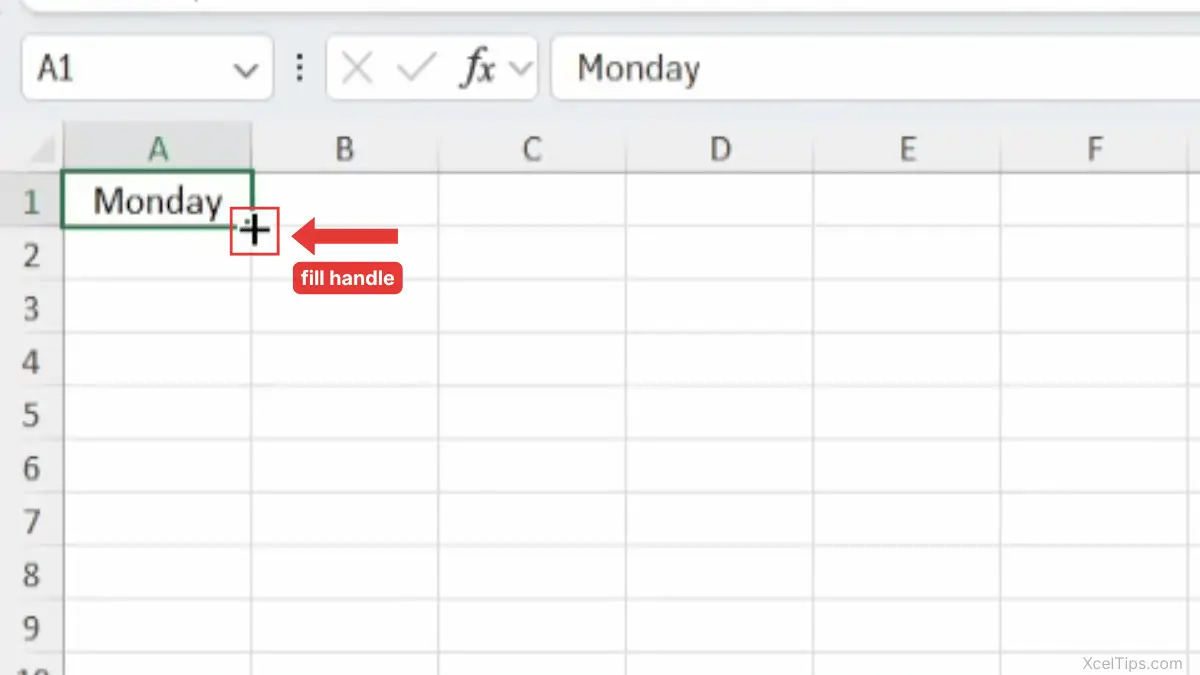
You can use the fill handle to quickly fill nearby cells with related data. For example, if cell A1 contains Monday, dragging the fill handle down can continue the list with Tuesday, Wednesday, Thursday, and so on.
A simple way to think about it is this:
| What You Select | What the Fill Handle Can Do |
|---|---|
| A single word or value | Copy it into nearby cells |
| A pattern such as 1 and 2 | Continue the pattern |
| A date | Continue the date sequence |
| A formula | Copy the formula to other rows or columns |
| A month or weekday | Continue the list |
The Excel fill handle is especially useful when building lists, schedules, budgets, sales sheets, and simple tracking workbooks.
For an official reference, Microsoft also explains how the fill handle can automatically fill worksheet cells with numbers, dates, and other series.
Beginner Tip:
If you do not see the fill handle, make sure the cell is selected and look closely at the lower-right corner of the cell border.
Once you know what the fill handle looks like, the next step is learning the basic drag action.
How to Use the Fill Handle in Excel Step by Step
The basic method is the same whether you are filling text, numbers, dates, or formulas. You select the starting cell, point to the fill handle, then drag.
This section shows the core process first. Later sections explain how the result changes depending on the type of data you selected.
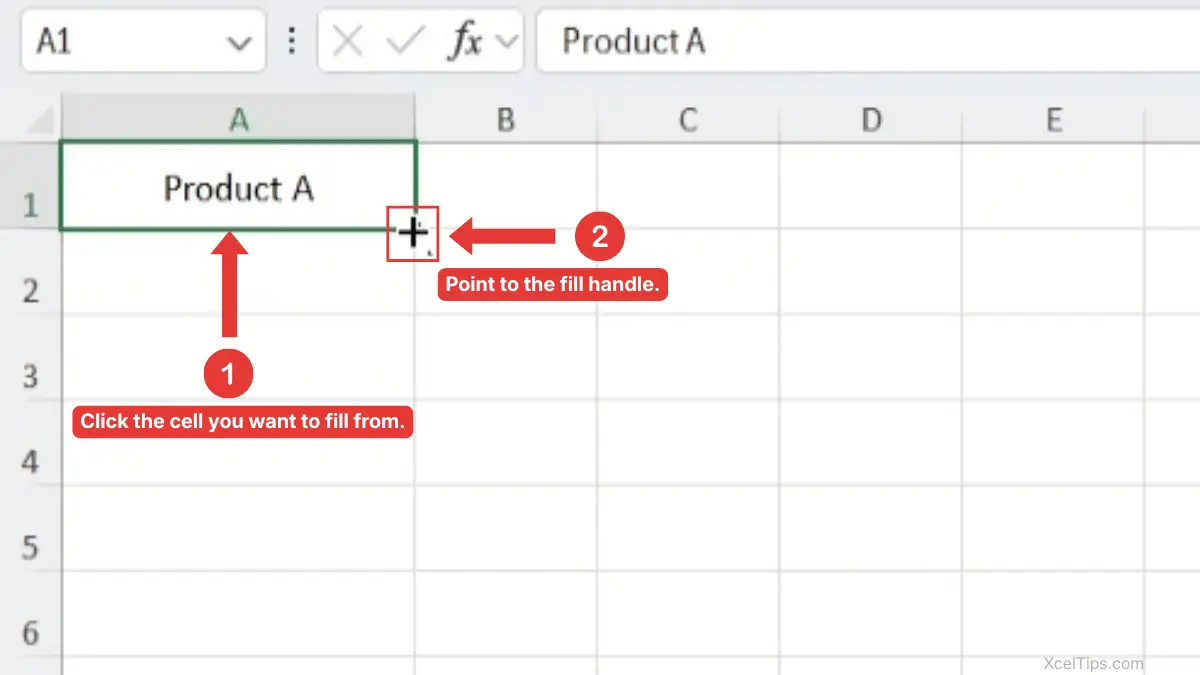
For example, if cell A1 contains Product A, dragging the fill handle down to A5 copies Product A into A2 through A5. Follow these steps when you want to fill nearby cells.
- Click the cell that contains the value, date, text, or formula you want to fill.
- Move your mouse pointer over the small square at the bottom-right corner of the selected cell until the pointer changes to a thin black plus sign.
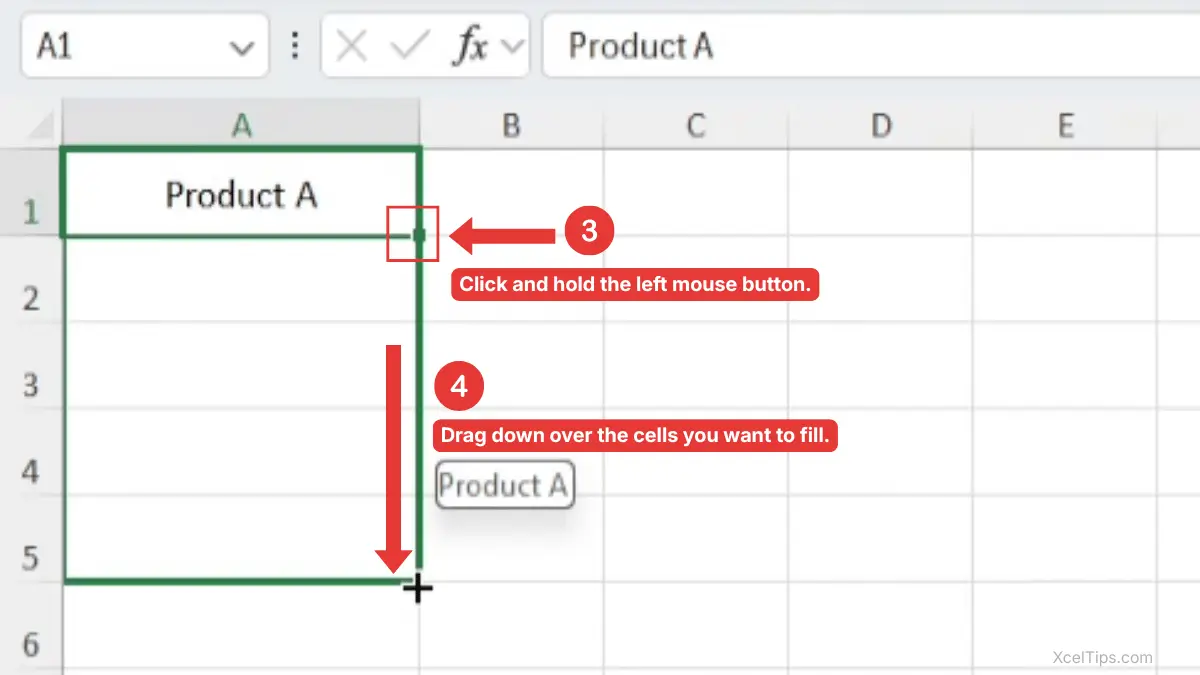
- Click and hold the left mouse button.
- Drag down, across, up, or left over the cells you want to fill.
- Release the mouse button and check the result.
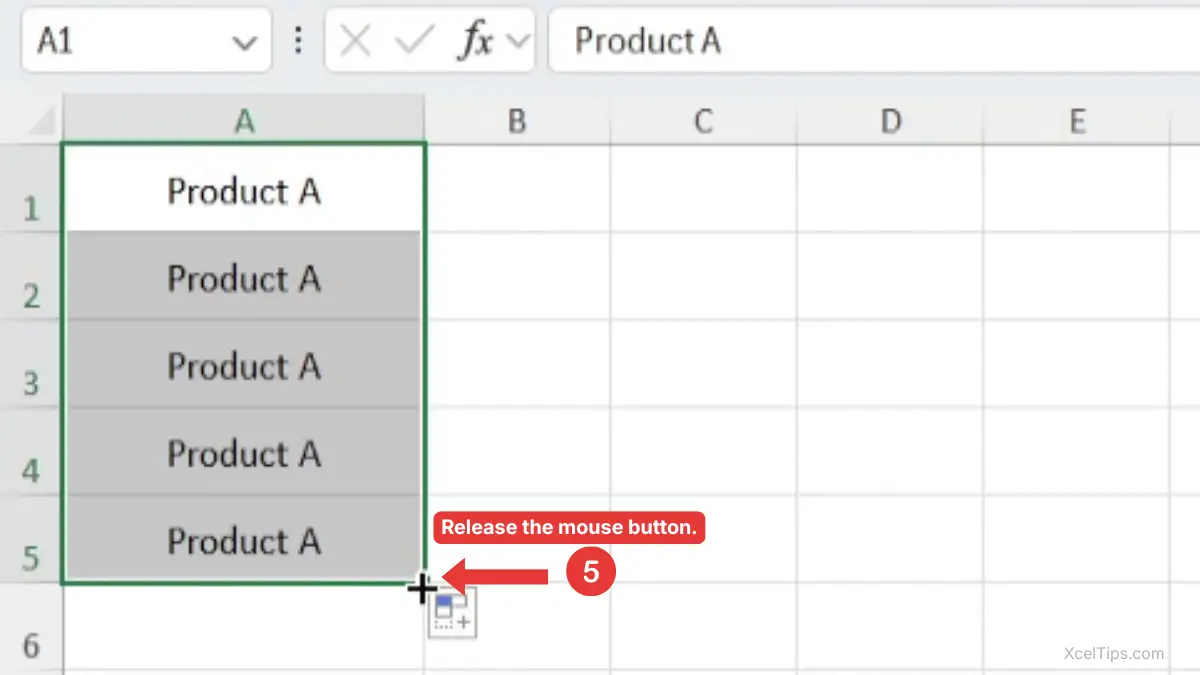
Excel fills the selected area based on the starting value.
Beginner Warning:
Make sure you drag from the small square at the bottom-right corner, not from the middle of the cell border. Dragging from the border may move the cell instead of filling other cells.
This basic action works for copying, but the fill handle becomes more powerful when Excel detects a pattern.
Use the Fill Handle to Copy the Same Value
The simplest use of the fill handle is copying the same value into nearby cells. This is helpful when several rows share the same category, status, department, or label.
For beginners, this is often the safest first use because Excel does not need to guess a complex pattern. It simply repeats the value.
Example: Copy a Category Down a Column
Suppose you have a product list, and several rows belong to the same category.
- Type
Office Suppliesin cellB2. - Click cell
B2again to select it. - Point to the fill handle in the bottom-right corner.
- Drag down to
B6. - Release the mouse button.
Excel copies Office Supplies into the selected cells.
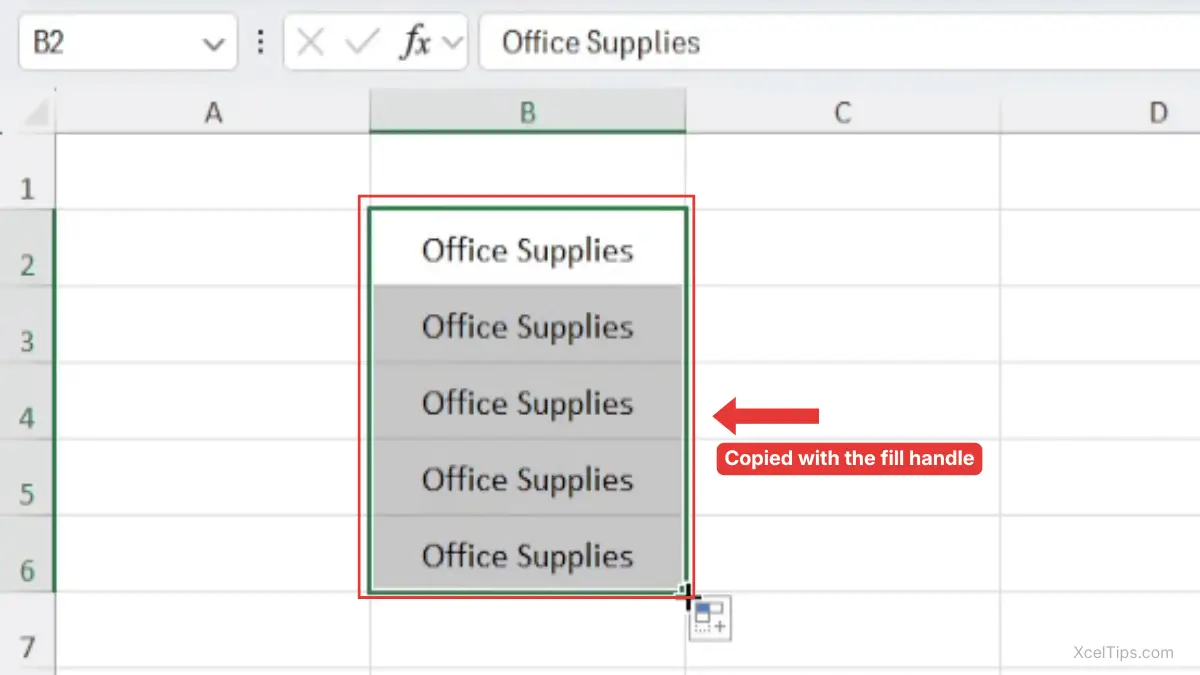
This is faster than typing the same text repeatedly. It also reduces small typing mistakes, which are common when entering the same label many times.
If you are still learning basic selection, it may help to review how to select cells and ranges in Excel before using the fill handle for larger areas.
The fill handle does more than copy one value. It can also continue a series when Excel understands the pattern.
Use the Fill Handle to Continue a Number Pattern
Numbers can be a little confusing at first because Excel may either copy the number or continue a pattern depending on what you select. The key is to give Excel enough information.
If you select only one number, Excel may copy that number. If you select two numbers that show a pattern, Excel can continue the pattern.
Example: Fill 1, 2, 3, 4, 5
Use this method when you want a numbered list.
- Type
1in cellA2. - Type
2in cellA3. - Select cells
A2:A3. - Point to the fill handle at the bottom-right corner of the selected range.
- Drag down to
A10. - Release the mouse button.
Excel continues the pattern down to 9 in cell A10.
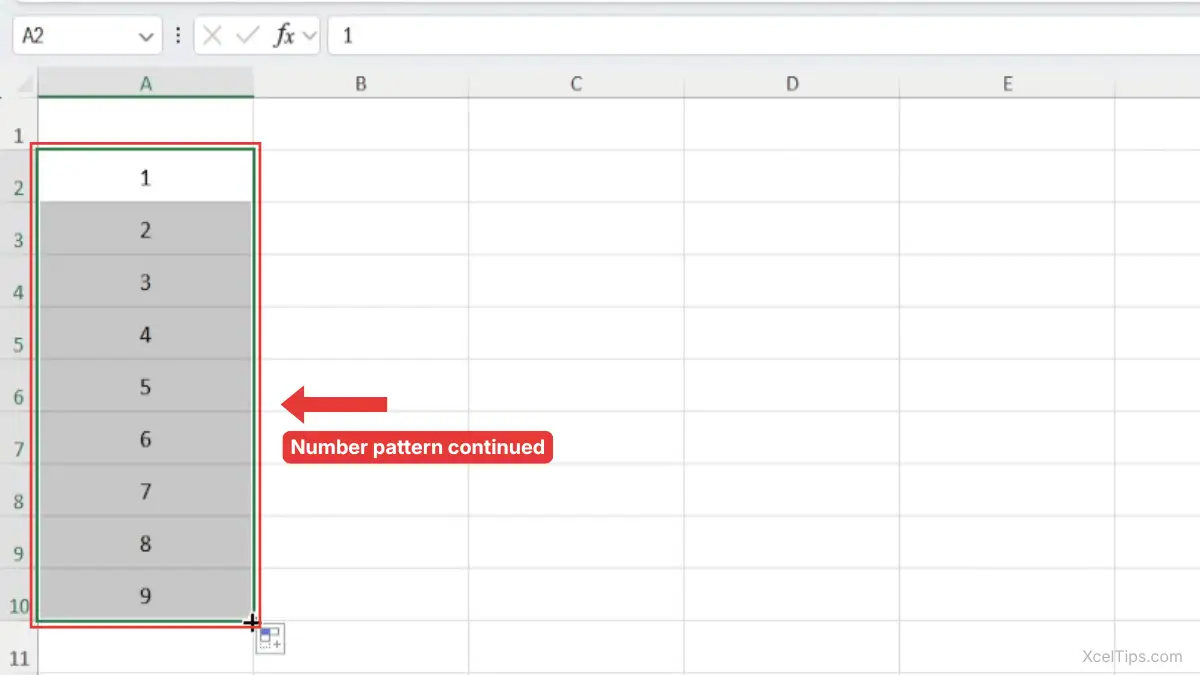
This works because Excel sees the difference between 1 and 2. It understands that the next numbers should increase by 1.
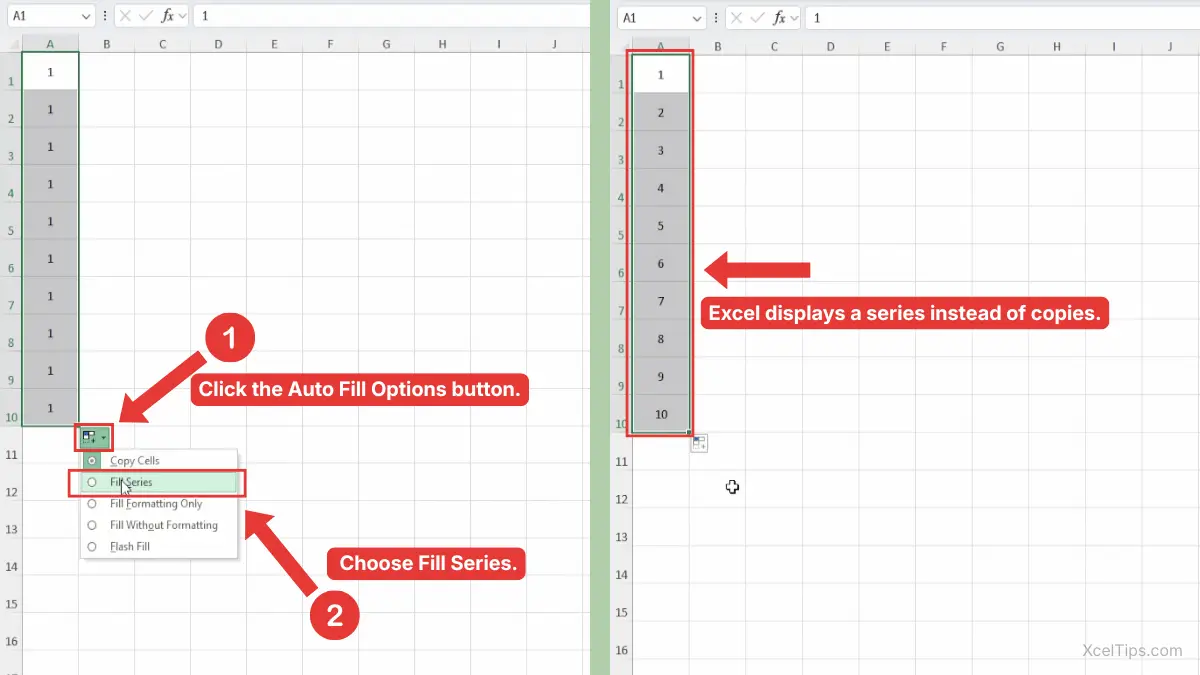
If Excel copies the numbers instead of continuing the pattern, click the Auto Fill Options button and choose Fill Series.
Example: Fill Every 5 Numbers
You can also create a larger pattern.
- Type
5in cellA2. - Type
10in cellA3. - Select
A2:A3. - Drag the fill handle down
Excel continues with 15, 20, 25, and so on.
Beginner Tip:
When you want Excel to continue a number pattern, select at least two starting numbers. One number alone may not give Excel enough information.
Number patterns are useful, but dates are one of the most common reasons beginners use the fill handle.
Use the Fill Handle to Fill Dates, Weekdays, and Months
Excel understands dates, weekdays, and months very well. This makes the fill handle useful when creating schedules, calendars, timesheets, attendance sheets, and project trackers.
You do not need to type every date manually. You can enter the first date and let Excel continue the sequence.
Example: Fill Daily Dates
Suppose you want to create a simple daily schedule.
- Type
1/1/2026in cellB2. - Click cell
B2. - Drag the fill handle down to
B8. - Release the mouse button.
Excel fills the next dates in order.
Depending on your regional date settings, Excel may display the date format differently. If you want to change how dates appear, see our guide on how to format a date in Excel. The important point here is that Excel recognizes the entry as a date.
Example: Fill Weekdays
You can also fill weekdays.
- Type
Thursdayin cellA2. - Click cell
A2. - Drag the fill handle down to
A8. - Release the mouse button.
Excel continues with Friday, Saturday, Sunday, and so on.
Example: Fill Months
For a monthly report, you might use month names across columns.
- Type
Januaryin cellB1. - Click cell
B1. - Drag the fill handle to the right to
M1. - Release the mouse button.
Excel continues with February, March, April, and the following months until December.
This is very useful when creating budget sheets, sales summaries, and yearly trackers. This example shows how the fill handle continues common date and time patterns in Excel.

Beginner Warning:
If Excel copies the date instead of continuing it, check the Auto Fill Options button after dragging. You may need to choose Fill Series.
The AutoFill Options button is important because it lets you correct or adjust what Excel did after you use the fill handle.
Understand Auto Fill Options After Dragging
After you use the fill handle tool in Excel, you may see a small Auto Fill Options button near the filled range. This button lets you decide whether Excel should copy, fill a series, fill formatting, or fill without formatting.
Beginners often ignore this button, but it is useful when Excel’s first result is not what you wanted.
Common AutoFill Options
The exact options you see can depend on the data you filled, but these are common choices.
| Auto Fill Option | What It Does | When to Use It |
|---|---|---|
| Copy Cells | Repeats the original value | Use for labels, categories, or repeated text |
| Fill Series | Continues a pattern | Use for numbers, dates, months, or weekdays |
| Fill Formatting Only | Copies only the cell formatting | Use when you want the same style but not the same value |
| Fill Without Formatting | Copies or continues values without copying the design | Use when you want clean data in existing formatting |
How to Use Auto Fill Options
Use this when Excel fills the cells in a way you did not expect.
After using the fill handle to fill the cells:
- Click the Auto Fill Options button that appears near the filled range.
- Choose the option that matches what you wanted.
For example, if Excel copied 1 down the column but you wanted 1, 2, 3, 4, choose Fill Series.
Beginner Tip:
Auto Fill Options help you fix the result without starting over.
After values and dates, the next common use is formulas. This is where the fill handle becomes especially useful in real workbooks.
Use the Fill Handle to Copy Formulas
The fill handle can copy formulas into nearby cells. This is one of the biggest time-savers in Excel because you can write a formula once and reuse it for other rows or columns.
This section stays beginner-friendly. It does not go deep into formula logic, but it shows how the fill handle helps you apply a simple formula quickly.
Example: Copy a Total Formula Down a Column
Suppose you have prices in column B and quantities in column C. You want totals in column D.
- Click cell
D2. - Type
=B2*C2. - Press Enter.
- Click cell
D2again. - Drag the fill handle down to the remaining rows.
Excel copies the formula into the rows below.
The useful part is that Excel adjusts the formula for each row. In D3, the formula becomes =B3*C3. In D4, it becomes =B4*C4.
This happens because Excel uses relative cell references by default. You do not need to fully understand references yet, but you should know that Excel usually updates copied formulas based on the new row or column.
If you want to understand why formulas change as you copy them, see our beginner guide to relative and absolute references in Excel.
Beginner Warning:
Always check one or two filled formulas after dragging. This helps you confirm the formula is using the correct cells.
Copying formulas is powerful, but sometimes you may not need to drag at all.
Double-Click the Fill Handle to Fill Down Quickly
Dragging is easy for short ranges, but it can be annoying when you have many rows. If there is data in the column beside your formula or value, Excel can often fill down automatically when you double-click the fill handle.
This works best when the column next to your formula has no blank cells.
Example: Double-Click to Copy a Formula Down
Suppose column A contains product names, column B contains prices, column C contains quantities, and cell D2 contains a total formula.
- Click cell
D2. - Move your pointer to the fill handle.
- When the pointer becomes a thin black plus sign, double-click.
- Excel fills the formula down to match the nearby data.
This saves time when your worksheet has many rows.
Beginner Warning:
Double-clicking the fill handle usually stops when Excel reaches a blank cell in the nearby column. If your list has blank rows, Excel may not fill as far as you expect.
If you are preparing longer lists, you may also want to learn how to remove blank rows in Excel so fill actions behave more predictably.
The fill handle is useful, but it is not the right tool for every type of pattern. That is where beginners often confuse it with Flash Fill.
Fill Handle vs Flash Fill
The fill handle and Flash Fill can both save time, but they are not the same feature. Understanding the difference helps you choose the right tool and avoid frustration.
The fill handle is best for copying, continuing simple patterns, filling dates, and copying formulas. Flash Fill is better when Excel needs to recognize a text pattern, such as pulling first names from full names.
| Feature | Best For | Beginner Example |
|---|---|---|
| Fill Handle | Copying or continuing simple patterns | Fill 1, 2, 3 or January, February, March |
| Flash Fill | Detecting text patterns | Split “John Smith” into “John” |
| Copy and Paste | Repeating exact data manually | Copy one cell to another location |
For example, if you type January and drag the fill handle, Excel can continue the months. But if you have full names and want only the last names, Flash Fill is usually the better tool.
This lesson focuses on the fill handle. For that task, see our separate lesson on how to use Flash Fill in Excel because that feature belongs more naturally in data cleanup.
Once you know which feature to use, it helps to understand common beginner mistakes.
Common Fill Handle Mistakes Beginners Should Avoid
The fill handle is simple, but small mistakes can produce unexpected results. Knowing these problems ahead of time helps you fix them quickly.
Most mistakes happen because Excel either copies when the user expected a pattern, or continues a pattern when the user expected a copy.
Mistake 1: Dragging from the Wrong Part of the Cell
If you drag from the border of the selected cell instead of the fill handle, Excel may move the cell contents.
To avoid this, wait until your pointer becomes a thin black plus sign before dragging.
Mistake 2: Selecting Only One Number for a Series
If you type 1 and drag the fill handle, Excel may copy 1 instead of creating 1, 2, 3, 4.
To create a number series, type the first two numbers, select both cells, then drag.
Mistake 3: Not Checking AutoFill Options
Sometimes Excel fills the cells correctly, but sometimes it guesses differently than you expected. The Auto Fill Options button lets you change the result.
For example, after dragging a number, you can choose Copy Cells or Fill Series.
Mistake 4: Copying Formatting by Accident
When you drag the fill handle, Excel may copy both the value and formatting. If the filled cells look different from what you wanted, use Auto Fill Options and choose Fill Without Formatting.
Mistake 5: Filling Formulas Without Checking References
When copying formulas, Excel adjusts references automatically. This is usually helpful, but it can cause errors if your formula needs one fixed cell.
This topic connects to relative and absolute references, so beginners should learn it later instead of trying to master it all in this lesson.
For example, a tax rate or discount rate stored in one fixed cell may need a different type of reference.
Now that you know the common mistakes, here is a simple decision guide for choosing the right fill handle method.
When Should You Use the Fill Handle?
The fill handle is best when your data follows a simple pattern or when you want to copy something into nearby cells. It is not only a shortcut; it also helps keep your worksheet more consistent.
Use the guide below when you are not sure whether the fill handle is the right tool.
| Your Task | Use the Fill Handle? | Why |
|---|---|---|
| Copy the same label down a column | Yes | It repeats the value quickly |
| Continue 1, 2, 3, 4 | Yes | Excel can detect the number pattern |
| Fill daily dates | Yes | Excel understands date sequences |
| Fill month names across columns | Yes | Excel can continue built-in lists |
| Copy a formula down a list | Yes | Excel adjusts the formula by row |
| Split full names into first names | No | Use Flash Fill instead |
| Clean messy imported data | Not Usually | Use data cleanup tools instead |
This decision table keeps the fill handle in its proper beginner scope. It is mainly a data entry and pattern-filling tool.
Before finishing, try a short practice task so the steps feel familiar.
Quick Practice
Open a blank workbook, or use a simple practice file named XcelTips_Practice.xlsx. The goal is to try copying, filling a series, filling dates, and copying a formula.
- In cell
A1, typeDay. - In cell
A2, typeMonday. - Drag the fill handle down to
A8. - In cell
B1, typeNumber. - In cell
B2, type1. - In cell
B3, type2. - Select
B2:B3and drag the fill handle down toB8. - In cell
C1, typeSales. - Enter a few numbers in
C2:C8. - In cell
D1, typeDouble Sales. - In cell
D2, type=C2*2. - Use the fill handle to copy the formula down to
D8.
After completing this practice, check that weekdays continued correctly, numbers increased by 1, and formulas changed row by row.
Key Takeaways
- The fill handle is the small square at the bottom-right corner of a selected cell or range.
- You can use it to copy values, continue patterns, fill dates, and copy formulas.
- To continue a number pattern, select at least two starting numbers before dragging.
- Auto Fill Options help you change the result after using the fill handle.
- Double-clicking the fill handle can fill down quickly when nearby data exists.
- The fill handle is different from Flash Fill, which is better for recognizing text patterns.
These basics answer the main idea, but beginners may still have a few quick questions.
Frequently Asked Questions (FAQs)
How do I use the fill handle in Excel?
Select a cell or range, move your pointer to the small square at the bottom-right corner, then drag it over the cells you want to fill. Excel will copy the value, continue a pattern, fill dates, or copy formulas depending on your selection.
What is the fill handle in Excel?
The fill handle is the small square that appears at the bottom-right corner of a selected cell or range. You can drag it to fill nearby cells with copied data, patterns, dates, or formulas.
Why is my fill handle copying instead of counting?
This usually happens when Excel does not have enough information to detect a pattern. Type the first two numbers, such as 1 and 2, select both cells, then drag the fill handle.
Can I use the fill handle to copy formulas?
Yes. Select the cell with the formula, then drag the fill handle down or across. Excel copies the formula and usually adjusts the cell references for each new row or column.
What is the difference between the fill handle and Flash Fill?
The fill handle copies or continues simple patterns. Flash Fill recognizes examples and fills data based on a text pattern, such as extracting first names from full names.
Why can’t I see the fill handle?
If the fill handle is not visible, make sure a cell is selected and look at the bottom-right corner of the selection. If it still does not appear, the fill handle option may be turned off in Excel settings.
With those questions answered, let’s wrap up the main lesson.
Conclusion
Learning how to use the fill handle in Excel is one of the easiest ways to speed up everyday data entry. Instead of typing repeated values, dates, numbers, or formulas one by one, you can let Excel fill the pattern for you.
Practice with small lists first, then try it in real worksheets such as schedules, budgets, and sales trackers.
This lesson is part of the Beginner Learning Path, a structured series designed to help you learn Microsoft Excel step by step from the basics.
← Previous Lesson
How to Cut and Paste in Excel: Copy and Paste Basics for Beginners