Written By Sophanith Dith
Last Updated May 15, 2026
Applies to Microsoft Excel 365 (Windows only)
Part of the Beginner Learning Path
Module 2 Working with Data
Lesson 16 of 22
Imagine you have a worksheet with dozens or hundreds of rows, and you suddenly notice the same word, product name, department, or spelling mistake appears again and again. Editing each cell one by one can take too long and increases the chance of mistakes. This is where find and replace in Excel becomes useful.
The Find and Replace feature helps you quickly search for specific data and change it in one place, across a selected range, worksheet, or even a workbook. For beginners, it is one of the simplest ways to clean up repeated text or values without using formulas.
In this tutorial, you will learn how to find data, replace data, use important options, and avoid mistakes that can accidentally change the wrong cells.
Quick Answer:
To use Find and Replace in Excel, press Ctrl + H, type the text or value you want to find in the Find what box, type the replacement in the Replace with box, then choose Find Next, Replace, or Replace All.
Before going step by step, here is a simple overview of what you will learn.
Quick Reference
This quick reference is useful when you only need a reminder after practicing the full lesson.
- Use Ctrl + F to open the Find tab directly under Find and Replace dialog box.
- Use Ctrl + H to open the Replace tab directly under Find and Replace dialog box.
- Use Find what to enter the text, number, or value you want to search for.
- Use Replace with to enter the new text, number, or value.
- Use Replace to change one result at a time.
- Use Replace All only when you are sure every match should be changed.
The safest way to learn this tool is to begin with finding data before replacing it.
What Find and Replace Does in Excel
Find and Replace is a built-in Excel feature that searches the contents of cells and can change matching text, numbers, or values to something else. It is helpful when the same mistake or repeated label appears in many places.
For beginners, this feature is especially useful because it does not require formulas or advanced tools. You can use it from the ribbon or with keyboard shortcuts.
For example, suppose a sales worksheet uses the old region name North-East, but your company now wants it written as Northeast. Instead of checking every row manually, you can use Find and Replace to search for the old text and replace it with the new text.
Common uses include:
- Correcting repeated spelling mistakes.
- Updating product names.
- Changing department names.
- Replacing old codes with new codes.
- Finding a customer name or invoice number.
- Changing repeated labels in a worksheet.
Beginner Tip:
Find and Replace works with text, numbers, dates, and even parts of cell contents. However, you should always review your results before using Replace All.
Once you understand what the feature does, the first practical skill is learning how to find information without changing anything.
How to Find Data in Excel
Before replacing anything, it is safer to learn how searching works. This helps you confirm that Excel is finding the correct cells before you make changes.
If you are wondering how to find data in Excel, the easiest method is to use the Find command. It lets you search for a word, number, phrase, or value inside your worksheet.
Method 1: Use the Ribbon to Find Data
The Ribbon is the easiest way to open the Find tool. This method is helpful for beginners who prefer using buttons instead of shortcuts.
- Go to the Home tab.
- Look at the Editing group.
- Click Find & Select.
- Choose Find…
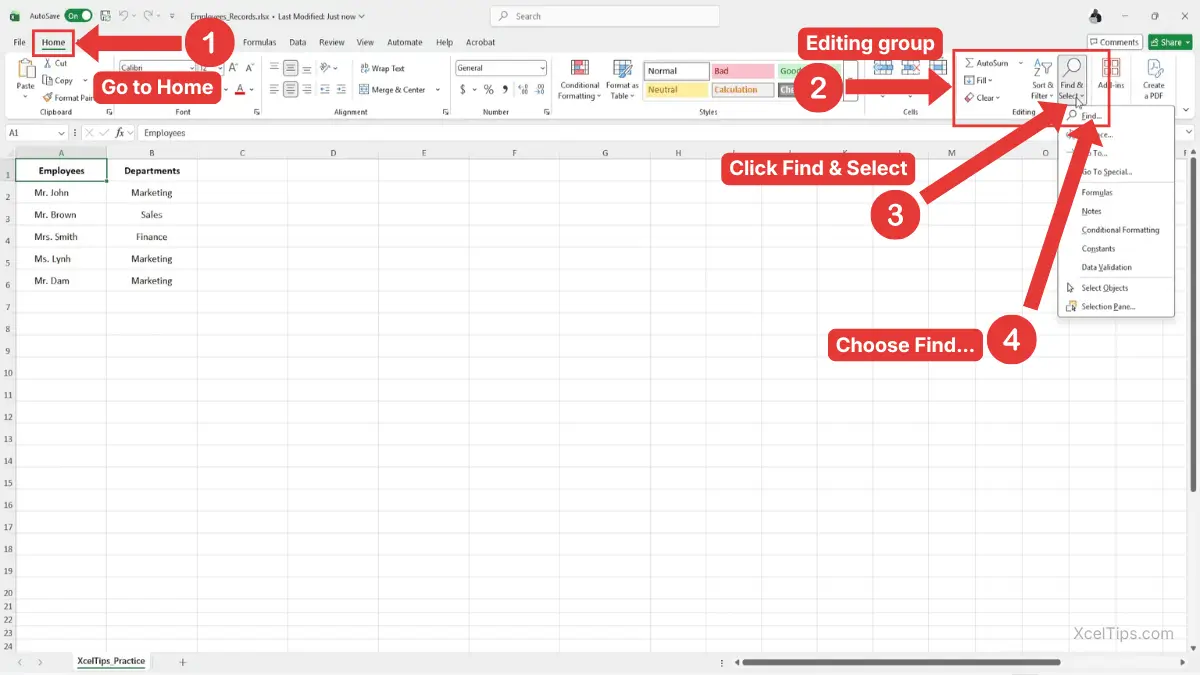
The Find and Replace dialog box opens with the Find what box ready for your search term.
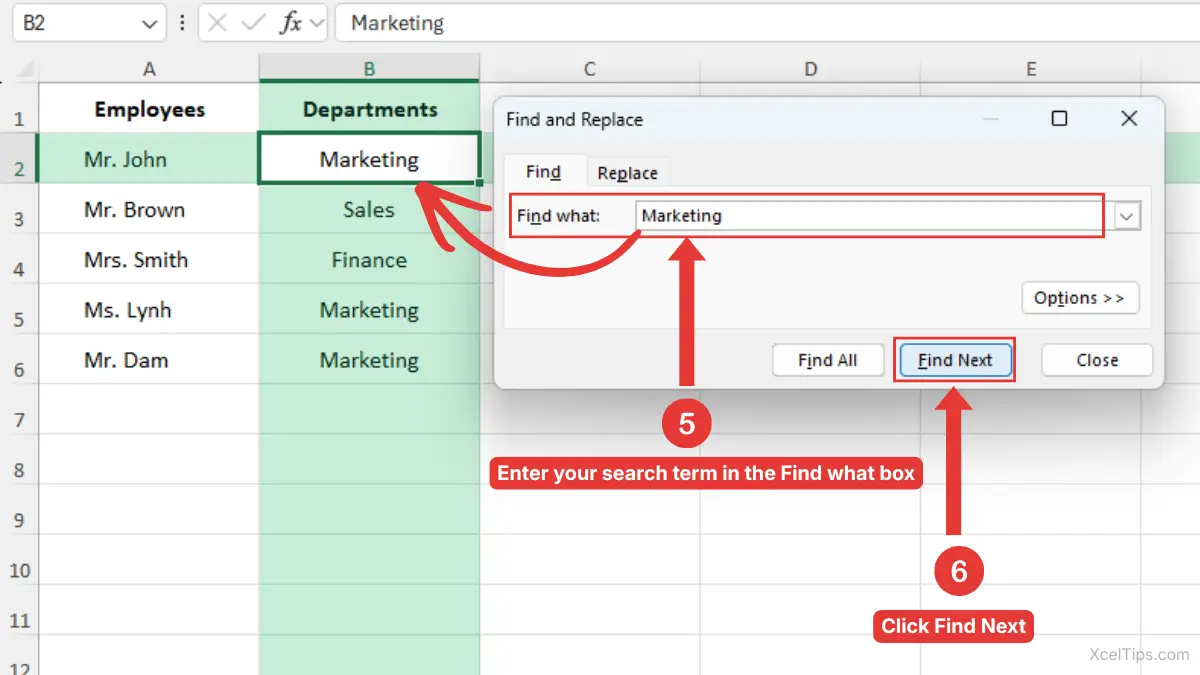
- Enter your search term in the Find what box.
- Click Find Next.
Excel selects the next cell that contains your search term, so you can quickly see where the matching data appears in the worksheet. For example, if you type Marketing in the Employees_Records.xlsx, Excel will search for cells that contain that word. Each time you click Find Next, Excel moves to the next matching result.
The Ribbon path is:
Home tab → Editing group → Find & Select → Find…
Beginner Warning:
Excel may find the word even if it appears as part of a longer cell entry. For example, searching for East may also find Northeast.
The Ribbon method is easy to follow, but the keyboard shortcut is faster once you know where the Find tool is.
Method 2: Use the Keyboard Shortcut to Find Data
You can also open the Find tool from using keyboard shortcut. This is useful when you are working in a large worksheet and need to jump to a specific item quickly.
- Click any cell in the worksheet, then press Ctrl + F.
- In the Find what box, type the text or value you want to search for.
- Click Find Next.
- Keep clicking Find Next to move through each matching cell.
This method opens the same Find and Replace dialog box as the Ribbon method.
If you need more help with selecting cells before searching, you can review how to select cells and ranges in Excel before continuing.
After you can find data correctly, you are ready to learn how to replace it.
How to Use Find and Replace in Excel
Replacing data means telling Excel what to search for and what to put in its place. This is where the feature becomes powerful, especially when you need to fix repeated entries.
You can use Find and Replace to replace data in Excel one match at a time or update all matches at once. For beginners, replacing one result at a time is usually safer until you understand how the tool behaves.
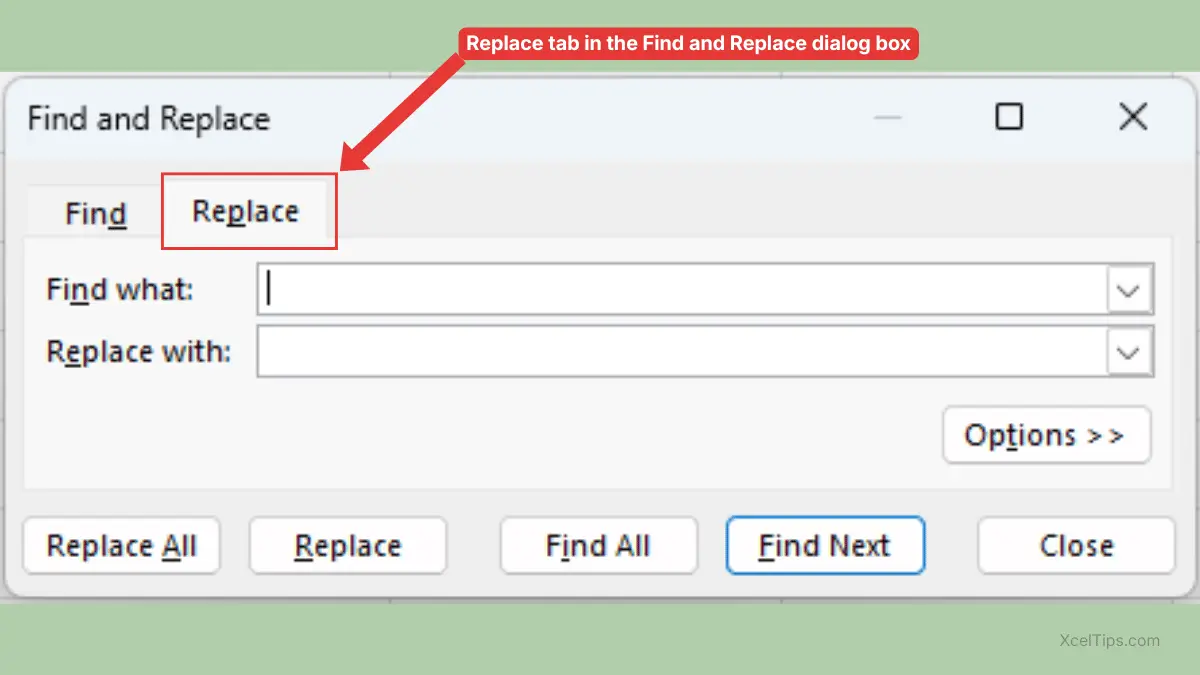
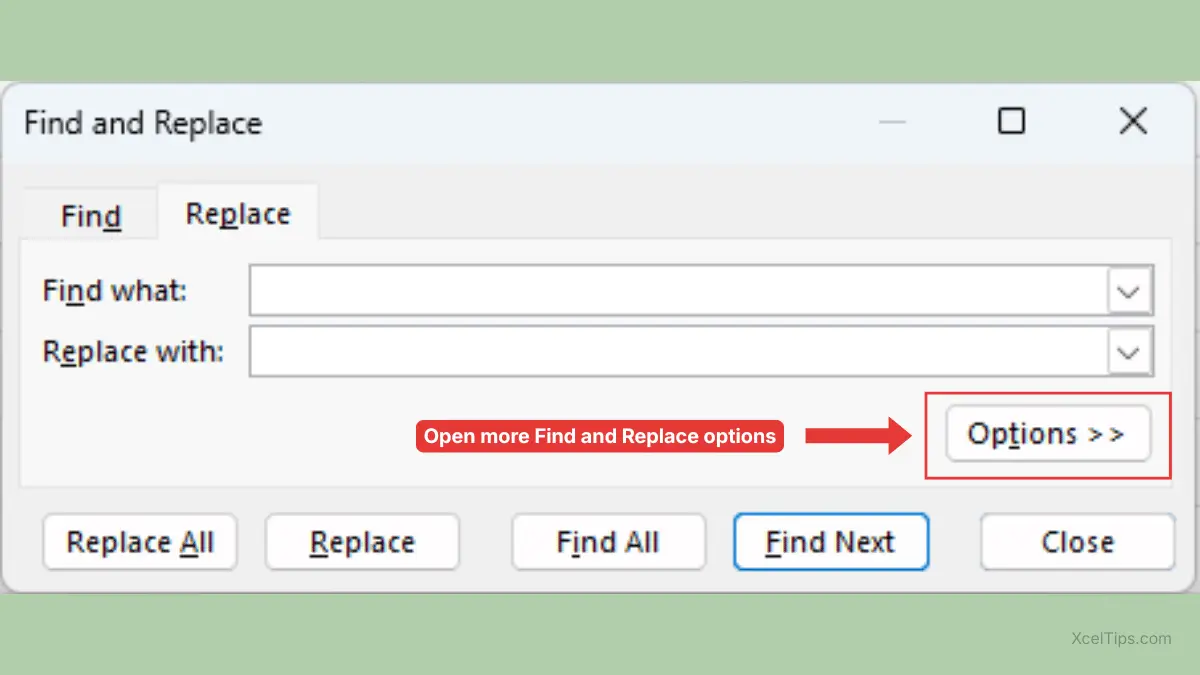
Open the Replace Tab
The Replace tab is part of the same Find and Replace dialog box. You can open it directly with a keyboard shortcut or from the Ribbon.
- Press Ctrl + H on any cell in the worksheet.
- The Find and Replace dialog box opens on the Replace tab.
You can also open it from the Ribbon: Home tab → Editing group → Find & Select → Replace…
- Go to the Home tab.
- Look at the Editing group.
- Click Find & Select.
- Choose Replace…
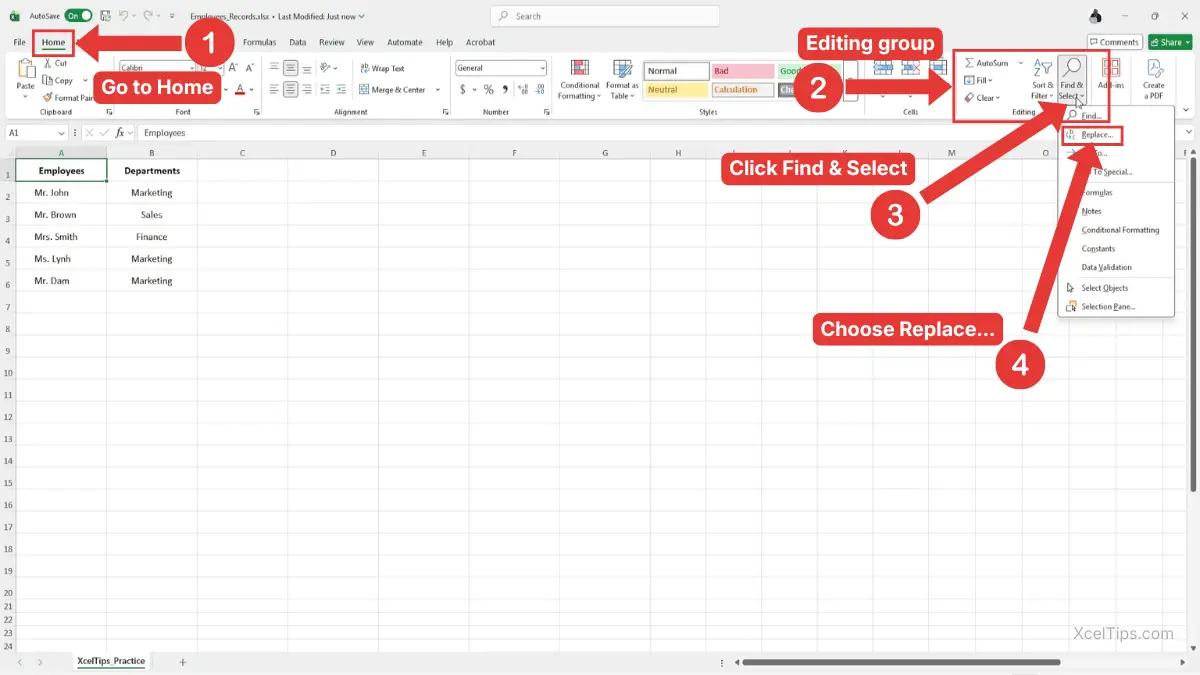
Excel opens the Replace tab in the Find and Replace dialog box. Whether you use Ctrl + H or the Ribbon, both methods take you to the same place. The shortcut is faster, while the Ribbon method is easier to remember when you are still learning.
For official reference, Microsoft also explains the Find and Replace commands in its guide to finding or replacing text and numbers on a worksheet.
Replace One Match at a Time
Replacing one match at a time gives you more control. This is the best method when you are not completely sure every result should be changed.
After you open the Find and Replace dialog box following the steps above, then:
- In Find what, type the existing text or value.
- In Replace with, type the new text or value.
- Click Find Next.
- Look at the selected cell in the worksheet and confirm it is the result you want to change.
- Click Replace if you want to change that result. Repeat until you finish checking the matches.
For example, suppose your worksheet contains Custmer by mistake. You can type Custmer in Find what and Customer in Replace with. Then you can review each result before replacing it.

Beginner Tip:
Use Replace instead of Replace All when working with important data, especially customer names, product codes, or financial records.
Replace All Matches at Once
Replace All changes every matching result in the selected range, current worksheet, or workbook, depending on your search settings. It is fast, but it should be used carefully.
- Press Ctrl + H to open the Replace tab.
- Type the old text or value in Find what.
- Type the new text or value in Replace with.
- Click Replace All.
- Read the message showing how many replacements Excel made.
- Click OK.
For example, if every cell that says Qtr 1 should become Quarter 1, Replace All can update them in seconds.
Beginner Warning:
Replace All does not ask you to confirm each individual change. If your search term appears in places you did not expect, Excel will replace those too.
Once you know the basic replacement process, it helps to understand the difference between replacing text and replacing other values.
How to Find and Replace Text in Excel
Text replacement is one of the most common beginner uses for this feature. It helps you fix spelling, update labels, or clean inconsistent wording in a worksheet.
When you find and replace text in Excel, Excel searches inside cell contents for the text you entered. Depending on your options, it may replace the text even when it appears inside a longer phrase.
Example: Replace a Department Name
Suppose a worksheet uses HR in several places, but you want the department name to appear as Human Resources. Find and Replace can update the repeated text quickly.
- Press Ctrl + H.
- In Find what, type
HR. - In Replace with, type
Human Resources. - Click Find Next to review the first result.
- Click Replace to change one result, or Replace All if every
HRentry should change.
This is a simple way to replace text in Excel when the same wording appears across a list.
Be Careful with Partial Text Matches
Excel can replace text even when it is part of a longer word or phrase. This is helpful sometimes, but risky in other cases.
For example, if you replace East with Eastern, Excel may also change Northeast into something you did not want. This happens because Excel is matching the text inside a larger cell entry. This is why short words and abbreviations need extra care.
To avoid this mistake, use the Options button in the Find and Replace dialog box. Then consider using Match entire cell contents when the whole cell must match your search term.
When to Use Match Entire Cell Contents
The Match entire cell contents option tells Excel to only find cells where the full cell content matches your search. This prevents accidental changes inside longer text.
Use this option when:
- You are replacing short words.
- You are changing codes.
- Your search term may appear inside longer words.
- You only want exact cell matches.
For example, if you search for HR with Match entire cell contents turned on, Excel will find cells that contain only HR. It will not find a longer phrase like HR Team.
Beginner Tip:
Short search terms are more likely to create accidental matches. Always review results carefully when searching for abbreviations, codes, or short words.
After text, the next beginner question is whether Find and Replace also works with numbers and values.
How to Replace Numbers, Values, and Dates
Find and Replace is not limited to words. You can also use it to update numbers, simple values, and date entries inside cells.
This is useful when a code, price, year, or label changes across a worksheet. However, number and date replacement should be done carefully because formatting can affect what you see.
Replace a Number
If a worksheet contains a repeated number that needs to change, you can replace it the same way you replace text.
- Press Ctrl + H.
- In Find what, type the number you want to find.
- In Replace with, type the new number.
- Click Find Next to review the first match.
- Click Replace or Replace All.
For example, you may need to replace product code 1001 with 1002. If that code appears in multiple rows, Find and Replace can update it quickly.
Beginner Warning:
Be careful when replacing common numbers like 1, 10, or 100. These may appear in many places, including dates, prices, or IDs.
Replace a Date
Dates can also be found and replaced, but beginners should be careful because Excel may store and display dates differently depending on the date format. What you see on screen may depend on the cell’s date format.
A simple beginner-safe approach is:
- Click a cell that contains the date format used in your worksheet.
- Look at how the date appears in the formula bar.
- Press Ctrl + H.
- Enter the date in a matching format.
- Use Find Next before replacing.
For example, if your worksheet shows 1/1/2026, search using that same visible date style first. If Excel does not find it, the cell may be formatted differently.
If your goal is to remove data without changing formatting, see how to clear cells in Excel without deleting formatting instead of replacing values with blanks.
Once you are comfortable replacing basic entries, the Options button gives you better control.
Important Find and Replace Options Beginners Should Know
The basic Find and Replace boxes are enough for many tasks. But the Options button gives you extra control when your search needs to be more precise.
These options matter because they help prevent unwanted changes. Beginners do not need to memorize every setting, but a few are worth understanding early.
Common Find and Replace Options
The table below explains the most useful options in beginner-friendly terms. Use it when you are deciding how specific your search should be.
| No. | Option | What It Does | Beginner Example |
|---|---|---|---|
| 1 | Within | Searches the current sheet or the entire workbook | Search only Sheet1 or all sheets |
| 2 | Search | Searches by rows or columns | Usually leave this as default |
| 3 | Look in | Searches formulas, values, or comments/notes | Use values for normal cell results |
| 4 | Match case | Finds only text with the same capitalization | Finds “East” but not “east” |
| 5 | Match entire cell contents | Finds only cells that exactly match | Finds “HR” but not “HR Team” |
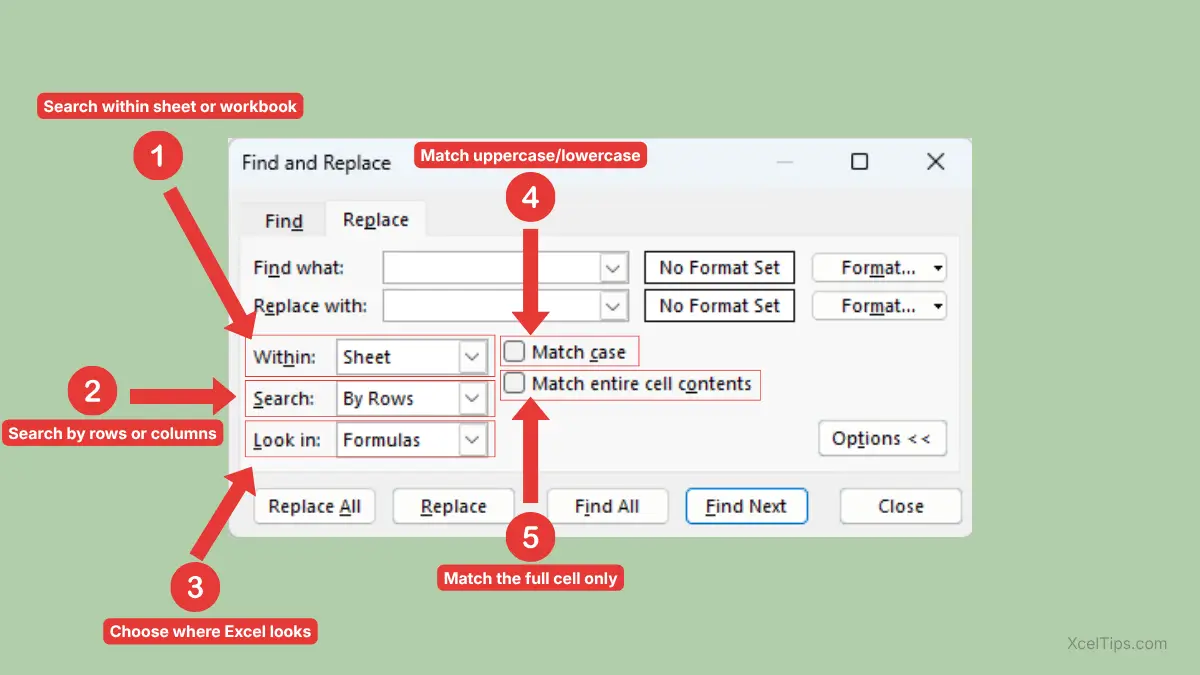
Search Within Sheet or Workbook
The Within option controls where Excel searches. This can be the current worksheet or the entire workbook.
Use Sheet when you only want to search the worksheet you are viewing. Use Workbook when the same data might appear across multiple sheets.
Beginner Warning:
Replacing across an entire workbook can change data in sheets you are not looking at. Use this only when you are confident the replacement should apply everywhere.
Match Case
The Match case option makes Excel pay attention to uppercase and lowercase letters.
For example:
- Searching for
applewill not findAppleif Match case is turned on. - Searching for
Eastwill not findeastif Match case is turned on.
Most beginners can leave this option turned off unless capitalization matters in the worksheet.
Match Entire Cell Contents
This is one of the safest options for avoiding accidental replacements. It tells Excel to find only cells that exactly match your search.
For example, if you search for A1, Excel might find that text inside longer entries. With Match entire cell contents, Excel only finds cells that contain exactly A1.
With these options in mind, it is easier to choose the right replacement method for different situations.
Replace, Replace All, Find Next, and Find All: What Is the Difference?
The buttons in the Find and Replace dialog box can be confusing at first. They sound similar, but they behave differently.
Understanding these buttons helps you work more safely. This is especially important before using Replace All in a real workbook.
| Button | What It Does | Best For |
|---|---|---|
| Find Next | Moves to the next matching cell | Checking one result at a time |
| Find All | Lists all matching results | Reviewing matches before replacing |
| Replace | Replaces the current match only | Careful editing |
| Replace All | Replaces every match at once | Fast cleanup when you are sure |
When to Use Find All
Find All shows a list of every matching result in the Find and Replace dialog box. This lets you review where the data appears before changing anything.
Use Find All when:
- You want to see how many matches exist.
- You are not sure where the text appears.
- You want to check whether the search term is too broad.
- You need to confirm the data before replacing it.
For example, before replacing Online with Website, you can use Find All to see every cell where Online appears.
When to Use Replace All
Replace All is best when you are completely sure that every match should change. It is efficient but less forgiving.
Good Replace All examples include:
- Fixing a repeated spelling mistake.
- Updating a consistent product name.
- Changing a repeated label.
- Replacing an old department code.
Beginner Tip:
Save your workbook before using Replace All on important data. That gives you an easier recovery point if the result is not what you expected.
Find and Replace is powerful, but like many Excel tools, most problems happen when the search term is too broad.
Common Find and Replace Mistakes to Avoid
Beginners often make Find and Replace mistakes because Excel does exactly what it is told to do. If the search term is too general, Excel may change more cells than expected.
The good news is that these mistakes are easy to avoid. A few careful habits can make Find and Replace much safer.
Mistake 1: Using Replace All Too Quickly
Replace All is convenient, but it can change many cells instantly. If your search term appears in unexpected places, those cells will change too.
Safer approach:
- Use Find All first.
- Review the results.
- Use Replace for important data.
- Use Replace All only when the matches look correct.
Mistake 2: Searching the Whole Workbook by Accident
If the Within option is set to Workbook, Excel may replace data across multiple sheets. This can surprise beginners who only meant to update the current worksheet.
Before replacing, check whether Within is set to Sheet or Workbook.
Mistake 3: Replacing Short Text Without Exact Match
Short words, abbreviations, and codes can appear inside longer entries. Replacing them without checking may create strange results.
For example, replacing Jan could affect longer text that contains those letters. When in doubt, use Match entire cell contents or replace one result at a time.
Mistake 4: Forgetting to Select a Range First
If you select a specific range before opening Find and Replace, Excel can limit the search to that selected area. If you do not select a range, Excel searches more broadly based on the current settings.
For focused cleanup, select the cells you want to work with first. If selecting ranges still feels new, review how to select multiple cells in Excel before using Replace All.
Mistake 5: Replacing Data When Clearing Is Better
Sometimes you do not need to replace data with new data. You may simply need to remove contents from cells.
For example, replacing old notes with nothing can work, but the clearer beginner method may be to use Excel’s Clear Contents command. That is covered separately in how to clear contents in Excel.
Once you know the common mistakes, the final step is learning a simple safe workflow you can repeat.
A Safe Beginner Workflow for Find and Replace
A repeatable workflow helps you use Find and Replace without feeling nervous. This is especially useful when you are editing important lists, reports, or shared workbooks.
The goal is to search first, review second, and replace only when the results make sense. This habit prevents most beginner mistakes.
Recommended Workflow
Use this process whenever you need to replace repeated data.
- Save your workbook.
- Select the range you want to search, if needed.
- Press Ctrl + H.
- Enter the old data in Find what.
- Enter the new data in Replace with.
- Click Find All or Find Next.
- Review the matches.
- Choose Replace for careful changes.
- Choose Replace All only when every match should change.
- Check the worksheet after replacing.
This workflow may feel slower at first, but it builds confidence. Over time, you will know when it is safe to use Replace All immediately.
Simple Real-World Example
Suppose you have a customer list where the city name NYC should be changed to New York. The list has many rows, so manual editing would take too long.
You could:
- Select the city column.
- Press Ctrl + H.
- Type
NYCin Find what. - Type
New Yorkin Replace with. - Click Find All.
- Review the results.
- Click Replace All if all matches are correct.
This updates the city names only in the selected column, which is safer than searching the whole worksheet.
To finish the lesson, practice on a small sample before using the feature on important workbooks.
Quick Practice
Practice helps you remember the difference between Find, Replace, and Replace All. Use a small test worksheet so you can experiment without worrying about real data.
Create a simple list with repeated words or labels, then try the steps below.
- Type
Northin a few cells. - Type
North Regionin one cell. - Press Ctrl + F and search for
North. - Press Ctrl + H.
- Replace
NorthwithNorthernone result at a time. - Undo the change with Ctrl + Z.
- Try again using Match entire cell contents.
- Notice how the results change.
After practicing on a small sample, the main lesson is simple: search first, review the matches, and replace only when you are sure the results are correct.
Key Takeaways
Find and Replace is simple, but it becomes much safer when you understand the main buttons and options. These points summarize the most important beginner lessons.
- Use Ctrl + F to find data without changing it.
- Use Ctrl + H to open Find and Replace.
- Use Replace to change one result at a time.
- Use Replace All only when you are sure every match should change.
- Use Find All to review matches before replacing.
- Use Match entire cell contents for exact matches.
- Select a range first if you only want to search part of a worksheet.
- Use Options when you need a more precise search.
These habits will help you clean up repeated data more confidently.
These key points cover the basics, but beginners often have a few extra questions before using Find and Replace in real worksheets.
Frequently Asked Questions (FAQs)
Beginners often have similar questions about Find and Replace because the feature can search in several ways. Here are the most useful answers to know before using it in real workbooks.
What is Find and Replace in Excel?
Find and Replace in Excel is a feature that lets you search for specific text, numbers, or values and replace them with something else. It is commonly used to fix repeated mistakes, update labels, or change old values in a worksheet.
What is the shortcut for Find and Replace in Excel?
Use Ctrl + H to open the Replace tab directly. Use Ctrl + F if you only want to find data without replacing anything.
Can I find and replace data in Excel for only one column?
Yes. Select the column first, then open Find and Replace. Excel will search only inside the selected column unless you change the search area.
Can I replace text in Excel without replacing part of longer words?
Yes. Click Options in the Find and Replace dialog box, then choose Match entire cell contents. This helps Excel find only cells that exactly match your search entry.
What is the difference between Replace and Replace All?
Replace changes only the current match. Replace All changes every match in the selected range, worksheet, or workbook, depending on your settings.
Why did Excel replace more cells than I expected?
This usually happens because the search term was too broad, the wrong range was selected, or the search was set to the entire workbook. Use Find All before replacing to preview the matches.
Once you understand the shortcuts, options, and safety checks, Find and Replace becomes a quick and reliable way to clean up repeated data.
Conclusion
Learning how to use find and replace in Excel gives you a faster way to clean up repeated text, update values, and correct common worksheet mistakes. Instead of editing every cell manually, you can search, review, and replace data in a controlled way.
For best results, start with Find Next or Find All, then use Replace before trying Replace All on important data. A few careful checks can prevent accidental changes and help you build confidence.
This lesson is part of the Beginner Learning Path, a structured series designed to help you learn Microsoft Excel step by step from the basics.