Written By Sophanith Dith
Last Updated May 01, 2026
Applies to Microsoft Excel 365 (Windows only)
Part of the Beginner Learning Path
Module 2 Working with Data
Lesson 6 of 22
If your worksheet has extra records, blank lines, old entries, or rows you no longer need, learning how to delete rows in Excel is an important beginner skill. Deleting rows helps keep your worksheet clean, easier to read, and easier to work with.
In Excel, a row runs horizontally across the worksheet and is identified by a number on the left side, such as row 1, row 2, or row 3. When you delete a row, Excel removes the entire row and shifts the rows below it upward.
This tutorial will show you the easiest ways to delete one row, delete several rows, and remove blank rows safely.
If you just learned how to insert rows in Excel, this lesson teaches the opposite skill: removing rows you no longer need.
Quick Answer
To delete rows in Excel, select the row number on the left side of the worksheet, right-click the selected row, and choose Delete. To delete multiple rows, select several row numbers first, then right-click and choose Delete. You can also use Home tab→ Cells group→ Delete → Delete Sheet Rows.
Quick Reference
Before going into the full steps, here is a quick overview of the main methods. This helps you choose the right approach based on what you are trying to remove.
- To delete one row, select the row number, right-click, and choose Delete.
- To delete several nearby rows, select the row numbers together, then delete them.
- To delete rows that are not next to each other, hold Ctrl while selecting the row numbers.
- To use the Ribbon, go to Home tab → Cells group → Delete → Delete Sheet Rows.
- To delete blank rows, first identify the truly blank rows, then delete the full row.
- Be careful not to confuse Delete Row, Clear Contents, and Hide Row.
The first method is usually the easiest for beginners because it uses the row number and right-click menu.
How to Delete Rows in Excel Using the Row Header
The row header is the numbered area on the far left side of the worksheet. Selecting the row number tells Excel that you want to work with the entire row, not just one cell inside that row.
This is the safest beginner method because it clearly shows which row will be removed before you delete it.
How to Delete a Row in Excel
Use this method when you only need to remove one row from your worksheet. For example, you may have a duplicate customer entry, an old item, or a blank row between two records.
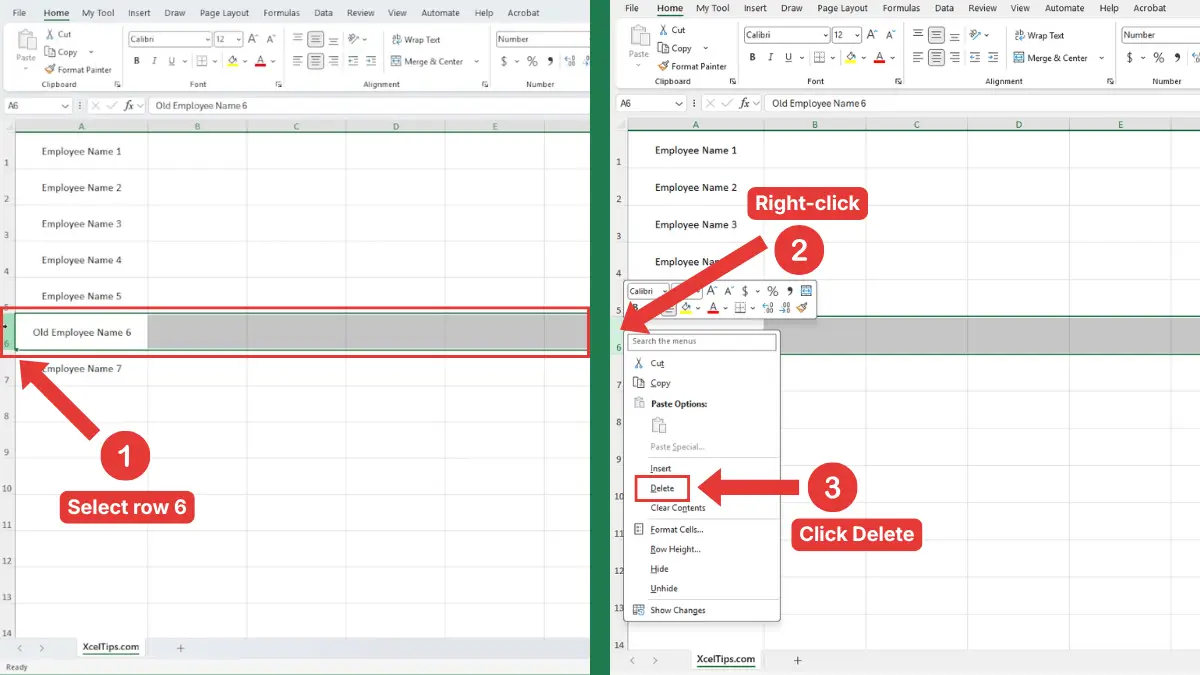
- Click the row number you want to delete. Make sure the entire row is highlighted.
- Right-click the selected row number.
- Click Delete.
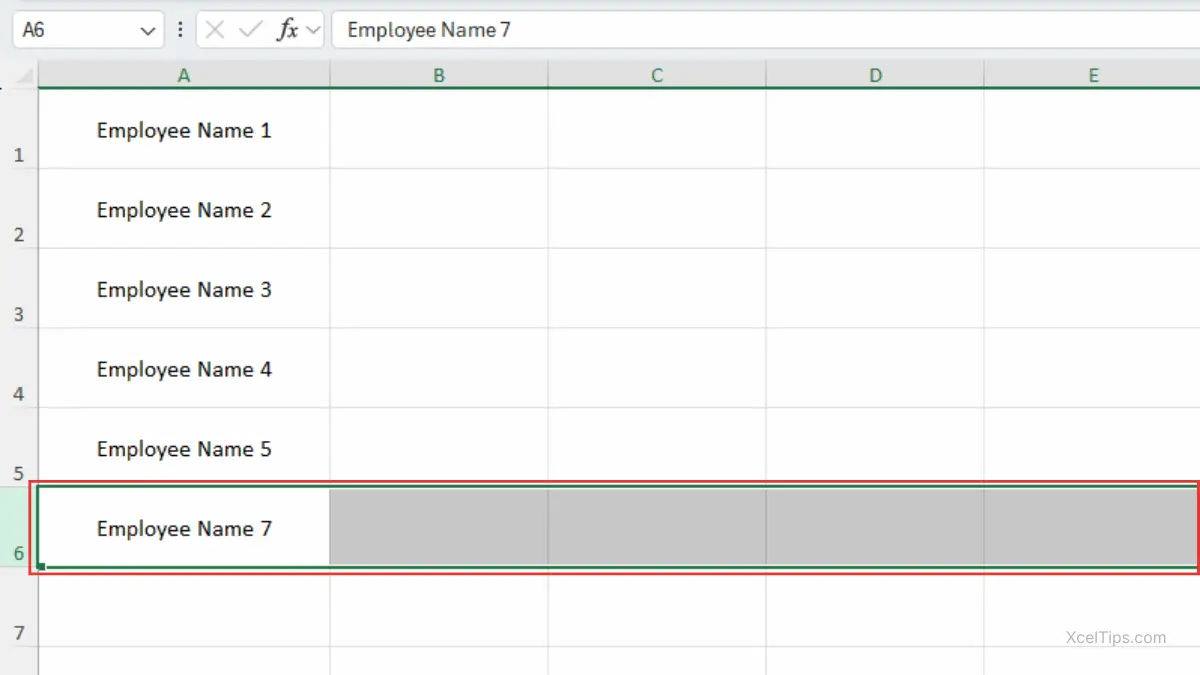
Excel will remove the selected row, and the rows below it will move up automatically.
For example, if rows 3, 4, 5, and 6 contain sample data you no longer need, select row numbers 3 through 6, right-click the selected area, and choose Delete. Excel removes those rows and shifts the remaining rows upward, as shown below.
Beginner Tip:
Always click the row number, not just a cell inside the row. Clicking the row number selects the entire row and makes it clearer what Excel will delete.
This is the most direct answer for beginners searching for how to delete a row in Excel.
Before deleting more rows, it helps to understand that Excel can remove several rows at once if you select them first.
How to Delete Multiple Rows in Excel
Deleting multiple rows saves time when you have more than one row to remove. You can delete rows that are next to each other, or rows that are separated in different parts of the worksheet.
If selecting rows still feels new, review how to select rows in Excel first. The deletion steps are much easier once you are comfortable selecting full rows.
Delete Multiple Rows That Are Next to Each Other
Use this method when the rows are connected, such as rows 5 through 9. This is helpful when you want to remove a block of old data.
- Click the first row number you want to delete.
- Hold your mouse button and drag down to the last row number. Make sure all the rows you want to remove are highlighted.
- Right-click any selected row number.
- Click Delete.
Excel deletes all selected rows at once.
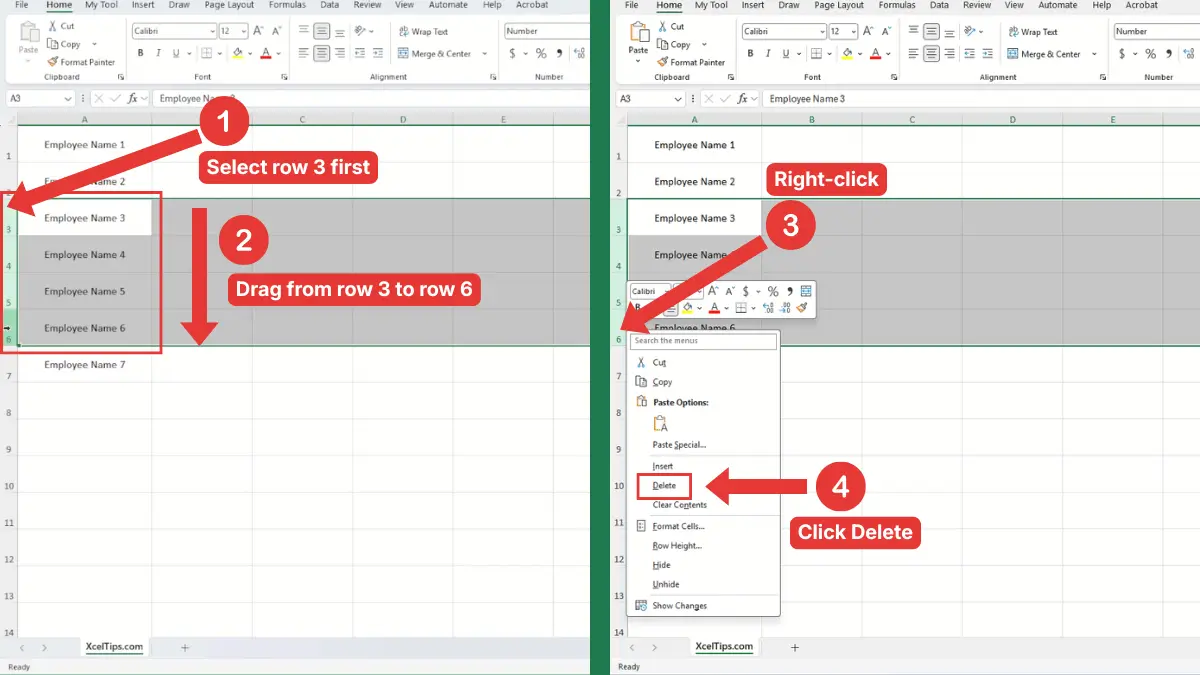
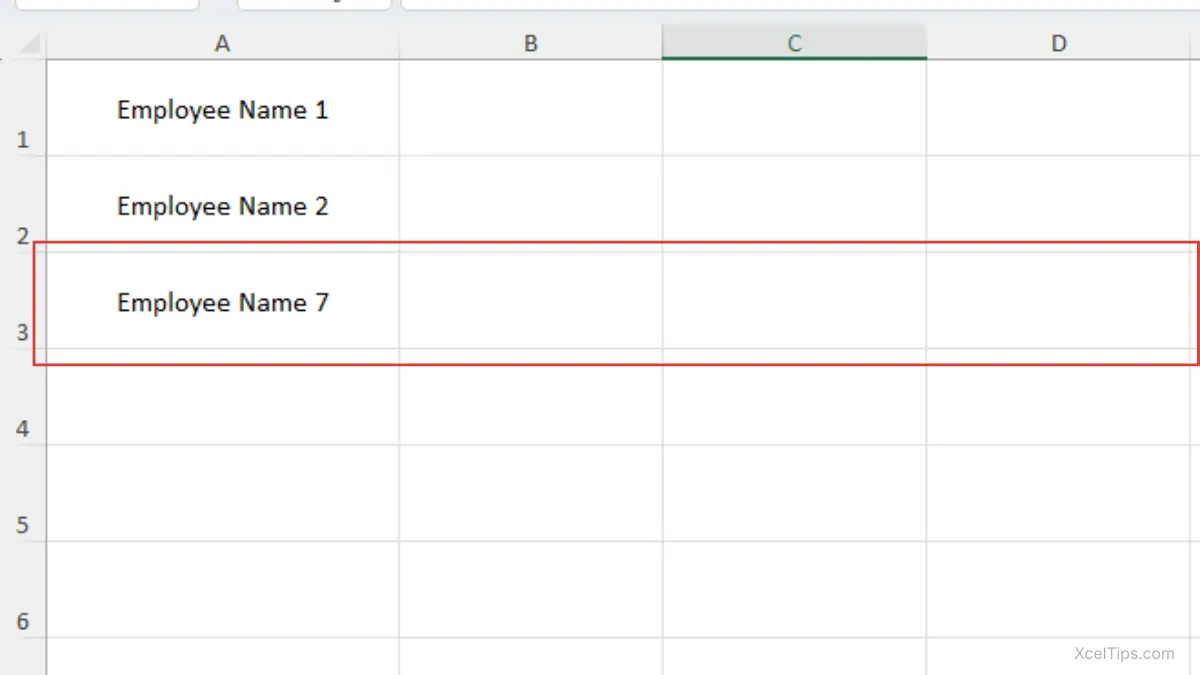
For example, if rows 3, 4, 5, and 6 contain sample data you no longer need, select row numbers 3 through 6, right-click the selected area, and choose Delete. Excel removes those rows and shifts the remaining rows upward.
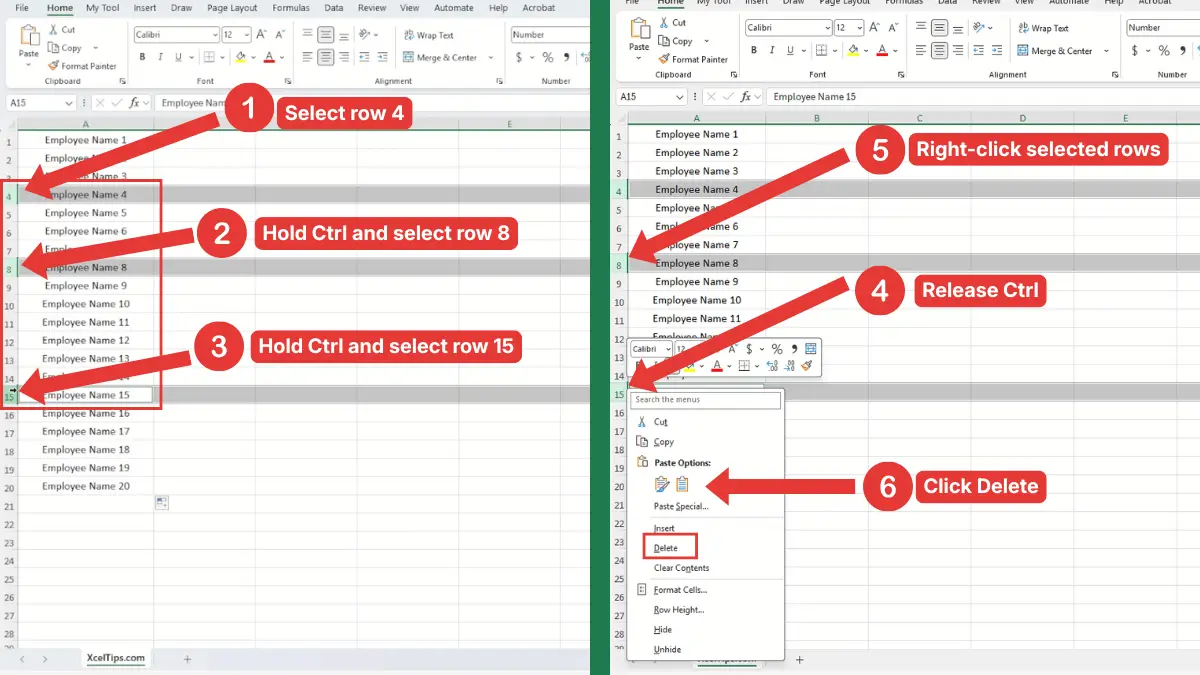
Delete Multiple Rows That Are Not Next to Each Other
Sometimes the rows you want to remove are not next to each other. For example, you may want to delete rows 4, 8, and 15.
- Click the first row number you want to delete.
- Hold Ctrl on your keyboard.
- While holding Ctrl, click each additional row number you want to delete.
- Release Ctrl after all needed rows are selected.
- Right-click one of the selected row numbers.
- Click Delete.
Excel removes all selected rows, even though they are not next to each other.
Beginner Warning:
Be careful when selecting non-adjacent rows. If you accidentally include a row you still need, Excel will delete it along with the others.
This method is the best fit for anyone searching for how to delete multiple rows in Excel because it works for both connected and separated rows.
The right-click method is quick, but Excel also gives you a Ribbon option if you prefer using buttons at the top of the window.
Delete Rows from the Home Tab
The Home tab method is useful if you prefer using Excel’s Ribbon instead of the right-click menu. It does the same thing as the right-click method, but the command is found at the top of the Excel window.
This is also helpful for beginners who are still learning where common Excel commands are located.
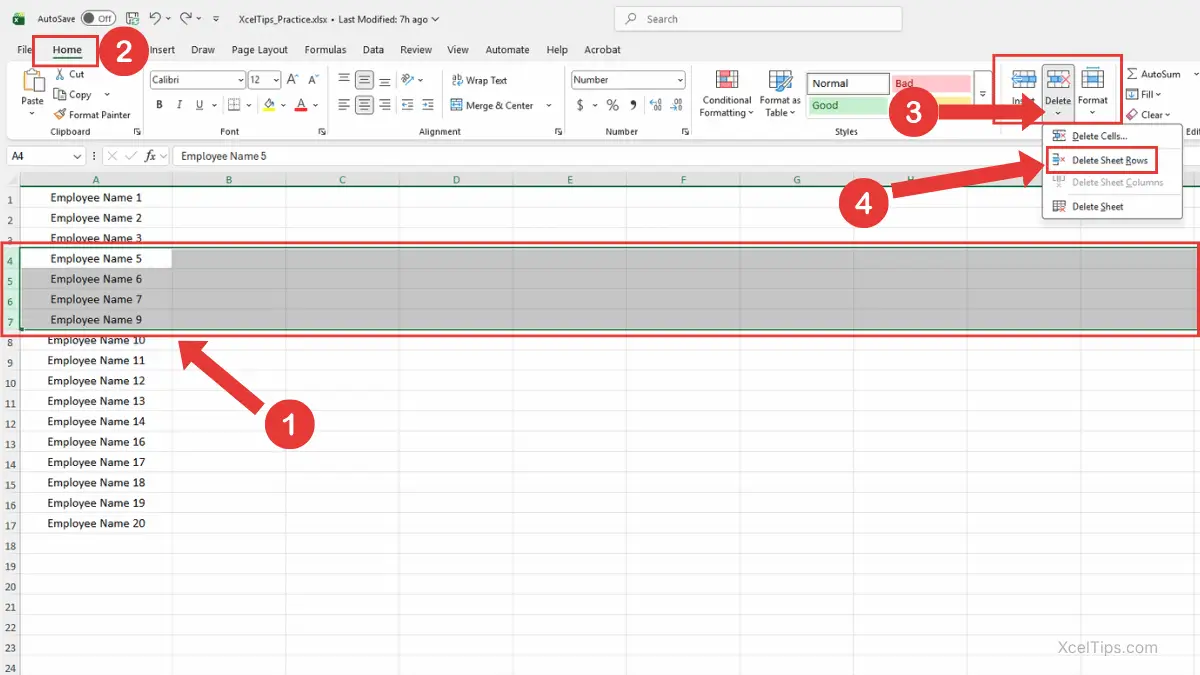
Use Delete Sheet Rows from the Ribbon
Start by selecting the row or rows you want to remove. Once the row is selected, you can use the Delete command from the Home tab.
- Select the row number or row numbers you want to delete.
- Go to the Home tab.
- In the Cells group, click the arrow beside Delete.
- Choose Delete Sheet Rows.
Excel removes the selected row or rows from the worksheet.
Microsoft also explains this Ribbon method in its official guide to inserting or deleting rows and columns in Excel, which is helpful if you want to confirm the standard Excel command path.
Beginner Tip:
If you select only one cell and then use the Delete menu, Excel may not delete the entire row unless you choose the correct row option. Selecting the row number first avoids confusion.
When Should You Use the Home Tab Method?
The Home tab method is a good choice when you want a more visual path. It also helps you learn where Excel keeps row and column commands.
Here is a simple comparison.
| Method | Best For | Beginner Note |
|---|---|---|
| Right-click row header | Fast everyday deleting | Easiest for most beginners |
| Home tab command | Learning the Ribbon | Good if you prefer buttons |
| Ctrl + select rows | Non-adjacent rows | Useful but requires careful selection |
| Filter blank rows | Finding blank rows in a list | Best for larger datasets |
Both the right-click method and the Home tab method delete the selected rows. The main difference is how you access the command.
Before you delete more rows, it helps to understand what Excel changes when a row is removed.
What Happens When You Delete a Row?
When you delete a row, Excel removes the entire horizontal row from the worksheet. The rows below the deleted row move upward to fill the space.
This is different from clearing the contents of cells or hiding a row. Understanding the difference helps you avoid a common beginner mistake.
Delete Row vs Clear Contents vs Hide Row
These three actions may look similar at first, but they do different things. The table below shows the difference.
| Action | What It Does | When to Use It |
|---|---|---|
| Delete Row | Removes the entire row and shifts rows below upward | When the row is no longer needed |
| Clear Contents | Removes the data but keeps the row in place | When you want an empty row to remain |
| Hide Row | Keeps the row but makes it temporarily invisible | When you want to keep data but not display it |
For this lesson, the focus is deleting rows. That means the row itself is removed from the worksheet.
Beginner Tip:
Pressing the Delete key on your keyboard usually clears the selected cell contents. It does not remove the full worksheet row unless you use a row deletion command.
Common Mistakes to Avoid When Removing Rows
Learning how to remove a row in Excel is simple, but beginners can still run into problems if they delete too quickly. Most mistakes happen because the wrong row was selected or because the user meant to clear data instead of deleting the entire row.
Take a moment to check your selection before you click Delete.
Mistake 1: Selecting a Cell Instead of the Full Row
If you select only one cell and use a delete command, Excel may ask how you want to shift cells. That can confuse beginners and may change the layout of nearby data.
To avoid this, click the row number on the left side before deleting.
Mistake 2: Deleting Rows Without Checking the Full Row
A row may contain data far to the right that is not visible on your screen. Before deleting, scroll across the worksheet or check the full row if the file is important.
This is especially important in wide worksheets with many columns.
Mistake 3: Deleting Rows in a Filtered List Without Thinking
When a filter is active, Excel may only show some rows. If you delete visible rows, make sure those are truly the rows you want to remove.
Filtered lists are useful, but beginners should move slowly when deleting data from them.
Mistake 4: Confusing Delete with Clear Contents
If you only want to remove the text or numbers inside a row but keep the row itself, use Clear Contents instead of deleting the row.
Deleting the row changes the worksheet structure. Clearing contents leaves the row in place.
Mistake 5: Forgetting to Save or Undo
If you delete a row by mistake, press Ctrl + Z right away. If you notice the mistake much later, it may be harder to recover depending on what else you changed.
A simple habit is to review your worksheet after deleting rows, especially before saving and closing the file.
After learning the main methods and mistakes, it is helpful to practice with a small sample worksheet.
Quick Practice
Practice helps you build confidence before using row deletion in a real workbook. Use a simple sample worksheet with a few rows of practice data.
Open a blank worksheet in XcelTips_Practice.xlsx or use a new blank workbook, then try this short exercise.
- Open a blank worksheet.
- Type simple labels in row 1, such as
Name,Department, andStatus. - Add five sample rows of data.
- Click row number 4.
- Right-click the selected row.
- Click Delete.
- Add two blank rows between your sample records.
- Select the blank row numbers.
- Right-click and choose Delete.
- Press Ctrl + Z once to practice undoing a deletion.
This quick practice shows how row deletion affects the worksheet. It also helps you see why selecting the row number is important.
Once you finish the practice, review the main points so you know which method to use later.
Key Takeaways
Deleting rows is a basic Excel skill, but it affects the structure of your worksheet. The safest beginner method is to select the row number first, then delete the full row.
- Use the row number to select the entire row before deleting.
- Right-click and choose Delete for the fastest method.
- Use Home tab → Cells group → Delete → Delete Sheet Rows if you prefer the Ribbon.
- Hold Ctrl to select rows that are not next to each other.
- Be careful when deleting blank rows from a large worksheet.
- Use Ctrl + Z immediately if you delete the wrong row.
- Remember that deleting a row is different from clearing its contents.
These points will help you delete rows confidently without damaging nearby data.
Frequently Asked Questions (FAQs)
What is the easiest way to learn how to delete rows in Excel?
The easiest way is to click the row number on the left side, right-click the selected row, and choose Delete. This selects and removes the full row, which is easier for beginners than selecting individual cells.
How to delete a row in Excel without deleting the wrong data?
Click the row number first and make sure the entire row is highlighted. Before choosing Delete, check that you selected the correct row. If you make a mistake, press Ctrl + Z right away.
Can I delete multiple rows at the same time?
Yes. Select several row numbers first, then right-click and choose Delete. For rows that are next to each other, drag across the row numbers.
For rows that are not next to each other, hold Ctrl while selecting each row number.
How to delete blank rows in Excel?
For a few blank rows, select the blank row numbers, right-click, and choose Delete. For many blank rows, you can use Filter to show blanks in an important column, then delete the visible blank rows carefully.
What is the difference between deleting a row and clearing contents?
Deleting a row removes the entire row and shifts the rows below upward. Clearing contents removes the data inside the cells but keeps the row in the worksheet.
Can I undo a deleted row?
Yes. Press Ctrl + Z immediately after deleting the row. This restores the deleted row if no other action has made the undo step harder to track.
Conclusion
Learning how to delete rows in Excel helps you clean up worksheets, remove old records, and organize your data more clearly. The key is to select the row number first so Excel knows you want to remove the entire row, not just a single cell.
Start by practicing with one row, then try deleting multiple rows and blank rows in a small sample worksheet. Once you are comfortable, you can use the same skill in real workbooks with more confidence.
After this lesson, continue with how to delete columns in Excel to learn how to remove vertical data from a worksheet.
This lesson is part of the Beginner Learning Path, a structured series designed to help you learn Microsoft Excel step by step from the basics.
← Previous Lesson
How to Insert Rows in Excel: Step-by-Step Guide for Beginners