Written By Sophanith Dith
Last Updated May 14, 2026
Applies to Microsoft Excel 365 (Windows only)
Part of the Beginner Learning Path
Module 2 Working with Data
Lesson 15 of 22
You have a worksheet that already looks good. The headers are bold, the totals are formatted as currency, the cells have borders, and some rows have fill colors. But the actual values may be wrong, outdated, or just sample data. This is when you need to clear cells in Excel without deleting the formatting.
The good news is that Excel has a built-in command called Clear Contents. It removes the data inside selected cells but keeps the cell formatting in place. This is useful when you want to reuse a form, template, budget sheet, sales tracker, checklist, or practice worksheet.
In this tutorial, you will learn how to clear data safely, what to avoid, and which Excel command to use when you want to remove values but keep the design of your worksheet.
Quick Answer:
To clear cells in Excel without deleting formatting, select the cells you want to empty, go to the Home tab, open Clear in the Editing group, and choose Clear Contents (Home tab → Clear → Clear Contents). You can also press the Delete key after selecting the cells. Both methods remove the contents while keeping formatting.
Quick Reference
Before going step by step, here is the basic idea. Excel gives you several Clear options, and choosing the wrong one can remove more than you intended.
- Use Clear Contents to remove data but keep formatting.
- Use the Delete key to quickly clear selected cell contents.
- Avoid Clear All if you want to keep formatting.
- Formatting includes font style, color, borders, alignment, and number formats.
- Clearing contents also removes formulas from the selected cells.
- Always check your selection before clearing anything.
The main skill is simple, but the difference between the Clear options is important.
What It Means to Clear Cells in Excel
Clearing cells means removing something from a cell without necessarily deleting the cell itself. This is different from deleting rows, deleting columns, or removing the entire cell structure from the worksheet.
When beginners say they want to “delete data,” they often mean they want to empty the cells. In Excel, the safer term is usually clear contents in Excel, because the cells stay in the same place and the worksheet layout does not shift.
For example, imagine you have a monthly expense template. The categories, borders, colors, and currency formatting are already set up. At the start of a new month, you only want to remove last month’s numbers. You do not want to rebuild the whole sheet.
That is exactly where Clear Contents helps.
Here is the difference in simple terms:
| Action | What It Does | Formatting Kept? | Beginner Use Case |
|---|---|---|---|
| Clear Contents | Removes values or formulas inside cells | Yes | Empty a template for reuse |
| Clear Formats | Removes formatting only | No | Reset cell appearance |
| Clear All | Removes contents and formatting | No | Completely reset selected cells |
| Delete cells | Removes cells and may shift nearby cells | No, layout can change | Rearranging worksheet structure |
Beginner Warning:
Do not confuse Clear with Delete. Clearing contents empties the selected cells. Deleting cells can move surrounding data and change the layout.
If you are still learning how to highlight cells correctly before using commands, review how to select cells and ranges in Excel before continuing.
Once you understand what “clear” means, the safest place to start is with the Clear Contents command.
How to Clear Cells in Excel Without Deleting Formatting
The most reliable beginner method is to use Clear Contents from the Home tab. This lets you see the command before you click it, which reduces the chance of choosing the wrong option.
This method is best when you are learning how to clear data in Excel because it shows the exact command name. You will also see nearby options, such as Clear Formats and Clear All, so you can understand what not to use.
Method 1: Use Clear Contents from the Ribbon
Follow these steps when you want to remove data but keep the existing cell style.
- Select the cell or range of cells you want to clear, such as
B2:B10. - Go to the Home tab.
- Look for the Editing group on the right side of the Ribbon.
- Click Clear.
- Choose Clear Contents.
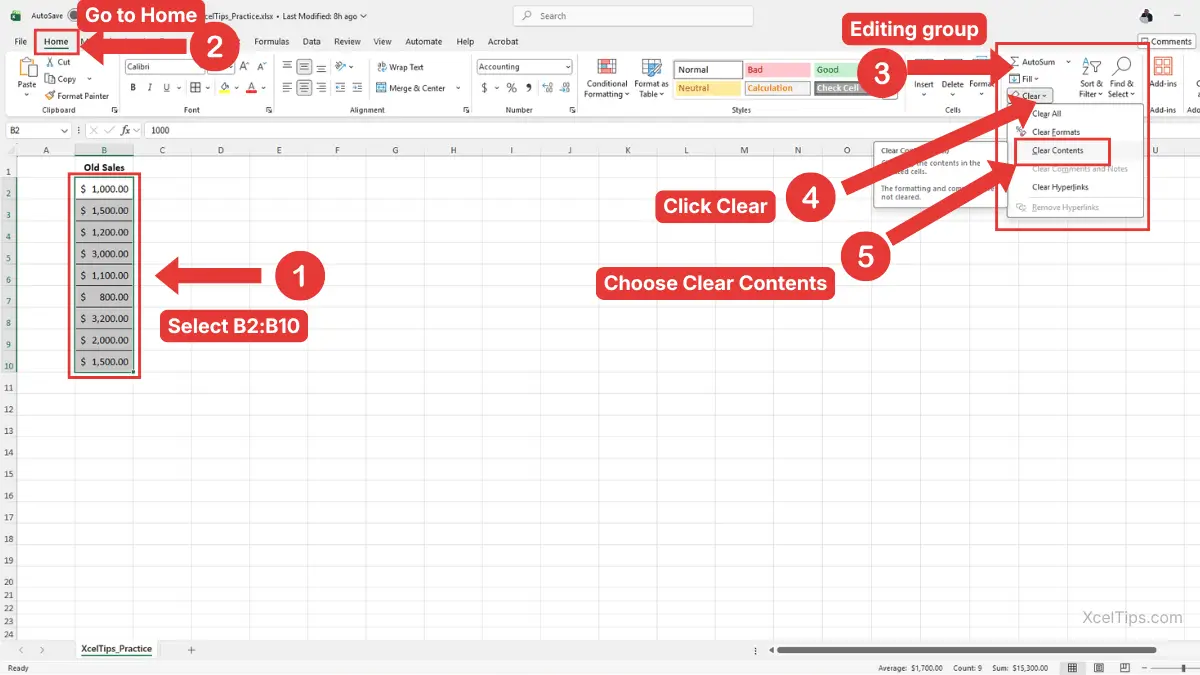
For example, suppose cells B2:B10 contain old sales numbers. The cells are formatted as currency and have borders. If you select B2:B10 and choose Home tab → Clear → Clear Contents, Excel removes the old numbers but keeps the currency formatting and borders ready for new entries.
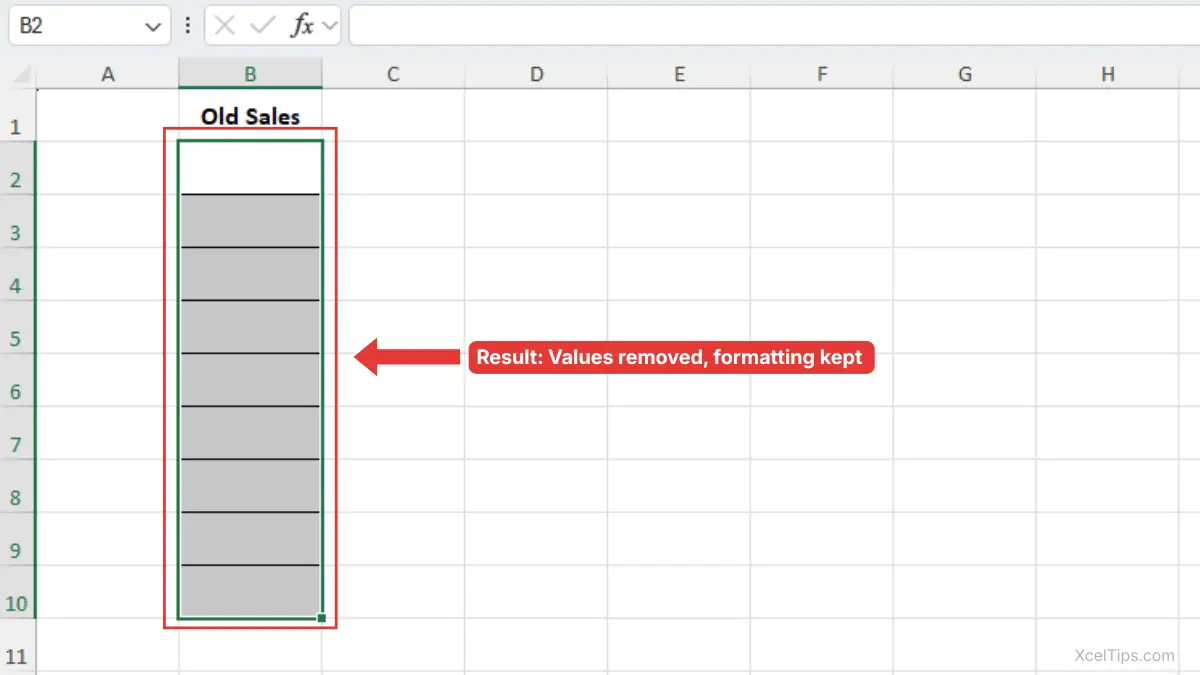
After using Clear Contents, the old values are gone, but the cell design stays in place. The borders, fill color, header style, and other formatting remain ready for new data, as shown in the image below.
Beginner Tip:
After clearing the cells, click one of the empty cells and type a new value. If the formatting was kept, the new value should automatically appear with the same style as before.
This Ribbon method is clear and safe, but there is also a faster way for everyday use.
Method 2: Use the Delete Key to Clear Data Quickly
Once you are comfortable selecting cells, the Delete key is the fastest way to clear cell contents. It removes the data inside the selected cells without removing the formatting.
This method is useful when you already know which cells you want to empty. It is especially helpful for clearing practice data, old numbers, or temporary notes from a worksheet.
Use this method when you want a quick shortcut-like option without opening the Ribbon.
- Select the cell or range of cells you want to clear.
- Press the Delete key on your keyboard.
- Check that the cell formatting is still visible.
Excel clears the contents from the selected cells. The cells remain in the same location, and the formatting remains available for new data.
For example, if you have a formatted attendance sheet and want to remove names from a column, select the names and press Delete. The names disappear, but the row shading, borders, and alignment stay in place.
Beginner Warning:
The Delete key clears the contents of the selected cells. It does not delete the worksheet rows or columns. If you right-click and choose Delete, that is a different command and may shift cells, rows, or columns.
If you want to review basic editing actions before using faster methods, you may also find how to cut, copy, and paste in Excel helpful.
Method 3: Use Right-Click and Clear Contents
The right-click method is helpful when you prefer working directly from the selected cells instead of using the Ribbon.
- Select the cell or range of cells you want to clear.
- Right-click the selected cells.
- Choose Clear Contents from the shortcut menu.
Excel removes the contents from the selected cells while keeping the existing formatting.

Beginner Warning:
In the right-click menu, choose Clear Contents, not Delete. The Delete command can remove cells and shift nearby data, which is not the goal here.
The three method above to clear cell contents are convenient, but beginners should also understand what Excel keeps behind after the contents are removed.
What Formatting Stays After You Clear Contents?
When you use Clear Contents or press Delete, Excel removes the cell contents but keeps the cell’s appearance. This is the main reason the command is useful for templates and repeated worksheets.
Formatting controls how data looks, not the actual value stored in the cell. When you clear the contents, the formatting remains attached to the empty cells.
Common formatting that stays includes:
- Font style and font size
- Bold, italic, and underline
- Fill color
- Font color
- Cell borders
- Alignment
- Number formats, such as currency, percentage, and dates
- Cell width and row height
For example, if a cell was formatted as currency, clearing the value does not remove the currency format. When you type a new number later, Excel may display it as currency again.
This is useful when reusing worksheets such as:
- Weekly schedules
- Monthly budgets
- Sales trackers
- Inventory lists
- Invoice templates
- Classroom grade sheets
- Practice worksheets
Here is a simple example. Suppose you have a budget table with categories in column A and amounts in column B. Column B is formatted as currency. If you clear only the amount cells, the table is ready for a new budget period without losing its layout.
Beginner Tip:
If you clear contents and then type new data, Excel may apply the existing format automatically. This is usually helpful, especially in templates.
Formatting stays in place, but not everything is formatting. That is why it is important to know what gets removed.
What Gets Removed When You Clear Contents?
When you clear contents in Excel, Excel removes the actual content inside the selected cells. That includes typed text, numbers, dates, and formulas.
This matters because a formula may look like a number in the worksheet. For example, a total cell may show 250, but the formula bar may contain =SUM(B2:B6). If you clear that cell, the formula is removed too.
Clear Contents removes:
- Typed text
- Numbers
- Dates
- Formulas
- Formula results
- Manually entered values
For example, if cell C10 contains =SUM(C2:C9), using Clear Contents on C10 removes the formula. The cell may still look formatted, but it will no longer calculate a total.
Beginner Warning:
Before clearing cells in a workbook you care about, click a few cells and look at the formula bar. If you see formulas, make sure you really want to remove them.
This is one of the most common beginner mistakes. A worksheet may look like it contains simple numbers, but some of those numbers may actually be formula results.
If you are still early in formula learning, you can connect this skill later with lessons like how to use the SUM function in Excel, where formulas are explained more directly.
Once you know what stays and what disappears, the next important skill is choosing the correct Clear option.
Clear Contents vs Clear All vs Clear Formats
Excel’s Clear menu includes several choices. They sound similar, but they do very different things. Choosing the wrong one can remove formatting you wanted to keep.
This comparison is important for beginners because Clear All may look like the obvious choice, but it is not the best choice when you want to preserve formatting.
| Clear Option | Removes Data? | Removes Formatting? | Best Used When |
|---|---|---|---|
| Clear Contents | Yes | No | You want to remove data but keep formatting |
| Clear Formats | No | Yes | You want to keep values but remove styling |
| Clear All | Yes | Yes | You want to reset the cells completely |
| Clear Comments and Notes | No | No | You only want to remove comments or notes |
| Clear Hyperlinks | Sometimes affects link behavior | Usually keeps visible text | You want to remove link behavior |
For Microsoft’s official explanation of these options, see their guide on clearing cells of contents or formats.
For this lesson, the most important option is Clear Contents.
When to Use Clear Contents
Use Clear Contents when the design of the worksheet is correct, but the data needs to be removed.
Examples include:
- Emptying old sales numbers.
- Clearing sample data from a template.
- Removing temporary notes.
- Preparing a blank form.
- Reusing a weekly tracker.
When to Avoid Clear All
Avoid Clear All when you want to keep formatting. Clear All removes both the cell contents and the formatting, so your worksheet may lose colors, borders, fonts, and number formats.
For example, if you select a formatted invoice table and choose Clear All, Excel removes the invoice values and the design. That means you may need to format the table again.
Beginner Warning:
If your goal is to clear cells in Excel without deleting formatting, Clear All is usually the wrong command.
Now let’s look at some practical examples so you can see when this skill helps in real workbooks.
Common Examples of Clearing Cells Without Removing Formatting
Clearing cells is not just a technical command. It is a practical worksheet habit that saves time when you work with repeated layouts.
Beginners often use the same worksheet structure again and again. Instead of creating the file from scratch, you can clear the old entries and keep the formatting ready for new data.
Example 1: Reuse a Monthly Budget
Suppose you have a budget worksheet with categories, borders, and currency formatting. Last month’s expenses are still in the amount column.
To prepare the sheet for the next month:
- Select the cells that contain last month’s amounts.
- Go to Home tab → Clear → Clear Contents.
- Leave the category names and formatting in place.
- Enter the new month’s amounts.
This lets you reuse the same budget layout without rebuilding it.
Example 2: Clear Practice Data from a Training Sheet
If you are learning Excel, you may type sample data into a formatted practice table. After finishing the exercise, you can clear the sample values and use the same table again.
- Select only the sample data cells.
- Press Delete.
- Keep the headings, borders, and formatting visible.
This is helpful when following a beginner learning path because you can practice the same skill more than once.
Example 3: Empty a Checklist
A checklist may have formatted rows, shaded sections, and check marks or notes. If you want to start fresh, you can clear only the cells where users enter information.
- Select the input cells.
- Choose Clear Contents.
- Keep the checklist structure unchanged.
This works well for recurring tasks, weekly plans, or simple tracking sheets.
Example 4: Clear a Form Before Sending It
If you use Excel as a simple form, you may need to remove example responses before sharing the file. Clear the response cells but keep labels, instructions, and formatting.
Beginner Tip:
Save a clean copy of important templates before entering real data. That way, you always have a blank version ready.
The examples above all depend on selecting the right cells first, so the next section covers common mistakes to avoid.
Common Mistakes When Clearing Cells in Excel
Clearing cells is simple, but small selection mistakes can cause confusion. Most problems happen because the wrong cells are selected or the wrong Clear command is chosen.
Before using any clear command, pause for a second and check the highlighted range. Excel will apply the command to everything selected.
Mistake 1: Selecting the Whole Table by Accident
If you select the entire table, Excel will clear all selected contents. This may include headings, formulas, or labels you wanted to keep.
Better approach:
- Select only the input cells.
- Avoid selecting headings unless you want to remove them.
- Check the formula bar if you are unsure whether cells contain formulas.
Mistake 2: Using Clear All Instead of Clear Contents
This is the biggest mistake for this lesson. Clear All removes data and formatting, which defeats the purpose of keeping the worksheet design.
Use this rule:
- Want to remove data only? Use Clear Contents.
- Want to remove formatting only? Use Clear Formats.
- Want to reset everything? Use Clear All.
Mistake 3: Clearing Formula Cells
Formula cells may display normal-looking numbers. If you clear them, the calculation is removed.
Before clearing totals, averages, or calculated results, click the cell and look at the formula bar. If you see a formula, think carefully before removing it.
Mistake 4: Deleting Rows Instead of Clearing Cells
Pressing the Delete key is not the same as right-clicking and choosing Delete. The right-click Delete command may shift cells or remove rows and columns.
If your goal is only to clear data in Excel, use Clear Contents or press the keyboard Delete key after selecting the cells.
A safe workflow prevents most mistakes, especially when you are working in a real file.
A Safe Beginner Workflow for Clearing Data
A simple workflow helps you clear data without damaging the layout. This is especially useful when working with templates, shared files, or worksheets that contain formulas.
Instead of clearing cells quickly without checking, follow a short safety routine. It only takes a few seconds and can prevent a lot of frustration.
Safe Workflow
- Save your workbook first, especially if the file contains important data.
- Select only the cells that contain data you want to remove.
- Check whether the selected cells include formulas.
- Use Home tab → Clear → Clear Contents.
- Review the worksheet to confirm the formatting stayed.
- Enter new data if needed.
Beginner Tip:
If you make a mistake, press Ctrl + Z immediately to undo the action. For more ways to reverse or repeat recent changes, see how to use the Undo and Redo shortcuts in Excel.
This workflow is especially helpful when you are clearing data from a worksheet that someone else created. You may not know which cells contain formulas or special formatting.
Now that you know the safe method, let’s finish with a short practice exercise.
Quick Practice
Use this quick exercise to make the skill feel natural. For practice, open a blank workbook and save it as XcelTips_Practice.xlsx.
- Create a small table with headers: Item, Quantity, and Price.
- Enter a few sample values under each header.
- Add simple formatting, such as bold headers, borders, and currency formatting for prices.
- Select only the sample values, not the headers.
- Go to Home tab → Clear → Clear Contents.
- Confirm that the values disappear but the formatting remains.
- Type new values into the empty cells.
Practice again using the Delete key instead of the Ribbon. Both methods should remove the contents while keeping the formatting.
After trying both methods, the main idea should be clear: you are removing the contents, not rebuilding the worksheet. Here are the key points to remember.
Key Takeaways
These are the main points to remember when you want to clear cell data without damaging the worksheet design. Keep these rules in mind before using any Clear command.
- To clear cells in Excel without deleting formatting, use Clear Contents.
- The path is Home tab → Editing group → Clear → Clear Contents.
- Pressing the Delete key also clears selected cell contents while keeping formatting.
- Avoid Clear All unless you want to remove both data and formatting.
- Clearing contents removes formulas as well as typed values.
- Always check your selected range before clearing data.
- Use Ctrl + Z right away if you clear the wrong cells.
A few small details can still confuse beginners, especially the difference between clearing and deleting. These quick answers will help you avoid common mistakes.
Frequently Asked Questions (FAQs)
How do I clear cells in Excel without deleting formatting?
Select the cells, go to Home tab → Clear → Clear Contents, or press the Delete key. Excel removes the data from the selected cells but keeps formatting such as borders, colors, fonts, and number formats.
What is the difference between Clear Contents and Clear All in Excel?
Clear Contents removes only the data or formulas inside the selected cells. Clear All removes both the contents and the formatting. If you want to keep the worksheet design, use Clear Contents.
How do I clear contents in Excel using the keyboard?
Select the cells you want to empty, then press the Delete key. This is the fastest way to clear cell contents while keeping formatting.
Does Clear Contents remove formulas?
Yes. Clear Contents removes formulas from the selected cells. If a cell shows a calculated result, check the formula bar before clearing it.
Can I clear data in Excel but keep borders and colors?
Yes. Use Clear Contents or the Delete key. Borders, fill colors, font styles, and other formatting should stay in place.
What should I do if I accidentally clear the wrong cells?
Press Ctrl + Z immediately to undo the action. If you saved a backup copy, you can also return to the earlier version of the workbook.
With those common questions answered, you can use Clear Contents more confidently in everyday worksheets.
Conclusion
Learning how to clear cells in Excel without deleting formatting is a simple but important beginner skill. It lets you reuse worksheets, empty templates, remove old entries, and prepare clean work areas without rebuilding the design each time.
The key is to use Clear Contents, not Clear All. Select the cells carefully, clear the contents, and check that the formatting remains before entering new data.
This lesson is part of the Beginner Learning Path, a structured series designed to help you learn Microsoft Excel step by step from the basics.