Written By Sophanith Dith
Last Updated May 18, 2026
Applies to Microsoft Excel 365 (Windows only)
Part of the Beginner Learning Path
Module 2 Working with Data
Lesson 17 of 22
Duplicate values can make a worksheet confusing. You might have the same customer listed twice, the same order number repeated, or the same product copied into a report more than once. If you are learning how to remove duplicate values in Excel, the good news is that Excel has a built-in tool that helps you clean repeated data quickly.
The main tool is called Remove Duplicates. It compares the columns you choose, keeps one copy of each matching record, and removes the extra repeated rows from your selected range.
This matters because duplicate data can lead to incorrect counts, misleading summaries, and messy reports. Before you sort, filter, share, or analyze a worksheet, removing duplicates helps make your data more reliable.
Quick Answer:
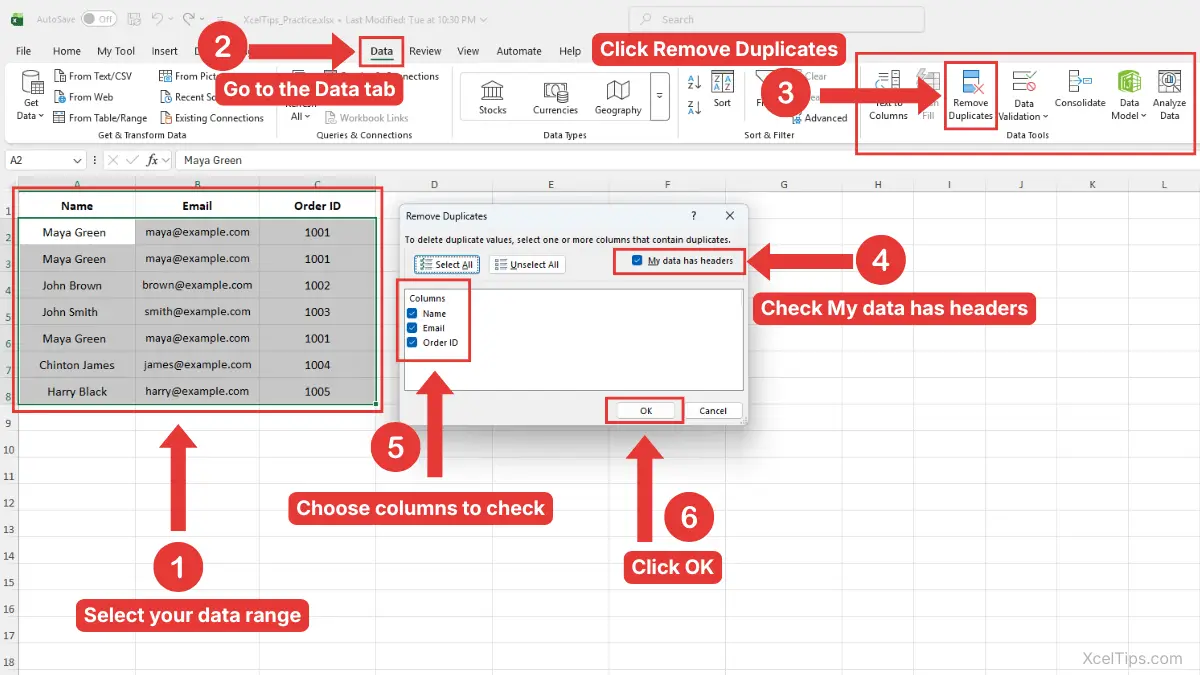
To remove duplicate values in Excel, select the data range, go to the Data tab, choose Remove Duplicates, select the columns Excel should check, and click OK. Excel keeps the first matching record and removes the duplicate rows from the selected data.
Before we go into the full explanation, here is a quick overview of the main steps you will use.
Quick Reference
Use this quick guide before you follow the full steps. It shows the basic process and the most important beginner warnings.
- Select the range that contains the possible duplicates.
- Go to Data tab → Data Tools group → Remove Duplicates.
- Confirm whether your first row contains headers.
- Select the columns Excel should compare.
- Click OK to remove repeated rows.
- Review the result message to see how many duplicates were removed.
The steps are simple, but the column choices are very important because they control what Excel treats as a duplicate. Before clicking the Remove Duplicates button, it helps to understand what Excel is actually checking behind the scenes.
What the Remove Duplicates Tool Does in Excel
Before you remove anything, it helps to understand what Excel is actually checking. The Remove Duplicates command does not just look for values that “look similar.” It compares the columns you select and removes rows that match based on those selected columns.
For example, if you check only the Email column, Excel removes repeated email addresses even if the names are slightly different. If you check Name and Email, Excel only removes rows where both the name and email match.
This is why beginners should slow down before clicking OK. The tool is powerful, but it permanently removes duplicate rows from the selected range.
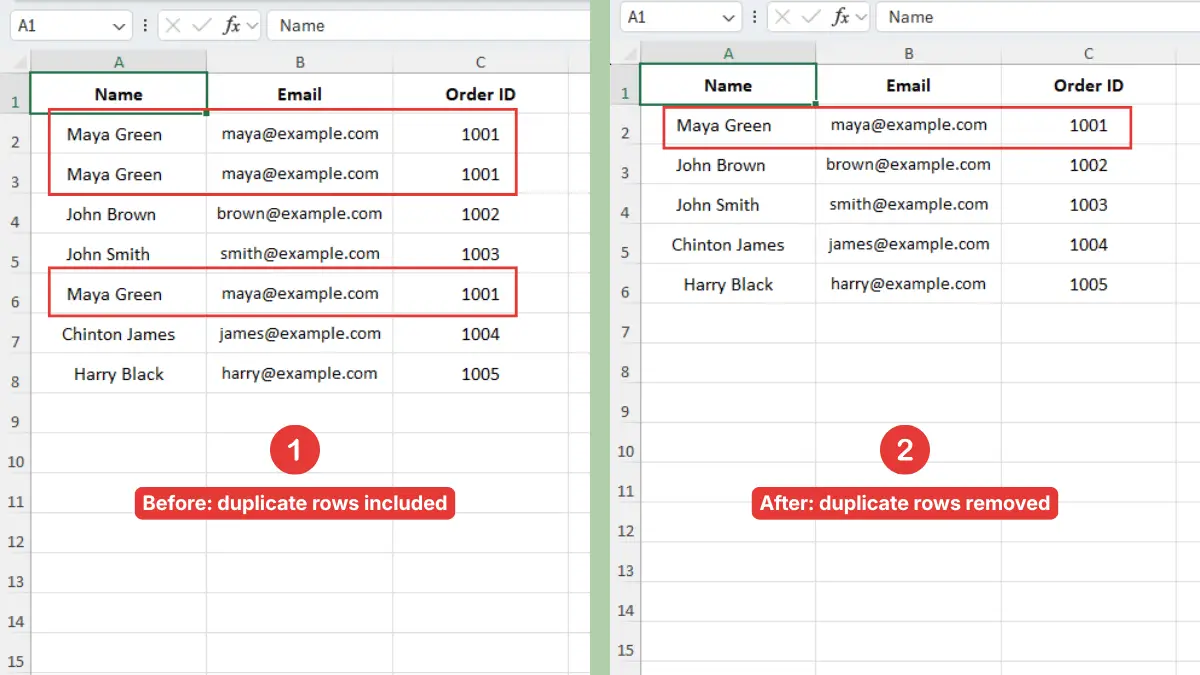
Example: How Excel Identifies Duplicate Rows
Imagine you have this small customer list:
| No. | Customer Name | City | |
|---|---|---|---|
| 1 | Ana Lopez | ana [at] example.com | Dallas |
| 2 | Ben Carter | ben [at] example.com | Austin |
| 3 | Ana Lopez | ana [at] example.com | Dallas |
In this example, the first and third rows are duplicates because the name, email, and city are the same. If you use the Remove Duplicates command and check all three columns, Excel keeps one Ana Lopez row and removes the repeated copy.
Beginner Tip:
Excel keeps the first matching row it finds and removes the later duplicate row. If the order matters, review your data before removing anything.
Once you understand what Excel is checking, the next step is preparing the worksheet so you do not accidentally remove the wrong data.
Prepare Your Data Before Removing Duplicates
A little preparation helps you avoid mistakes. Since Remove Duplicates changes your worksheet, beginners should always check the range, headers, and surrounding data first.
This does not need to take long. The goal is simply to make sure Excel is working with the correct list before you remove duplicate data in Excel.
Make a Backup Copy First
Before using Remove Duplicates, make a copy of the worksheet or workbook. This gives you a safe version to return to if the result is not what you expected.
If you are not sure how to copy a worksheet, see our guide on how to add, duplicate, and delete a sheet in Excel.
Beginner Warning:
Remove Duplicates removes rows from the selected data. If you save and close the workbook after making a mistake, it may be harder to recover the original list.
Microsoft also recommends copying your original range or table before removing duplicate values because duplicates are permanently deleted from the selected data.
Check That Your Data Has Headers
Headers are labels at the top of your columns, such as Name, Email, Order ID, or Product. Excel uses these labels in the Remove Duplicates window when the My data has headers box is checked.
For example, this list has headers:
| Name | Order ID | |
|---|---|---|
| Maya Green | maya [at] example.com | 1001 |
| Maya Green | maya [at] example.com | 1001 |
If your first row contains labels, keep My data has headers checked. If your first row is real data, uncheck it.
Beginner Tip:
Most beginner worksheets use headers. Keeping headers clear makes tools like sorting, filtering, and removing duplicates easier to use. If you need help with organized lists, review how to enter data in Excel before cleaning larger worksheets.
Select the Correct Data Range
You can click inside the list and let Excel detect the range, but beginners should still check the selected area. If there is a blank row or blank column inside your data, Excel may not include everything you expect.
To be safer:
- Click the first cell in your list.
- Drag to select the full range, including headers.
- Make sure all related columns are selected.
- Avoid selecting unrelated notes, totals, or separate lists.
If selecting a larger range still feels confusing, review our guide on how to select multiple cells in Excel using keyboard and mouse before removing duplicates.
If your list is large, click one cell inside the list and press Ctrl + A once. Excel usually selects the current data region around that cell.
Beginner Warning:
Do not select only one column if the duplicate rows include related information in nearby columns. Removing duplicates from only part of a list can misalign your data if you are not careful.
After the data is ready, you can use the main Remove Duplicates command from the Data tab.
How to Remove Duplicate Values in Excel Step by Step
The fastest beginner method is to use the Remove Duplicates command on the Data tab. This method is built into Excel and does not require formulas.
Use this when you want Excel to permanently remove repeated rows from a selected range. The key decision is choosing which columns Excel should use to identify duplicates.
Use the Remove Duplicates Command
Follow these steps to remove duplicates from a simple list.
- Select the range that contains your data.
- Go to the Data tab.
- In the Data Tools group, click Remove Duplicates.
- In the Remove Duplicates window, check My data has headers if your first row contains column labels.
- Select the columns Excel should check for duplicates.
- Click OK.
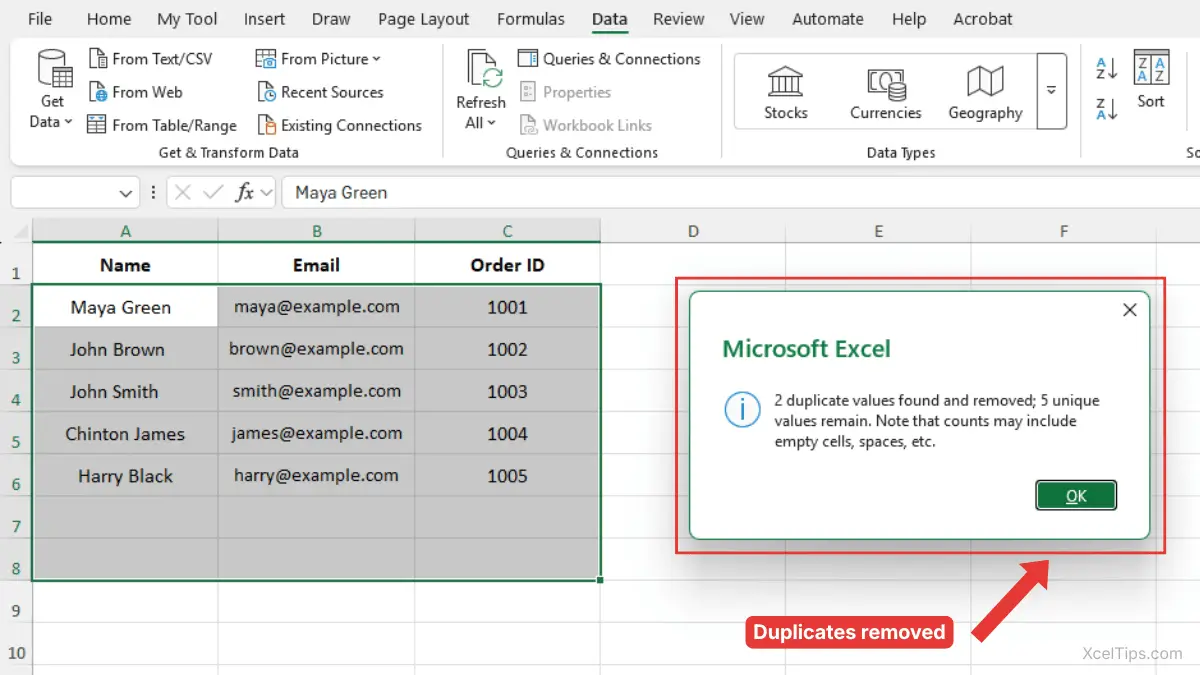
If your selected range has duplicate values, Excel shows a message telling you how many duplicate values were removed and how many unique values remain. Click OK to close the message and review the cleaned list.
Excel will keep one copy of each unique record and remove the repeated rows from the selected range.
Example: Remove Duplicate Customer Emails
Suppose you have a customer signup list with columns for Name, Email, and Signup Date. You want one row per email address because each email should appear only once.
In the Remove Duplicates window:
- Check My data has headers.
- Uncheck all columns except
Email. - Click OK.
Excel uses only the Email column to decide which records are duplicates. However, when it finds a duplicate email address, Excel removes the entire row, not just the email cell.
For example, if maya [at] onexample.com appears three times, Excel keeps the first row with that email address and removes the other rows that contain the same email. The related name and order ID in those duplicate rows are removed too because Excel deletes whole rows from the selected range.
This is useful when one column, such as email, ID, or order number, should be unique.
Beginner Warning:
If two people share the same email address, Excel may treat one as a duplicate when you check only the Email column. Always choose columns based on what should truly be unique in your list.
Example: Remove Fully Duplicate Rows
Sometimes you only want to remove rows that are exactly the same across all important columns. In that case, you should select all columns in the Remove Duplicates window.
For example, if your columns are Order ID, Customer Name, Product, and Amount, checking all four columns means Excel removes a row only if all four values match another row.
This is safer when you want to remove repeated data in Excel without accidentally removing similar but valid records.
Once you know the main command, the next important skill is understanding which columns to check.
How Excel Decides What Counts as a Duplicate
The Remove Duplicates window gives you a list of columns. The columns you check tell Excel what to compare.
This part is where many beginners make mistakes. A row may look like a duplicate in one column, but it may be different when you compare the full record.
If You Check One Column
If you check only one column, Excel removes rows where that column has repeated values.
For example, if you check only Product, Excel may remove repeated product names even if the sales dates or order numbers are different. That may be wrong if each product can appear in many orders.
Use one column only when that column should be unique, such as:
| Column | Good Reason to Check Only This Column |
|---|---|
| Each email should appear once | |
| Order ID | Each order number should be unique |
| Employee ID | Each employee ID should appear once |
| Invoice Number | Each invoice should be listed once |
If You Check Multiple Columns
If you check multiple columns, Excel removes rows only when all selected columns match. This is useful when a duplicate is based on a full record, not just one value.
For example, checking Name, Email, and City means Excel removes only rows where all three selected fields match.
This helps when you want to remove duplicate data in Excel but still keep similar records that are not truly duplicates.
Which Option Should Beginners Choose?
Use this table as a quick decision guide. It can help you decide whether to check one column or multiple columns.
| Situation | Columns to Check | Why |
|---|---|---|
| Each email should appear once | Email only | Email is the unique identifier |
| Each order should appear once | Order ID only | Order ID identifies the record |
| Entire repeated rows should be removed | All important columns | Excel checks the full record |
| Same customer may have many orders | Do not check Customer Name only | The name may repeat for valid reasons |
| Product appears in many sales rows | Do not check Product only | Repeated products are normal in sales data |
Beginner Tip:
If you are unsure, make a backup and try checking all important columns first. This usually removes only exact duplicate records and is less risky than checking a broad column like Product or City.
Choosing columns carefully prevents the most common duplicate-removal mistakes. The next section shows what to check after Excel removes the duplicates.
Review the Results After Removing Duplicates
After you click OK, Excel shows a message telling you how many duplicate values were removed and how many unique values remain. Beginners should not ignore this message.
This result message is useful because it helps you confirm whether the cleanup result makes sense. If Excel removed far more rows than expected, you may have selected the wrong columns.
Read the Result Message
Excel usually shows a message similar to this:
“3 duplicate values found and removed; 12 unique values remain.”
This means Excel deleted 3 repeated rows from the selected range and kept 12 unique rows.
If the number seems reasonable, you can continue working. If the number seems too high or too low, use Ctrl + Z immediately to undo the action and try again with different column selections.
Check the Remaining Data
After removing duplicates, scan the list to make sure it still looks correct. Pay attention to columns that identify each record, such as order numbers, email addresses, or employee IDs.
You can also sort the cleaned list to review it more easily. Sorting is a separate skill, so if you need a refresher, see how to sort data in Excel.
Beginner Warning:
Do not continue editing for a long time if you think the wrong duplicates were removed. Use Ctrl + Z right away while the action is still easy to undo.
After reviewing the result, it also helps to know the difference between removing duplicates and simply finding duplicates.
Remove Duplicates vs Finding Duplicates
Removing duplicates and finding duplicates are related, but they are not the same task. Removing duplicates deletes repeated rows, while finding duplicates helps you review them before deciding what to do.
Beginners often use Remove Duplicates too quickly when they should inspect the repeated values first. If you are working with important data, reviewing duplicates before deleting them may be safer.
When to Remove Duplicates
Use Remove Duplicates when you are confident that repeated rows should not be in the list.
Good examples include:
- Cleaning a mailing list with repeated email addresses.
- Removing repeated order numbers from an export.
- Cleaning a copied list where the same row was pasted twice.
- Preparing a unique list of names, IDs, or codes.
This is the best choice when your goal is to quickly remove duplicate data in Excel and keep one clean version of each record.
When to Find Duplicates First
You may want to find duplicates first when repeated values might be meaningful.
For example, a customer name may appear many times because the customer placed several orders. A product may appear many times because it was sold on different dates. These are repeated values, but they are not necessarily mistakes.
In those cases, you can briefly use sorting or filtering to review the data before removing anything. If you are not familiar with these tools yet, see our guides on how to sort data in Excel and how to filter data in Excel. You can also use conditional formatting in a later formatting lesson to highlight duplicate values without deleting them.
Controlled Note:
This article focuses on removing duplicates. Highlighting duplicates with conditional formatting is a different lesson because it finds repeated values visually without deleting rows.
Knowing when not to delete is just as important as knowing which button to click. The next section covers common mistakes so beginners can avoid damaging their worksheet.
Common Mistakes When Removing Duplicate Data in Excel
Remove Duplicates is easy to use, but small choices can create big changes in your worksheet. Most beginner mistakes happen because the wrong range or wrong columns were selected.
The good news is that these mistakes are easy to avoid when you know what to check first.
Mistake 1: Selecting Only Part of the List
If you select only one column from a multi-column list, you may remove duplicates without considering the rest of the row. This can create confusing results.
For example, selecting only Customer Name may remove valid rows because the same customer can appear more than once for different orders.
Better Approach:
Select the full list, then choose the correct columns inside the Remove Duplicates window.
Mistake 2: Forgetting About Headers
If your data has headers but My data has headers is unchecked, Excel may treat the first row as normal data. This can make the Remove Duplicates window harder to read because the column names may appear as generic column letters instead of clear labels.
Better approach:
If your first row contains labels, keep My data has headers checked.
Mistake 3: Checking Too Few Columns
Checking too few columns can remove records that are similar but not truly duplicates.
For example, if you check only Product, Excel may remove repeated product names even though each row represents a different sale.
Better approach:
Check the column that uniquely identifies the record, such as Order ID, or check all important columns if you only want exact repeated rows removed.
Mistake 4: Not Making a Backup
Because Remove Duplicates changes your worksheet, beginners should make a backup before using it on important data.
Better approach:
Copy the worksheet first, or save a duplicate workbook before cleaning the original file.
Mistake 5: Removing Duplicates Before Cleaning Obvious Text Issues
Sometimes values look the same to a person but are not exactly the same to Excel. Extra spaces, inconsistent spelling, or mixed formats can affect cleanup results.
For example, “Ana Lopez” and “Ana Lopez ” may not behave the way you expect if one value has an extra trailing space.
This connects to later cleanup skills such as how to use Find and Replace in Excel and how to use Text to Columns in Excel, but you do not need to master those tools before learning Remove Duplicates.
Once you know the mistakes to avoid, it is useful to practice with a small list before using the command on real workbooks.
Quick Practice
Practice helps you understand how Excel decides what to remove. Use a small sample list first so you can see the result clearly.
Try this exercise in a blank worksheet or XcelTips_Practice.xlsx.
- Create three columns named
Name,Email, andCity. - Enter five rows of sample data.
- Make two rows exactly the same.
- Select the full range, including the headers.
- Go to Data tab → Data Tools group → Remove Duplicates.
- Keep all three columns checked.
- Click OK.
- Check how many duplicates Excel removed.
Then try the same exercise again, but check only the Email column. Notice how the result changes when Excel compares one column instead of the full row.
After practicing the steps, review these main points so you know what to check the next time you remove duplicates.
Key Takeaways
Removing duplicates is a basic cleanup skill that helps make your worksheet more accurate. The most important part is not just clicking the command, but choosing the right range and columns.
- Use Data tab → Remove Duplicates to remove repeated rows.
- Make a backup before cleaning important data.
- Check My data has headers when your first row contains labels.
- Select the full data range, not just a random column.
- Check one column only when that column should be unique.
- Check multiple columns when you want to remove fully repeated records.
- Use Ctrl + Z right away if Excel removes the wrong rows.
These points will help you use the tool safely instead of guessing. Here are a few common beginner questions about removing duplicate values in Excel.
Frequently Asked Questions (FAQs)
These beginner questions cover the most common confusion about duplicate values in Excel. Use them as a quick review before applying the tool to important data.
How do I remove duplicate values in Excel?
Select your data range, go to the Data tab, click Remove Duplicates, choose the columns Excel should check, and click OK. Excel keeps the first matching record and removes later duplicate rows from the selected range.
Is removing duplicates the same as deleting duplicate rows?
Usually, yes. The Remove Duplicates command removes duplicate rows based on the columns you select. If you check only one column, Excel removes rows where that selected column repeats.
Can I undo Remove Duplicates in Excel?
Yes. Press Ctrl + Z immediately after removing duplicates if the result is wrong. For important workbooks, make a backup copy before using the tool.
Why did Excel remove more rows than I expected?
Excel probably checked too few columns. For example, if you checked only Product, Excel may have removed rows where the product repeated, even if the order date or customer was different.
Should I check all columns when removing duplicates?
Check all important columns if you only want to remove rows that are fully repeated. Check one specific column only when that column should be unique, such as an email address, order ID, or invoice number.
Can Excel remove duplicate data without formulas?
Yes. The Remove Duplicates command removes duplicate data in Excel without using formulas. Formulas can help find or mark duplicates, but they are not required for this basic cleanup task.
Removing duplicates is a small Excel skill, but it can make your worksheet much cleaner and more reliable.
Conclusion
Learning how to remove duplicate values in Excel helps you clean lists, reduce repeated records, and make your worksheet easier to trust. The basic process is simple: select the data, open Remove Duplicates, choose the right columns, and review the result.
The most important beginner habit is to make a backup and think carefully about which columns define a duplicate. A repeated customer name, product, or city is not always a mistake, but a repeated email address, order ID, or invoice number often is.
This lesson is part of the Beginner Learning Path, a structured series designed to help you learn Microsoft Excel step by step from the basics.