Written By Sophanith Dith
Last Updated May 20, 2026
Applies to Microsoft Excel 365 (Windows only)
Part of the Beginner Learning Path
Module 2 Working with Data
Lesson 19 of 22
When you have a small worksheet, it may be easy to find what you need by looking down the rows. But as soon as your list grows, the data can feel messy. Names may be out of order, sales amounts may be mixed together, and dates may appear randomly across the worksheet.
In this tutorial, you will learn how to sort data in Excel so you can organize your worksheet in a clear and safe way. Sorting helps you arrange rows alphabetically, number, or by date while keeping related information together.
This is an important beginner skill because sorting makes your data easier to read, compare, and check. Before you start using more advanced tools like filters and tables, you should understand how basic sorting works.
Quick Answer:
To sort data in Excel, click any cell inside your data range, go to the Data tab, and choose a sorting option such as A to Z, Z to A, or Sort. Always choose Expand the selection if Excel asks, so the entire row stays together.
Before going into the full steps, here is a quick overview of the sorting tools you will use most often.
Quick Reference
Sorting changes the order of rows based on the values in one or more columns. For beginners, the most important rule is to sort the entire data range, not just one column.
- Use A to Z to sort text alphabetically or numbers from smallest to largest.
- Use Z to A to sort text in reverse order or numbers from largest to smallest.
- Use Oldest to Newest to sort dates from earlier to later.
- Use Newest to Oldest to sort dates from later to earlier.
- Use the Sort dialog box when you need more control.
- Choose Expand the selection when Excel asks how much data to sort.
In Excel, the same A to Z and Z to A buttons also work for dates. A to Z sorts dates from oldest to newest, while Z to A sorts dates from newest to oldest.
The rest of this tutorial shows each method step by step, with beginner examples and common mistakes to avoid.
What Sorting Means in Excel
Sorting is one of the simplest ways to organize worksheet data. Instead of changing the values themselves, Excel rearranges the rows based on the column you choose.
For example, if you have a sales list with customer names, order dates, products, and sales amounts, you can sort the list by customer name, order date, or sales amount. Excel moves the full rows so each record stays together.
A basic worksheet might look like this:
| Customer | Order Date | Product | Sales |
|---|---|---|---|
| Lina | 15 March 2026 | Mouse | 25 |
| Dara | 10 February 2026 | Keyboard | 45 |
| Sophea | 04 January 2026 | Monitor | 180 |
If you sort by Customer A to Z, Excel rearranges the rows alphabetically by customer name. If you sort by Sales largest to smallest, Excel moves the row with the highest sale to the top.
Beginner Tip:
Sorting is different from filtering. Sorting changes the order of visible rows, while filtering hides rows that do not match your chosen condition. You will learn filtering in the next lesson on how to filter data in Excel.
Before sorting, it helps to understand the safest way to prepare your worksheet.
Prepare Your Data Before Sorting
Good sorting starts with clean, simple data. Excel works best when your list is arranged like a table, with column headers at the top and related information stored in the same row.
This preparation matters because Excel needs to understand which cells belong together. If your data has blank rows, merged cells, or missing headers, sorting may not behave the way you expect.
If your list uses merged cells, Excel may not sort it correctly. For beginner worksheets, it is safer to keep each column and row separate. You can learn more about merged cells in our guide on how to align text in Excel.
Use a Clear Header Row
A header row is the top row that names each column. Examples include Name, Date, Product, Quantity, and Sales.
Your list should usually have one header row at the top:
| Name | Date | Product | Sales |
|---|
Headers make sorting easier because Excel can show column names in the Sort dialog box. This helps beginners choose the correct column instead of guessing by column letters.
Keep Each Record on One Row
Each row should represent one full record. For example, one row should contain one customer, one order date, one product, and one sales amount.
Do not place part of a record in a different row unless it is truly a separate record. Sorting works by moving rows, so each row should contain complete information.
Avoid Blank Rows Inside the List
Blank rows can make Excel think your data range has ended. If your worksheet has blank rows in the middle, Excel may sort only part of the list.
If you need help selecting the correct area before sorting, review how to select cells and ranges in Excel. That lesson connects directly to sorting because Excel needs to know which data belongs in the sort range.
Once your data is arranged clearly, you can use the quick sorting buttons for common tasks.
How to Sort Data in Excel Using A to Z or Z to A
The fastest way to sort data in Excel is to use the built-in A to Z or Z to A commands. These buttons are useful when you want a quick sort by one column.
This method is perfect for beginners because it works with text, numbers, and dates. Excel changes the meaning of the sort based on the type of data in the selected column.
Sort Text from A to Z
Use this method when you want to sort names, products, departments, cities, or other text values alphabetically.
- Click any cell in the column you want to sort by. If your data is arranged as a clean list, Excel will usually detect the full range automatically.
- Go to the Data tab.
- In the Sort & Filter group, click A to Z. Excel sorts the rows based on that column.
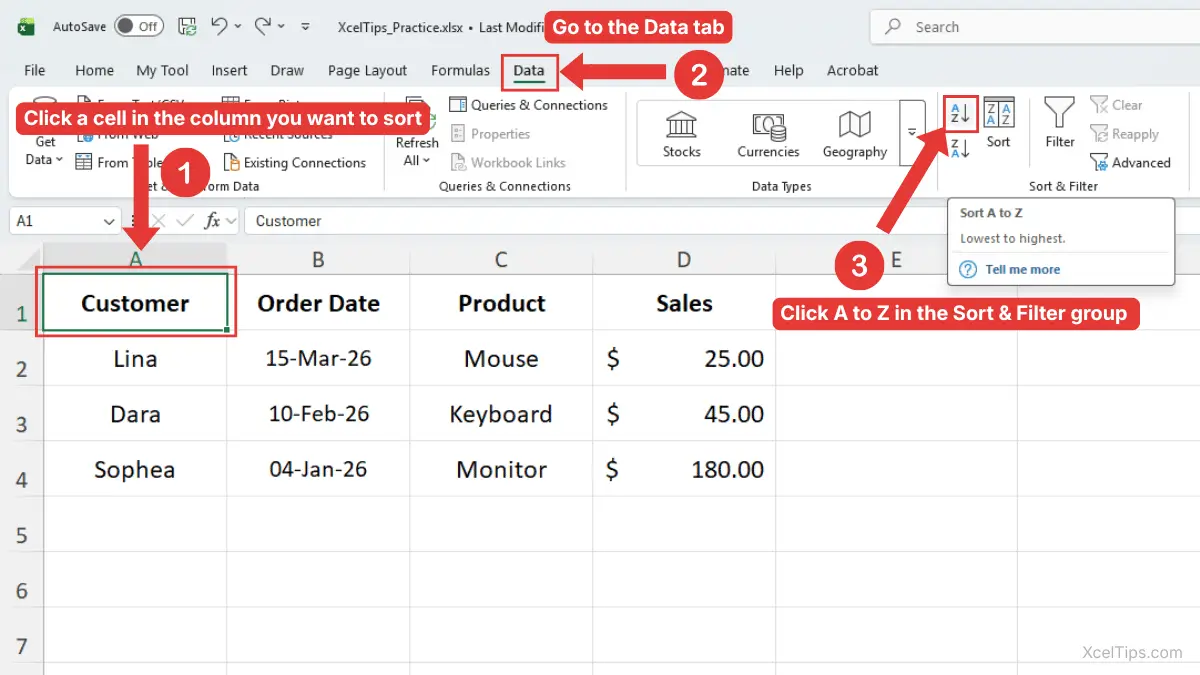
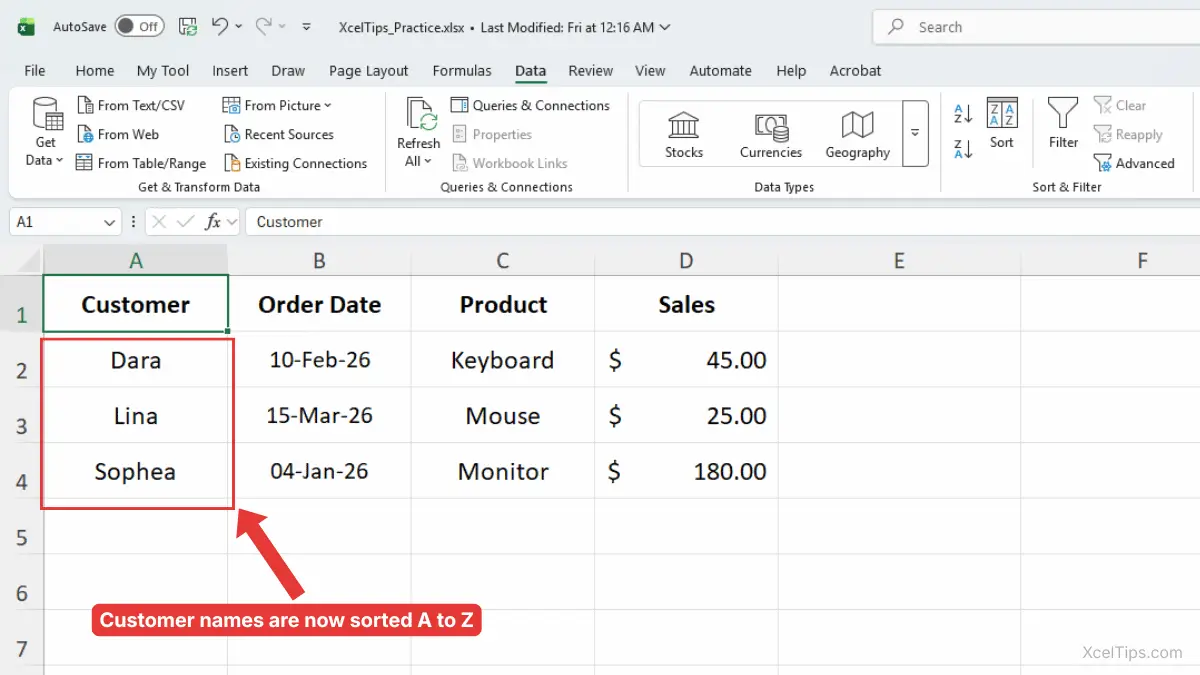
For example, if you click inside the Customer column and choose A to Z, Excel sorts the list alphabetically by customer name.
Beginner Warning:
Do not select only the customer names without the rest of the columns. If Excel asks, choose Expand the selection so the full rows stay together.
Sort Text from Z to A
Use this option when you want the reverse alphabetical order.
- Click any cell in the text column you want to sort by.
- Go to the Data tab.
- In the Sort & Filter group, click Z to A.
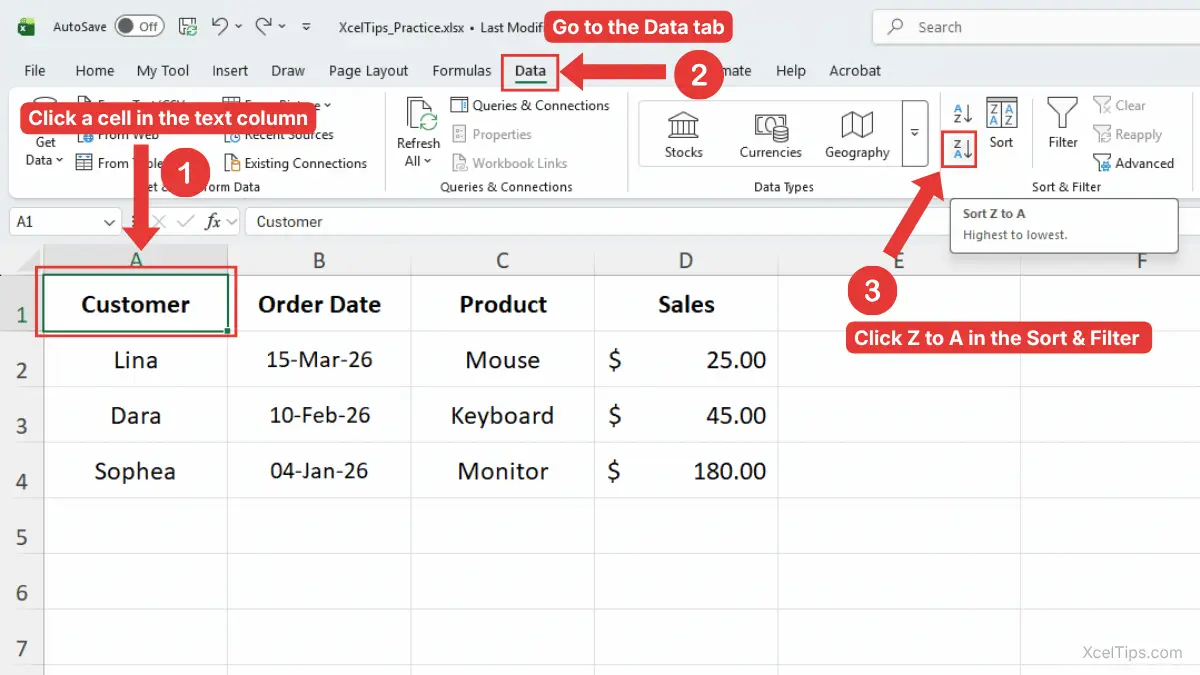
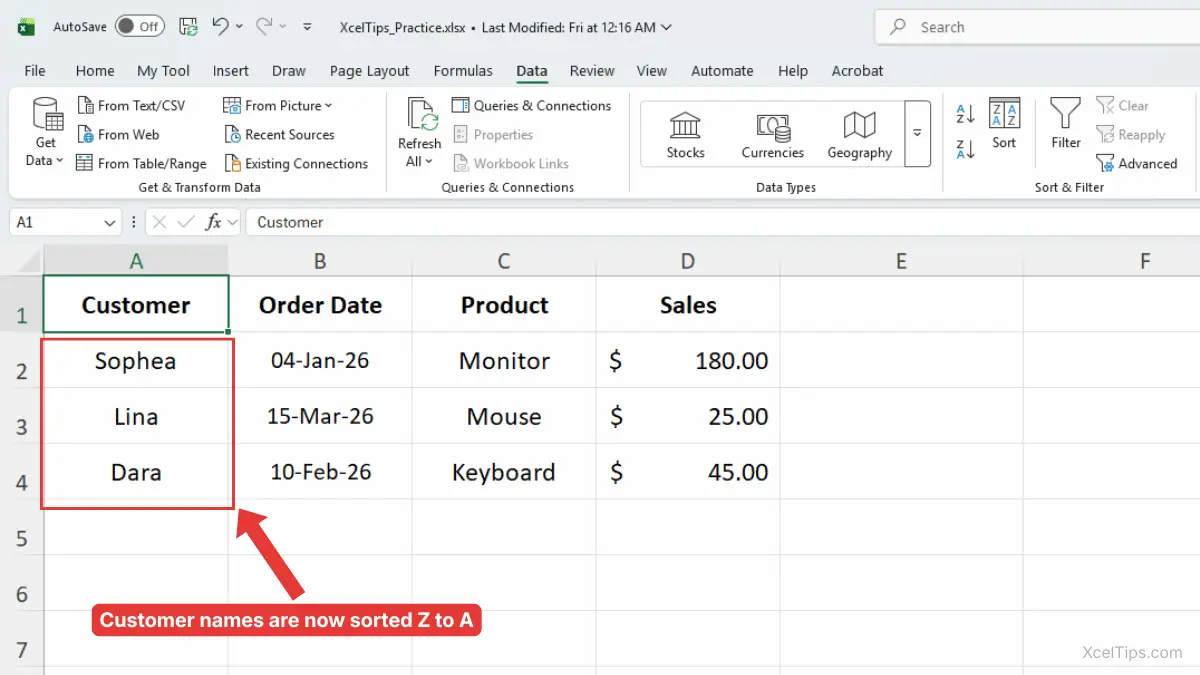
Excel sorts the list in reverse alphabetical order. This can be helpful when checking the end of a list first or reviewing names from bottom to top alphabetically.
Text sorting is common, but many beginners also need to organize numbers such as sales, prices, scores, or quantities.
Sort Numbers from Smallest to Largest or Largest to Smallest
Sorting numbers helps you quickly find the lowest, highest, smallest, or largest values in a worksheet. This is useful for sales reports, expense lists, inventory counts, student scores, and many other beginner workbooks.
When you sort a number column, Excel can arrange the values from smallest to largest or from largest to smallest. The rows move with the values, so the related names, dates, or products remain connected.
Sort Numbers from Smallest to Largest
Use this option when you want low values at the top. Even though the button says A to Z, Excel uses it as “smallest to largest” when the selected column contains numbers.
- Click any cell in the number column.
- Go to the Data tab.
- Click A to Z.
- Excel sorts the numbers from smallest to largest.
For example, if your worksheet has a Sales column, sorting smallest to largest can help you find the lowest sales amounts first.
Sort Numbers from Largest to Smallest
Use this option when you want high values at the top.
- Click any cell in the number column.
- Go to the Data tab.
- Click Z to A.
- Excel sorts the numbers from largest to smallest.
This is useful when you want to quickly see the top sales, highest expenses, or largest quantities.
Quick Sorting Reference
The same buttons can mean different things depending on the data type. This table helps beginners understand what Excel will do.
| Data Type | A to Z Does This | Z to A Does This |
|---|---|---|
| Text | A to Z | Z to A |
| Numbers | Smallest to largest | Largest to smallest |
| Dates | Oldest to newest | Newest to oldest |
This is why the same sort buttons work for different kinds of data. Excel reads the values in the column and applies the correct sorting order.
Numbers are straightforward, but date sorting can confuse beginners if Excel does not recognize the values as real dates.
How to Sort Data in Excel by Date
Many beginners search for how to sort data in Excel by date because date columns are common in real worksheets. You might want to organize orders by order date, tasks by due date, invoices by payment date, or events by schedule date.
Date sorting works best when Excel recognizes the values as actual dates, not plain text. If the dates are real Excel dates, you can sort them from oldest to newest or newest to oldest.
How to Sort by Date in Excel from Oldest to Newest
Use this method when you want earlier dates at the top of the list.
- Click any cell in the date column.
- Go to the Data tab.
- Click A to Z.
- Excel sorts the rows from oldest date to newest date.
For example, if your worksheet has an Order Date column, this sort shows the earliest orders first.
How to Sort by Date in Excel from Newest to Oldest
Use this method when you want the most recent dates at the top.
- Click any cell in the date column.
- Go to the Data tab.
- Click Z to A.
- Excel sorts the rows from newest date to oldest date.
This is helpful when you want to review the latest orders, newest invoices, or most recent activity first.
Beginner Warning: Check That Dates Are Real Dates
Sometimes dates look correct but are stored as text. If Excel treats dates as text, the sort order may look strange.
For example, Excel may not sort dates correctly if some values are typed with inconsistent formats, such as:
| Date Example |
|---|
| 1/5/2026 |
| January 12 2026 |
| 2026.03.15 |
| text: March 1 |
For this beginner lesson, the simplest solution is to use a consistent date format in the whole column. You can learn more in the related lesson on how to format dates in Excel.
After learning the quick sort buttons, the next step is using the Sort dialog box when you want more control.
Use the Sort Dialog Box for More Control
The Sort dialog box gives you a clearer way to choose the column, sort type, and order. It is especially helpful when your worksheet has headers because you can choose column names from a drop-down list.
This method is still beginner-friendly, but it gives you more control than clicking A to Z or Z to A. It is a good answer when someone asks, “How do I sort an Excel spreadsheet without guessing which button to click?”
Sort by One Column Using the Sort Dialog Box
Use these steps when you want to clearly choose the column and order.
- Click any cell inside your data range.
- Go to the Data tab.
- In the Sort & Filter group, click Sort.
- Make sure My data has headers is checked if your list has headers.
- In the Sort by box, choose the column you want to sort.
- In the Sort On box, choose Cell Values.
- In the Order box, choose the sorting order.
- Click OK.
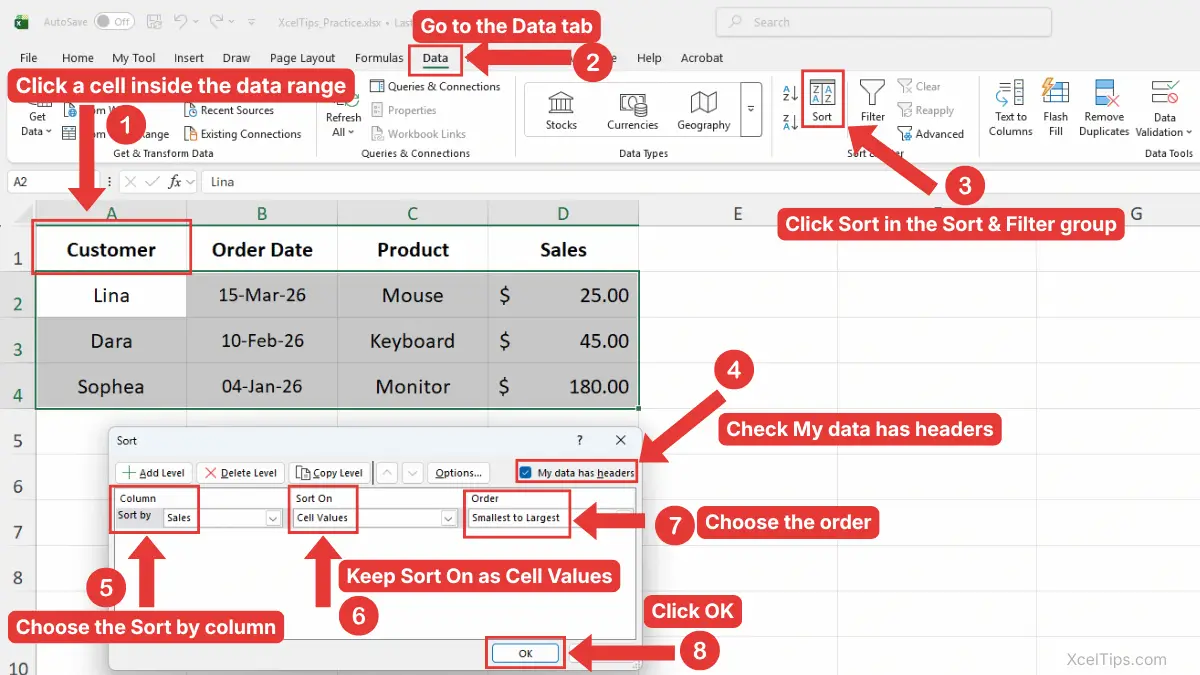
For example, you can sort a sales list by Sales from Smallest to Largest. Excel rearranges the full rows based on the sales amount.
For Microsoft’s official guidance on sorting text, numbers, dates, and tables, see Microsoft Support’s guide on sorting data in a range or table in Excel.
Beginner Tip:
If your data has headers, always check My data has headers. This prevents Excel from sorting the header row into the data.
When to Use the Sort Dialog Box Instead of Quick Sort
The quick buttons are faster, but the Sort dialog box is clearer. Beginners should use the Sort dialog box when the worksheet has several columns and they want to double-check the selected column before sorting.
| Situation | Best Sorting Method |
|---|---|
| Sort one obvious column quickly | A to Z or Z to A |
| Sort a list with many columns | Sort dialog box |
| Confirm headers are not sorted | Sort dialog box |
| Sort by more than one column | Sort dialog box |
The Sort dialog box is also useful when you want to sort by multiple columns, which is a common next step.
Sort by Multiple Columns in Excel
Sometimes one sorting rule is not enough. For example, you may want to sort sales data by Region first and then by Sales within each region.
This is called sorting by multiple columns. Excel sorts the first column first, then uses the second column to organize rows that have the same value in the first column.
Example: Sort by Region, Then by Sales
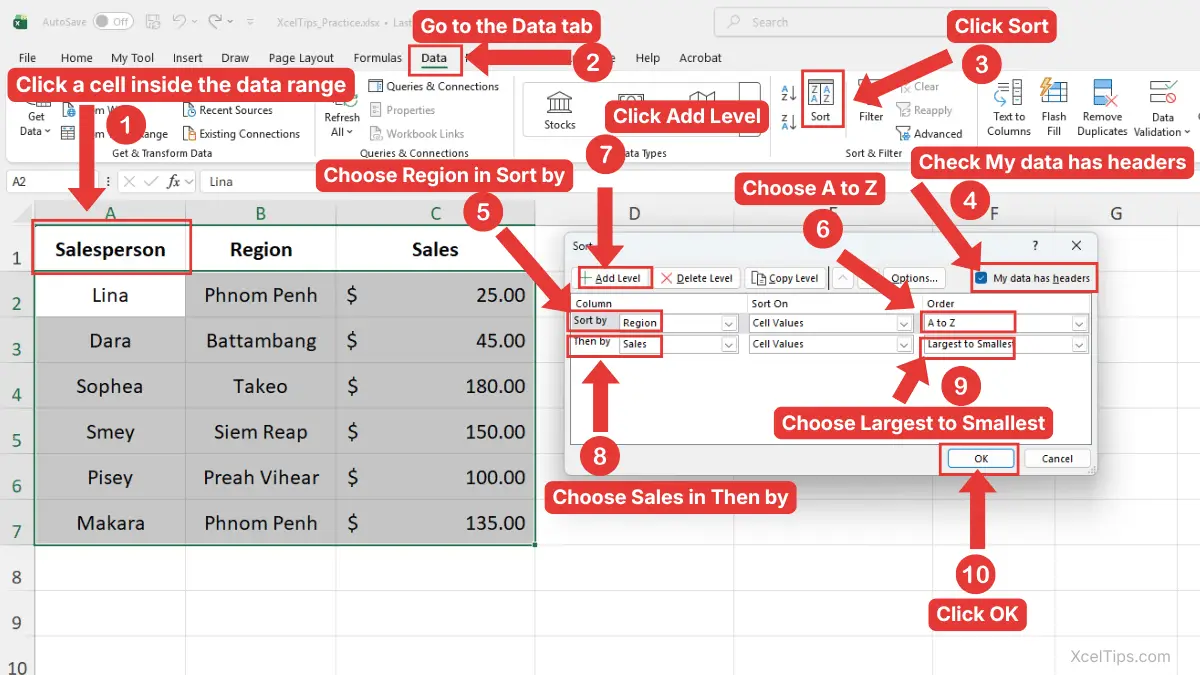
Imagine you have a sales worksheet with columns for Region, Salesperson, and Sales. You want all regions grouped together, and inside each region, you want the highest sales first.
In the Sort dialog box, each level is one sorting rule. The first level is applied first, and the next level is used only when rows have the same value in the first column.
- Click any cell inside the data range.
- Go to the Data tab.
- Click Sort.
- Check My data has headers if your list has headers.
- In Sort by, choose Region.
- In Order, choose A to Z.
- Click Add Level.
- In Then by, choose Sales.
- In Order, choose Largest to Smallest.
- Click OK.
In this example, Excel will group the list by Region first, then sort the Sales amounts from highest to lowest within each region.
Beginner Warning:
The order of sort levels matters. Excel applies the top sort level first, then the next level below it.
This kind of sorting is useful, but do not worry about advanced sorting rules yet. For now, focus on understanding that Excel can sort by one column or by multiple columns when needed.
Once you know how sorting levels work, it becomes even more important to understand the biggest beginner mistake.
Avoid the Most Common Sorting Mistake
The most common sorting mistake is sorting only one column instead of the full data range. This can break your worksheet because names, dates, products, and amounts may no longer match.
For example, if you sort only the Sales column but leave the Customer column unchanged, the sales amounts may become attached to the wrong customers. This can make the worksheet inaccurate.
Choose Expand the Selection
When Excel detects nearby data, it may show a warning asking whether you want to expand the selection or continue with the current selection. In the Sort Warning box, select Expand the selection, then click Sort. This tells Excel to sort the full rows, not just the selected cells.
When Continue with the Current Selection Is Risky
The option Continue with the current selection tells Excel to sort only the selected cells. Beginners should usually avoid this unless they intentionally want to sort one isolated column by itself.
For normal lists, always keep related row data together.
Beginner Warning:
If your worksheet contains names, dates, products, and amounts in the same rows, sorting only one column can mix up your records.
A safe habit is to click one cell inside the list and let Excel detect the full range. If you are unsure, select the entire range first.
If you later convert your list into an Excel Table, sorting becomes even easier because tables automatically understand the data range. You can learn that in how to create a table in Excel.
Sorting is easier when you also know which method fits the task you are doing.
Which Sorting Method Should Beginners Use?
Beginners do not need to memorize every sorting option immediately. The best method depends on what you are trying to organize.
If your worksheet is simple, the quick sort buttons are usually enough. If your worksheet has many columns or you want to sort by multiple rules, the Sort dialog box is safer.
| Task | Recommended Method |
|---|---|
| Sort names alphabetically | A to Z |
| Sort names in reverse order | Z to A |
| Sort sales from highest to lowest | Z to A |
| Sort dates from oldest to newest | A to Z |
| Sort dates from newest to oldest | Z to A |
| Sort by more than one column | Sort dialog box |
| Avoid sorting the wrong column | Sort dialog box |
If you are asking, “How do I sort data in Excel safely?” the best beginner answer is this: click inside the list, use the Data tab, and make sure the entire row moves together.
This simple decision table can help readers choose the right sorting tool without overthinking the feature.
Common Problems When Sorting Data in Excel
Sorting is usually easy, but a few small problems can confuse beginners. Most issues happen because Excel does not understand the data range or because the column values are inconsistent.
This section explains the most common problems and the simple way to think about each one. These problems are easy to fix once you know what caused them.
The Header Row Gets Sorted into the Data
This happens when Excel does not recognize your header row.
To avoid it, use the Sort dialog box and check My data has headers. This tells Excel that the first row contains labels, not regular data.
Only One Column Changes Order
This usually happens when only one column was selected before sorting.
If Excel shows the Sort Warning box, choose Expand the selection. If you do not see the warning, undo the sort with Ctrl + Z, then select the full data range and try again.
Dates Do Not Sort Correctly
If dates sort in a strange order, some of them may be stored as text. Use a consistent date format and make sure all dates in the column are real Excel dates.
For a full explanation of date display options, see our guide on how to format dates in Excel.
Blank Rows Interrupt the Sort Range
Blank rows can make Excel sort only part of your data. Remove unnecessary blank rows inside the list before sorting.
You do not need a perfect worksheet to start sorting, but the cleaner your list is, the safer your results will be.
Quick Practice
Practice is the best way to understand sorting because you can immediately see rows move into a new order. Use a small sample list so you can focus on the sorting behavior instead of worrying about a large workbook.
Create this simple worksheet:
| Customer | Order Date | Product | Sales |
|---|---|---|---|
| Lina | 3/15/2026 | Mouse | 25 |
| Dara | 2/10/2026 | Keyboard | 45 |
| Sophea | 4/01/2026 | Monitor | 180 |
| Vanna | 1/20/2026 | Laptop Stand | 35 |
Open a blank workbook or use a practice file named XcelTips_Practice.xlsx. Then try these practice tasks:
- Sort the Customer column from A to Z.
- Sort the Sales column from largest to smallest.
- Sort the Order Date column from oldest to newest.
- Open the Sort dialog box and sort by Product.
- Undo the sort with Ctrl + Z and try a different column.
After you practice the steps, remember the main rules before moving to the next lesson.
Key Takeaways
Sorting is a basic Excel skill, but it has a big impact on how easy your worksheet is to read. The most important idea is that Excel should move the entire row, not just one column.
- Sorting rearranges rows based on the values in a selected column.
- Use A to Z for alphabetical order, smallest to largest numbers, or oldest to newest dates.
- Use Z to A for reverse alphabetical order, largest to smallest numbers, or newest to oldest dates.
- Use the Sort dialog box when you want more control.
- Choose Expand the selection to keep related data together.
- Check My data has headers if your list has a header row.
- Use consistent date formats when sorting by date.
These points will help you sort data in Excel safely before learning how to show only selected records with filters.
These key points cover the basics, but beginners often have a few extra questions before they feel fully confident sorting Excel data.
Frequently Asked Questions (FAQs)
How do I use How to Sort Data in Excel as a beginner?
To sort data in Excel as a beginner, click any cell inside your data list, go to the Data tab, and choose A to Z, Z to A, or Sort. If Excel asks, choose Expand the selection so the full rows stay together.
How do I sort an Excel spreadsheet without mixing up rows?
Make sure Excel sorts the whole data range, not just one column. If you see the Sort Warning dialog box, choose Expand the selection. This keeps names, dates, products, and numbers connected in the same rows.
How do I sort data in Excel by date?
Click any cell in the date column, go to the Data tab, and choose A to Z for oldest to newest or Z to A for newest to oldest. If the dates do not sort correctly, check that they are real Excel dates and not text.
What is the difference between sorting and filtering?
Sorting changes the order of rows. Filtering hides rows that do not match your chosen condition. For example, sorting can place sales from highest to lowest, while filtering can show only sales from one region.
Can I sort by more than one column in Excel?
Yes. Use Data tab → Sort, then click Add Level. For example, you can sort by Region first and then by Sales within each region.
Should I select the whole table before sorting?
You can click one cell inside a clean data range and let Excel detect the list. However, if your worksheet has blank rows or unusual spacing, selecting the full range first can be safer.
Once you understand these common questions, you are ready to use sorting as a regular part of organizing your Excel worksheets.
Conclusion
Learning How to Sort Data in Excel helps you turn a messy worksheet into an organized list that is easier to read, check, and understand. You can sort names alphabetically, arrange numbers from largest to smallest, or sort dates from oldest to newest.
The key beginner rule is simple: keep the full row together. When Excel asks, choose Expand the selection, and use the Sort dialog box when you want more control.
This lesson is part of the Beginner Learning Path, a structured series designed to help you learn Microsoft Excel step by step from the basics.
← Previous Lesson
Next Lesson →
How to Use Flash Fill in Excel to Clean Data Faster
How to Filter Data in Excel to Find Information Faster